Map Network Drives with PowerShell in Windows 11


Mapping network drives with PowerShell in Windows 11 lets you connect to shared folders on other computers using text commands instead of clicking through File Explorer .
PowerShell is a built-in command-line tool that runs commands to automate everyday tasks on your PC. Running the New-PSDrive command links your computer to a shared folder instantly, needing only an available drive letter like Z: and the network path.
Use the New-SmbMapping cmdlet in PowerShell to map network drives persistently. Open PowerShell, then run New-SmbMapping -LocalPath “Z:” -RemotePath “\ServerNameShare” -Persistent $true, replacing “Z:” and the server path with your desired drive letter and network share.
Map or unmap network drive in PowerShell
You can map network drives PowerShell commands to connect shared folders directly without using File Explorer . Open PowerShell from the Start menu and use the New-PSDrive cmdlet followed by your network path and preferred drive letter to set up the connection quickly.
File Explorer serves as the standard tool for managing network drives. However, the PowerShell app also maps and unmaps these connections.
The steps below outline how to perform this process.
Open the Start Menu , search for PowerShell, and select the application under Best match to launch the Windows Terminal prompt.
Doing so prevents the mapped drive from appearing in File Explorer.
Type the command format shown below into the terminal window:
New-PSDrive -Name "DriveLetter" -PSProvider "FileSystem" -Root "\\ServerName-or-IPAddress\SharedFolder" -Persist
Replace `DriveLetter` with the desired letter. Change `ServerName` and `SharedFolder` to reflect the actual computer name and shared folder name.
Example:
New-PSDrive -Name "Z" -PSProvider "FileSystem" -Root "\\HomePC\Documents" -Persist
Entering a username and password completes the connection when prompted, finishing the network share mapping.
Protected shares always trigger a credentials prompt. Storing authentication details inside a variable avoids repetitive typing during command execution.
Executing the following steps incorporates the username and password directly into the command structure.
Run the command below first to store account credentials inside a variable.
$cred = Get-Credential -Credential USERNAME
Replace USERNAME with the actual account name.
A prompt window similar to the example below appears on screen. Enter the password and click Ok to save those credentials.
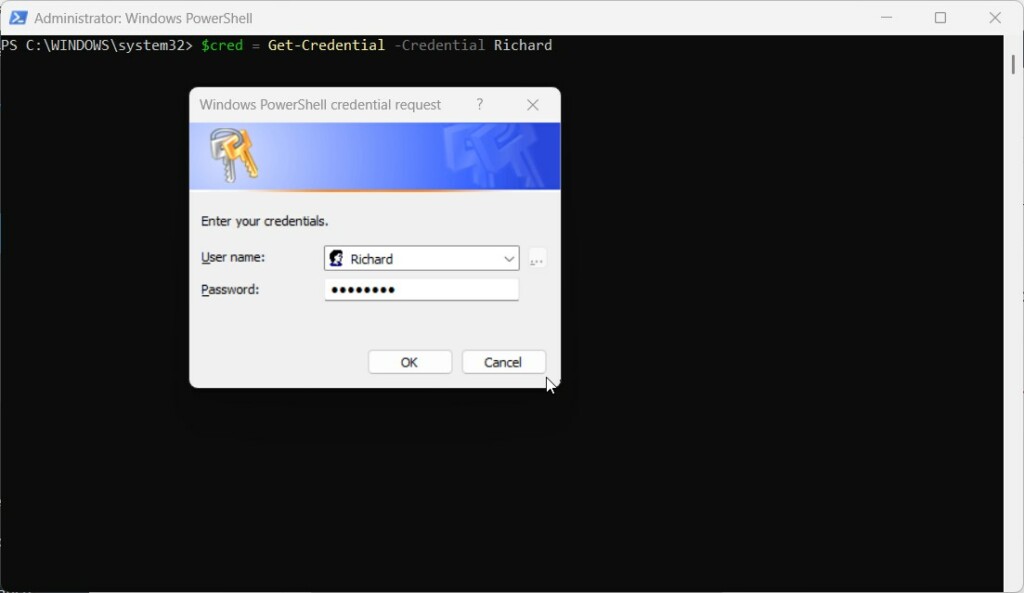
Stored credentials allow executing the command below to map the network drive while passing authentication details simultaneously.
New-PSDrive -Name "E" -Root "\\HomePC\Documents" -Persist -PSProvider "FileSystem" -Credential $cred
Windows Credential Manager (a secure Windows vault for storing passwords) provides an alternative approach for saving login details. Run the following command: cmdkey /generic:USERNAME /add:SERVERNAME. Replace `USERNAME` with the account name and `SERVERNAME` with the host computer name.
cmdkey /add:HomePC /user:WORKGROUND\username /pass:password
Credentials stored inside the Credential Manager permit running PowerShell commands without specifying user details or encountering prompt windows.
New-PSDrive -Name "P" -Root "\\HomePC\Documents" -Persist -PSProvider "FileSystem"
Unmap or disconnect shared network drives using PowerShell
You can disconnect network drive PowerShell commands when you no longer need access to a shared folder. Run the Get-PSDrive command to check your active connections, and then use the Remove-PSDrive command along with the drive letter to remove it.
Run the command below to view active connections.
Get-PSDrive -PSProvider "FileSystem"
Executing the command below disconnects the target drive once the assigned letter is identified.
Remove-PSDrive -Name DriveLetter
Replace `DriveLetter` with the letter assigned to the target drive. For example:
Remove-PSDrive -Name Z
Multiple drives disconnect using this syntax:
Get-PSDrive X, W | Remove-PSDrive
That completes the setup process.
- Mapping or unmapping shared network drives using PowerShell in Windows 11 provides a convenient and efficient way to manage access to network resources.
- Following the steps, users can easily map network drives and access shared folders, streamlining their workflow and enhancing productivity.
- Including credentials with the PowerShell command or storing them in the Credential Manager offers flexibility and security when mapping network drives.
- Additionally, PowerShell enables users to efficiently list and disconnect mapped network drives, providing a comprehensive solution for managing network resources on Windows 11.
Was this guide helpful?

About the Author
Richard
Tech Writer, IT Professional
Richard, a writer for Geek Rewind, is a tech enthusiast who loves breaking down complex IT topics into simple, easy-to-understand ideas. With years of hands-on experience in system administration and enterprise IT operations, he’s developed a knack for offering practical tips and solutions. Richard aims to make technology more accessible and actionable. He's deeply committed to the Geek Rewind community, always ready to answer questions and engage in discussions.


No comments yet — be the first to share your thoughts!