How to Turn On or off UAC for the Windows 11 Built-in Administrator

- 22 steps
- Needs administrator rights
- Includes a restart or sign-out
UAC (User Account Control, a security feature that asks for your permission before apps make changes to your PC) lets you manage security prompts for the Windows 11 built-in administrator account. Windows 11 hides this main administrator profile by default. It is a different account from the admin account you created during setup, so changes here affect only the built-in one.
You can turn UAC on or off for this account using 2 different methods. Turning UAC off lets apps run without asking, but it also leaves your PC open to risks if a harmful app tries to make changes. On a fresh install, Admin Approval Mode for the built-in administrator is usually already set to Disabled, so check the current setting before you change anything.
Enable or disable User Account Control for the built-in administrator by opening Local Security Policy (secpol.msc) or Registry Editor (regedit). Modify the “Admin Approval Mode for the Built-in Administrator account” setting or the “FilterAdministratorToken” registry value, then restart your PC.
Turn UAC On or Off Using Local Security Policy
This approach relies on the Local Security Policy Editor, a management tool designed for altering workstation security configurations. It is included in Windows 11 Pro, Enterprise and Education. Windows 11 Home does not have it, so Home users should skip to the Registry Editor method further down.
Steps:
- Press Windows key + R on your keyboard to open the Run box. A small Run window appears at the bottom left of the screen.
- Type secpol.msc and press Enter. If Windows asks for permission, click Yes. The Local Security Policy window opens.
- In the window that opens, go to Local Policies Security Options on the left side. Expand each item if it is collapsed. A long list of policies fills the right side.
- Look for the setting called “User Account Control: Admin Approval Mode for the Built-in Administrator account” on the right side. The list is sorted by name, so the User Account Control entries sit together.
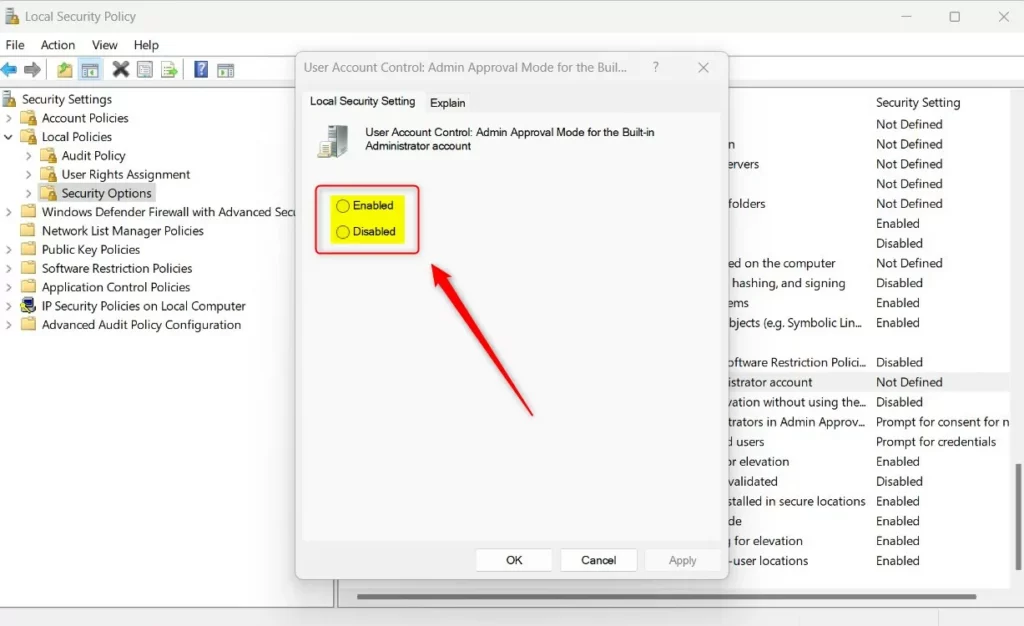
- Double-click that setting. Its properties window opens.
- Choose Enabled to turn UAC on or Disabled to turn it off.
- Click OK. The new value now shows in the Security Setting column next to the policy.
- Close the Local Security Policy Editor.
- Restart your PC. This policy does not take effect until you sign out and back in, and a full restart is the safest way to make sure it applies.
To undo the change, open the same setting again and pick the opposite option.
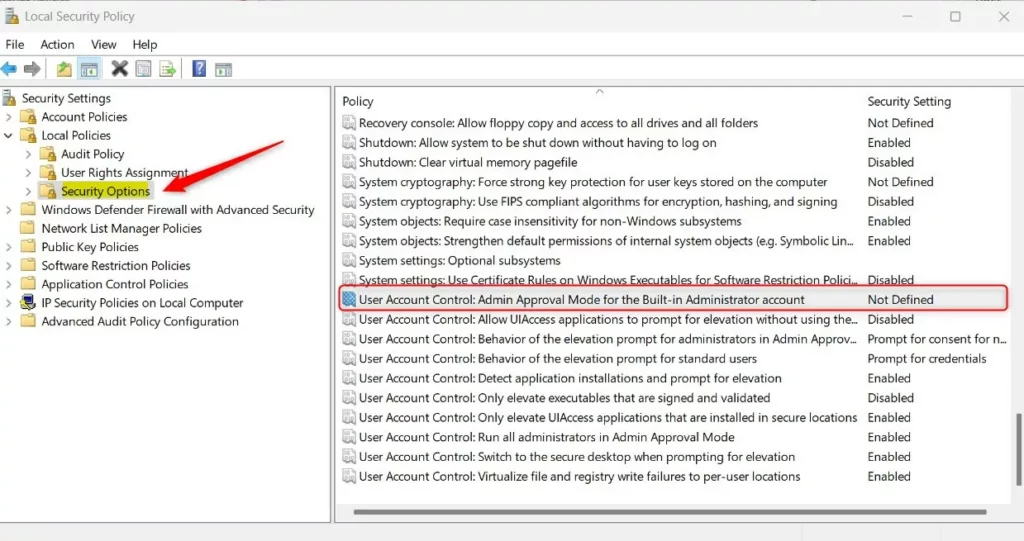
You can use the Local Security Policy Editor to manage the Windows 11 UAC administrator setting by running a quick command. This built-in tool lets you change how User Account Control handles the main administrator account on your PC without digging through complex menus. You only need to open the Run box, enter one command and change one setting.
If the command does not work and you get a “cannot find” error, you are most likely on Windows 11 Home. Use the Registry method below instead.
Turn UAC On or Off Using Registry Editor
The Windows Registry Editor offers an alternative method for making this change. It works on both Home and Pro editions. Proceed with caution, as incorrect tweaks can affect system stability. Before you start, consider backing up the registry: in Registry Editor, choose File Export, pick All as the export range, and save the file somewhere safe. You can also create a restore point first.
Steps:
- Press Windows key + R, type regedit, and press Enter.
- If prompted by UAC, click Yes to continue. The Registry Editor opens.
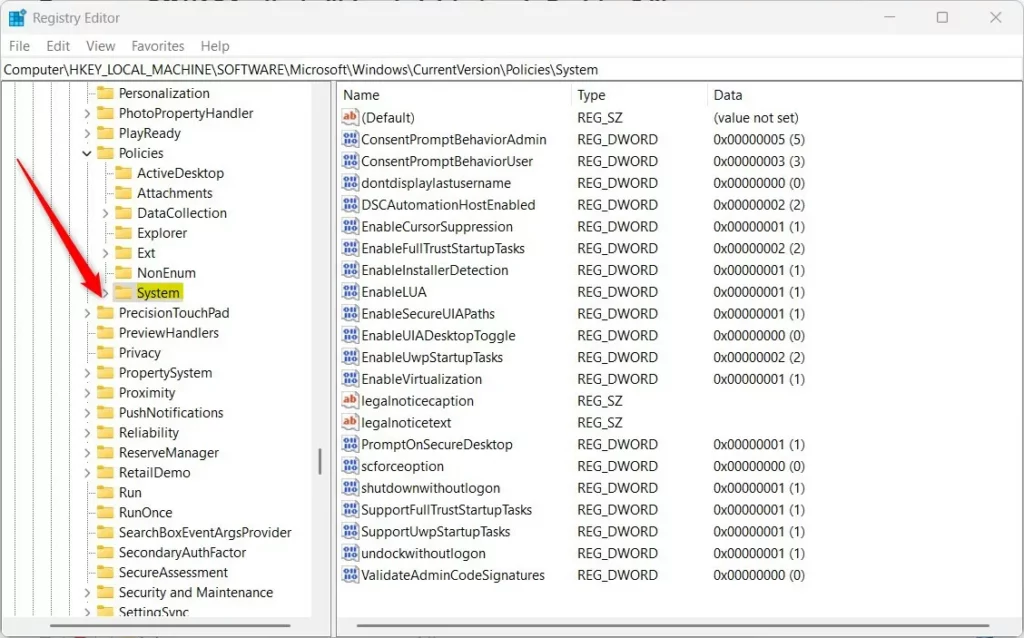
- In the Registry Editor, navigate to this path:
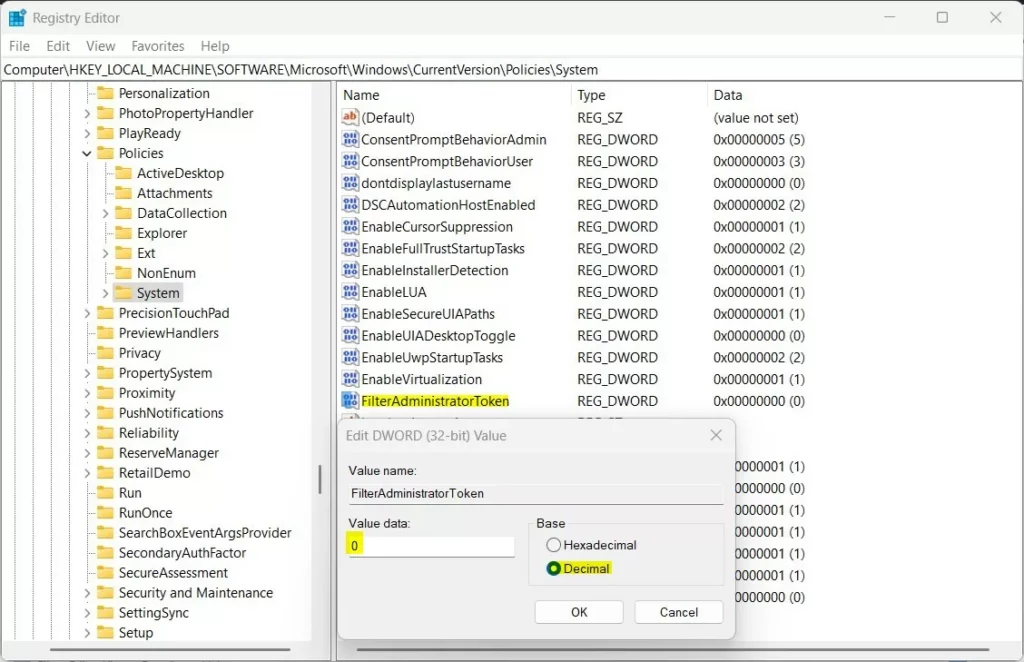
HKEY_LOCAL_MACHINE\SOFTWARE\Microsoft\Windows\CurrentVersion\Policies\System
- If the System folder is missing, right-click on Policies, select New Key, and name it System. The new key should now appear in the left pane under its parent.
- Right-click on the right side pane inside System and select New DWORD (32-bit) Value. A new entry appears in the list with its name highlighted for editing.
- Name this new value FilterAdministratorToken. If the value already exists, skip steps 5 and 6 and go straight to editing it.
- Double-click the FilterAdministratorToken entry. An edit window opens.
- Choose Decimal as the base.
- Set the value data:
- 1 to turn UAC ON for the built-in administrator.
- 0 to turn UAC OFF.
- Click OK and close the Registry Editor.
- Restart your computer to apply the changes.
To undo the change, return to the same value and set the opposite number, then restart again. If something goes wrong, double-click the registry backup file you exported to restore it.
Summary
- The built-in administrator account in Windows 11 has full control and can run without asking for UAC permission.
- Using this account without UAC can be risky, as dangerous changes might happen without warning.
- You can turn UAC on or off for this account by using either the Local Security Policy Editor (Pro, Enterprise and Education) or the Registry Editor (all editions, including Home).
- Always restart your PC after making these changes so they take effect.
- Both methods are reversible. Set the policy or registry value back to its earlier state and restart.
The Windows 11 UAC administrator settings control whether the hidden main administrator account asks for your permission before making system changes. Turning this security feature on keeps your PC safer by stopping rogue apps from making changes behind your back. For everyday work, use a standard or regular administrator account and leave the built-in one disabled unless you need it for repairs or testing.
Frequently asked questions
How to enable uac 🪟 Windows 11?
To enable UAC on Windows 11, open the Local Security Policy Editor (on Pro, Enterprise, or Education) and set Admin Approval Mode for the Built-in Administrator account to Enabled. Home users can change EnableLUA to 1 in the Registry Editor instead. Restart your PC afterward for the change to take effect.
How to enable uac onm 🪟 Windows 11 through registry editor?
Press Windows key + R, type regedit, and press Enter to open Registry Editor. Before you edit anything, back up the registry, because a wrong change can stop Windows from starting. Navigate to HKEY_LOCAL_MACHINE, then SOFTWARE, Microsoft, Windows, CurrentVersion, and Policies, and open the System key. Double-click EnableLUA, set Value data to 1, click OK, and restart your PC.
How do I turn of uac 🪟 Windows 11?
To turn off UAC on Windows 11, open Local Security Policy Editor (Pro, Enterprise, or Education) and set Admin Approval Mode for the Built-in Administrator account to Disabled. Home users can set EnableLUA to 0 in Registry Editor instead. This lets apps change your PC without asking, so only do it on a PC you control.
How to enable administrator by uac?
UAC does not turn on the built-in administrator account by itself. To enable Admin Approval Mode for that account, set it to Enabled in Local Security Policy Editor. To activate the account, open Computer Management, go to Local Users and Groups, open Users, double-click Administrator, and clear Account is disabled.
How to trigger uac on 🪟 Windows 11?
You trigger UAC by running an app that needs administrator rights. Right-click the app, choose Run as administrator, and the User Account Control prompt appears. If it never shows, check that UAC is on by searching Start for Change User Account Control settings.
How to go to the uac?
To open UAC settings, press Start, type Change User Account Control settings, and press Enter. Move the slider to change how often UAC prompts you. You can also open Control Panel, select User Accounts, then User Accounts again, and choose Change User Account Control settings.
Still have a question?
Answered by AI from this guide. Good questions may be added to this page — please don't include personal details.
Did this guide fix your problem?

About the Author
Richard
Tech Writer, IT Professional
Richard is a writer at Geek Rewind who turns complex IT tasks into clear, step-by-step guides. He draws on years of hands-on experience in system administration and enterprise IT operations, focusing on Windows, Linux and WordPress: the problems people actually run into, and the fixes that work. His server and WordPress guides come from systems he runs himself. Richard builds and maintains the platform behind Geek Rewind, from its Ubuntu servers and Nginx configuration to its custom WordPress plugins. Many new tutorials start with readers' questions, and he's always glad to answer them in the comments.
No comments yet — be the first to share your thoughts!