How to Enable or Disable Safeguard Holds in Windows 11

Safeguard holds are automatic blocks that stop your PC from installing a major new Windows 11 feature update when Microsoft finds a known bug or hardware conflict. They act as a safety net, so your computer avoids crashes, printer errors, or blue screens after an update.
Microsoft applies these holds to specific devices and lifts them once a fix is ready and tested. While a hold is active, Windows Update shows a “coming soon” style message instead of a download button, and your system stays on its current version until Microsoft resolves the issue. Monthly security updates are not affected. Holds only apply to feature updates, such as moving to a new Windows 11 version.
Open Local Group Policy Editor by pressing Win+R, typing gpedit.msc, and pressing Enter. Navigate to Computer Configuration Administrative Templates Windows Components Windows Update Manage updates offered from Windows Updates. Double-click Disable safeguards for Feature Updates, select Not Configured to enable safeguards or Enabled to disable them, then click OK.
References:
KB5006965: How to check information about safeguard holds affecting your device – Microsoft Support
Windows Update for Business reports overview – Windows Update for Business reports
Option One
Enable or Disable Safeguards for Feature Updates in Local Group Policy Editor
Local Group Policy Editor lets you control safeguard holds by turning off automatic blocking for feature updates. You open it with the run command gpedit.msc, then go to the Windows Update settings that control how your PC receives major operating system upgrades.
The Local Group Policy Editor is only included in Windows 11 Pro, Enterprise, and Education. If gpedit.msc says it cannot be found, you are most likely on Windows 11 Home, and you will need the Windows Terminal method further down instead. You also need to be signed in as an administrator.
- Press Win + R, type gpedit.msc, and press Enter. The Local Group Policy Editor window opens.
- In the left pane, expand the folders until you reach the location below. You should see a list of Windows Update policies in the right pane.
Computer Configuration Administrative Templates Windows Components Windows Update Manage updates offered from Windows Updates
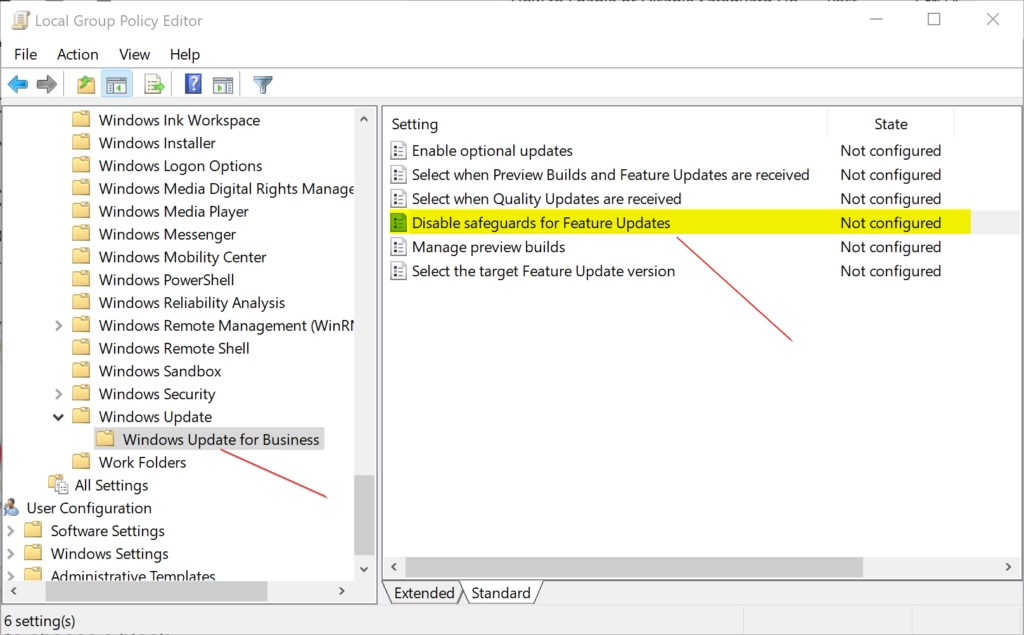
- In the right pane of Manage updates offered from Windows Updates, double-click the Disable safeguards for Feature Updates policy. Its settings window opens.
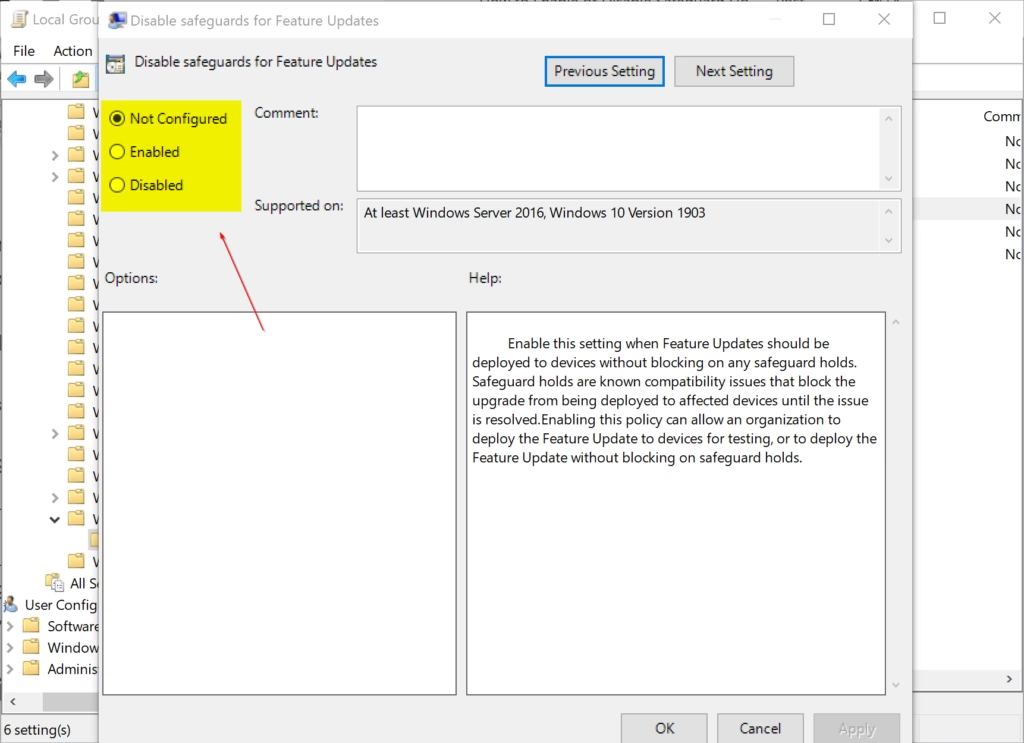
To Enable Safeguards for Feature Updates
This setting remains active by default. That means safeguard holds are on, and Microsoft can block a feature update on your PC if it finds a problem. Use the steps below to return to this default if you changed the policy earlier.
- Select the Not Configured option.
- Click OK. The window closes and the policy shows as Not configured in the list.
To Disable Safeguards for Feature Updates
Do this only on a test machine or when you have a clear reason. Microsoft put the hold there because that device is likely to hit a real problem with the update.
- Select the Enabled option.
- Click OK. The policy now shows as Enabled in the list.
- Close the Local Group Policy Editor if you like. Then open Settings and go to Windows Update to check for updates. If the policy doesn't seem to apply, restart the PC and check again.
To undo the change at any time, set the policy back to Not Configured as shown above.
Option Two
Enable or Disable Safeguards for Feature Updates using Registry
⚠️ Admin Required: Open Windows Terminal with administrator privileges and run the commands below. This method works on Windows 11 Home as well as Pro, since it does not need the Group Policy Editor.
- Right-click the Start button and choose Terminal (Admin).
- Click Yes if User Account Control asks for permission. A terminal window opens with administrator rights.
- Copy and paste the command you need from the box below into the terminal, then press Enter. The terminal should report that the operation completed successfully.
To Enable Safeguards for Feature Updates
This setting remains active by default, so a PC you have never changed needs nothing here. Run the matching command only if you want to switch the behavior, or to go back to the default later.
reg add "HKEY_LOCAL_MACHINE\SOFTWARE\Policies\Microsoft\Windows\WindowsUpdate" /v DisableWUfBSafeguards /t REG_DWORD /d 0 /f
To Disable Safeguards for Feature Updates
reg add "HKEY_LOCAL_MACHINE\SOFTWARE\Policies\Microsoft\Windows\WindowsUpdate" /v DisableWUfBSafeguards /t REG_DWORD /d 1 /f
Summary
You can turn them off in Windows Pro and Enterprise editions, but Microsoft warns that bypassing these holds may cause system instability.
You can disable safeguard holds with either the Local Group Policy Editor (in Windows Pro, Enterprise, and Education editions) or Windows Terminal with registry commands. Microsoft warns that disabling holds carries risks and can cause update failures and performance problems. Testing environments are the only proper place for this configuration. Each time a new Windows version installs, the safeguards turn back on automatically to keep the device protected.
Before you override a hold, make a backup or restore point, and check whether the update is worth the risk. In most cases, waiting for Microsoft to lift the hold is the safer choice.
Have a question about this guide?
Answered by AI from this guide. Good questions may be added to this page — please don't include personal details.
Did this guide fix your problem?

About the Author
Richard
Tech Writer, IT Professional
Richard is a writer at Geek Rewind who turns complex IT tasks into clear, step-by-step guides. He draws on years of hands-on experience in system administration and enterprise IT operations, focusing on Windows, Linux and WordPress: the problems people actually run into, and the fixes that work. His server and WordPress guides come from systems he runs himself. Richard builds and maintains the platform behind Geek Rewind, from its Ubuntu servers and Nginx configuration to its custom WordPress plugins. Many new tutorials start with readers' questions, and he's always glad to answer them in the comments.
No comments yet — be the first to share your thoughts!