How to Specify Target Feature Update Version in Windows 11

Specifying a target feature update version lets you pin a Windows 11 PC to a release you have chosen, such as 22H2, so it does not jump to a newer major version on its own. Windows keeps downloading the normal monthly security and quality updates for the version you pinned. Only the move to a newer feature release is held back.
Pinning a version keeps your apps, drivers and line-of-business software working and avoids surprise changes to the system. You can set the limit with the Local Group Policy Editor or with the Registry at HKEY_LOCAL_MACHINE\SOFTWARE\Policies\Microsoft\Windows\WindowsUpdate. Both methods write to the same policy location, so use one or the other, not both.
Open Local Group Policy Editor by pressing Win+R, typing gpedit.msc, and pressing Enter. Navigate to Computer Configuration Administrative Templates Windows Components Windows Update Manage updates offered from Windows Update , double-click Select the target Feature Update version, choose Enabled, type Windows 11 as the product version and your target release like 26H1 in the version box, then click OK and restart.
Comparison of Methods
| Method | Best For | Difficulty |
|---|---|---|
| Group Policy | Single PC | Easy |
| Registry | Advanced Users | Medium |
| Intune/MDM | Businesses | Professional |
How to Specify Target Feature Update Version in Local Group Policy Editor
The Local Group Policy Editor is the built-in tool for managing system settings, and it is the cleaner way to set this limit. It is included in Windows 11 Pro, Enterprise and Education. It is not included in Windows 11 Home, so if you run Home, skip to the Registry method. You need an administrator account.
- Press Win+R to open the Run box, type gpedit.msc, and press Enter. If a User Account Control prompt appears, click Yes. The Local Group Policy Editor window opens. If you see a “cannot find” error instead, you are most likely on Home.
- In the left pane, go to Computer Configuration Administrative Templates Windows Components Windows Update Manage updates offered from Windows Update . The policies for that folder appear in the right pane.
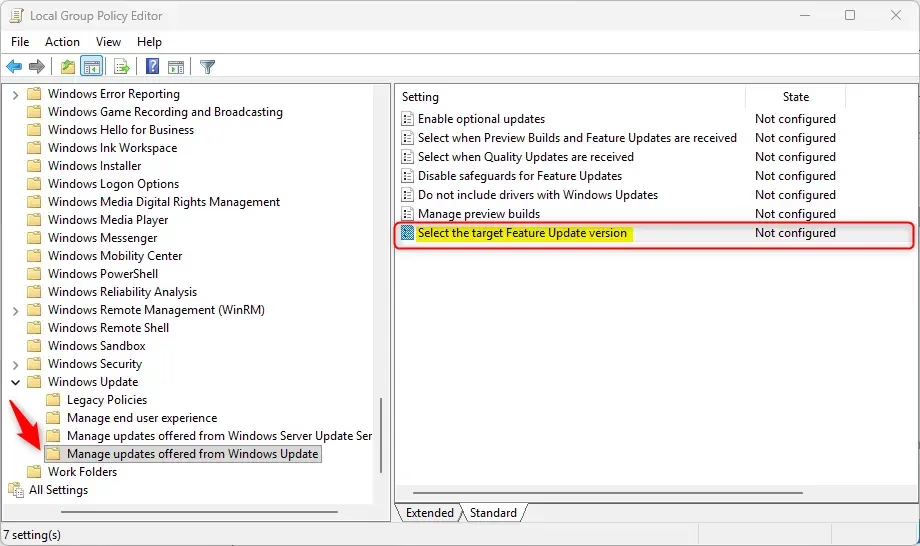
- Double-click Select the target Feature Update version. A settings window opens.
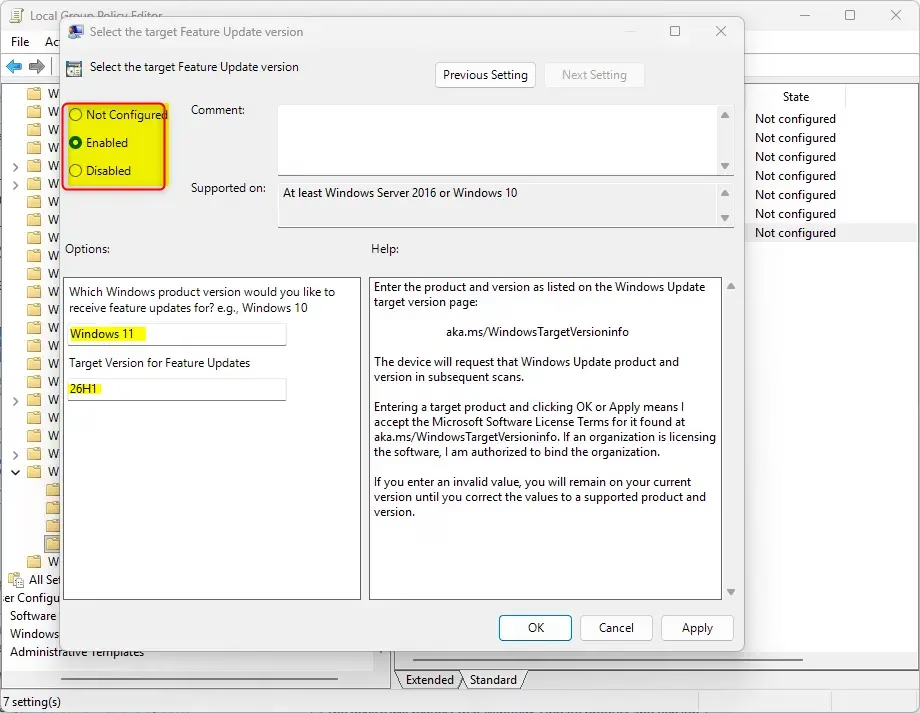
- Select Enabled. In the options box, type Windows 11 for the product version, and type the release you want to stay on (for example, 26H1) in the target version box. Use a release that actually exists for your device. A made-up or mistyped value will not give you the lock you expect.
- Click OK. The window closes and the policy now shows as Enabled in the list.
Restart the PC, or at least open Settings Windows Update and click Check for updates , to make sure the policy is picked up. A pinned PC will keep getting security updates but will not be offered a newer feature release. Note that this policy does not roll back a PC that is already on a newer version than your target. Also remember that every Windows release reaches an end-of-servicing date, after which it no longer gets security updates, so review your pinned version from time to time.
To undo this, open the same policy again, select Not Configured, and click OK. Windows will then offer feature updates normally again.
Specify Target Feature Update Version using Registry
Use it if you do not have the Group Policy tool, for example on Windows 11 Home. Be careful: a wrong change in the registry can cause system problems. Back up the key first or create a restore point. Also note that on Home, Windows may not honor these policy values the way it does on Pro, so check afterward that the setting really holds.
- Click the search box on the taskbar, type regedit, and open Registry Editor. Approve the User Account Control prompt if it appears.
- In the address bar at the top of the window, or by expanding the tree in the left pane, go to
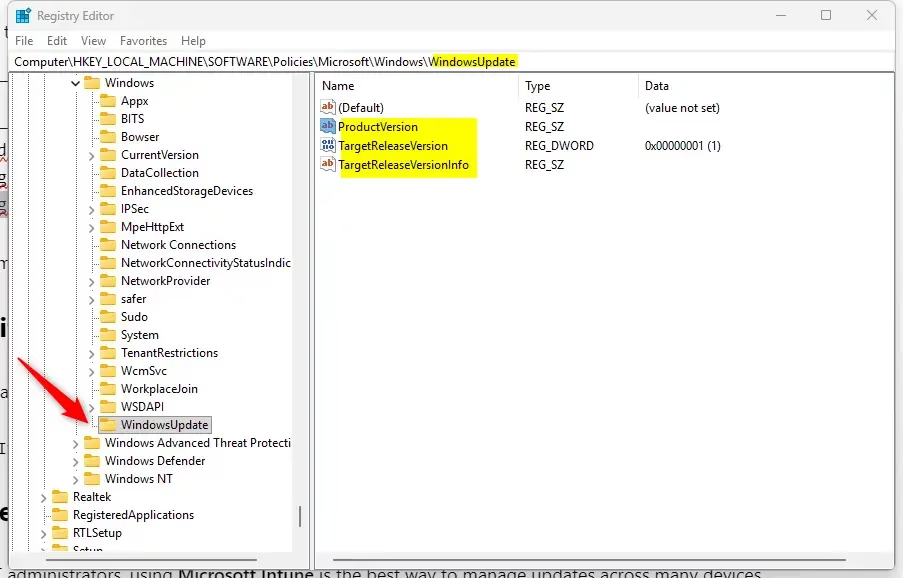
HKEY_LOCAL_MACHINE\SOFTWARE\Policies\Microsoft\Windows\WindowsUpdate. If the last key in that path does not exist yet, right-click its parent key, choose New Key, and name it to match the path. - Create or modify the values shown below, using the type listed for each one. Right-click an empty area in the right pane and choose New to add a value, then double-click it to set its data.
"ProductVersion"="Windows 11"
"TargetReleaseVersion"=dword:00000001
"TargetReleaseVersionInfo"="26H1"
To remove the restriction, right-click each of these three values in the right pane and choose Delete, then confirm. Restart the PC afterward so Windows stops applying the old limit.
Verification via PowerShell
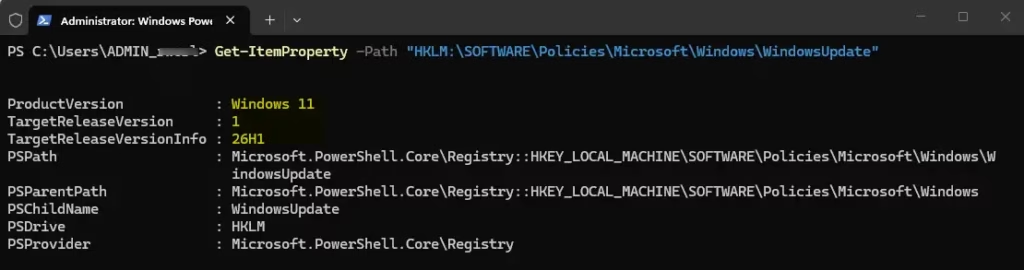
To check which settings are active, run the following command in PowerShell. Open it from the Start menu and run it as administrator if the command reports an access problem. The output should show the product and version you set. If the values come back empty, the policy is not set.
Get-ItemProperty -Path "HKLM:\SOFTWARE\Policies\Microsoft\Windows\WindowsUpdate"
Enterprise Management with Intune
If you manage many computers for a business, you can use Microsoft Intune to control the Windows 11 feature update version across all machines at once. This avoids editing each PC by hand and lets you change or remove the target from one place.
Summary
Specifying a target feature update version puts upgrade control in your hands, whether you use Group Policy, the Registry or Intune. Pick one method, confirm the setting is active, and keep track of when your chosen version stops getting security updates.
Have a question about this guide?
Answered by AI from this guide. Good questions may be added to this page — please don't include personal details.
Did this guide fix your problem?

About the Author
Richard
Tech Writer, IT Professional
Richard is a writer at Geek Rewind who turns complex IT tasks into clear, step-by-step guides. He draws on years of hands-on experience in system administration and enterprise IT operations, focusing on Windows, Linux and WordPress: the problems people actually run into, and the fixes that work. His server and WordPress guides come from systems he runs himself. Richard builds and maintains the platform behind Geek Rewind, from its Ubuntu servers and Nginx configuration to its custom WordPress plugins. Many new tutorials start with readers' questions, and he's always glad to answer them in the comments.
No comments yet — be the first to share your thoughts!