How to Enable or Disable Remote Assistance Connections in Windows 11

Remote Assistance in Windows 11 lets a trusted friend or IT helper connect to your PC from another location. They can see your screen, and with your permission take control, so the two of you can troubleshoot a problem together. The feature uses secure invitations and 6-digit passwords, so nobody can connect unless you send them an invitation and share the password.
You can turn these connections on or off in the System Properties window whenever you want to lock down your PC. If you manage several machines, or use Windows 11 Pro, Enterprise or Education, you can also control the setting through Group Policy or the other methods in this guide. Remote Assistance runs separately from the newer Quick Assist app. Turning it off will not affect Quick Assist or your other remote connection tools.
Open Run with Win+R, type SystemPropertiesRemote.exe, and press Enter. In the System Properties window, tick or clear the Allow Remote Assistance connections to this computer checkbox, then click OK. The change takes effect immediately without restarting.
Enable or Disable Remote Assistance Using System Properties
You need an administrator account. If you are signed in as a standard user, Windows asks for an admin password before it lets you change anything.
- Press Win+R to open the Run box, type SystemPropertiesRemote.exe, and press Enter. ⚠️ Requires admin privileges
- Approve the User Account Control prompt if one appears. The System Properties window opens on the Remote tab.
- In the Remote Assistance section, find Allow Remote Assistance connections to this computer. Tick the box to enable the feature, or clear it to disable it.
- Click OK to save the change. The window closes.
The change takes effect right away and you do not need to restart. If the checkbox is greyed out, a Group Policy setting or a registry value is controlling it, and you have to change it there (see the later methods). The Advanced button next to the checkbox lets you decide whether a helper can control your PC or only view it, and how long an invitation stays valid. To undo the change, open the same window and set the checkbox back.

Option Two
Enable or Disable Remote Assistance Using Command Lines
Enable Remote Assistance
This is the default configuration. On a fresh Windows 11 install, Remote Assistance connections are allowed, but nobody can connect unless you create an invitation and give them the password.
REG ADD "HKLM\SYSTEM\CurrentControlSet\Control\Remote Assistance" /v fAllowToGetHelp /t REG_DWORD /d 1 /f
REG ADD "HKLM\SYSTEM\CurrentControlSet\Control\Remote Assistance" /v fAllowFullControl /t REG_DWORD /d 1 /f
netsh advfirewall firewall set rule group="Remote Assistance" new enable=yes
⚠️ Requires admin privileges
Run this step as an administrator. If you are on a standard account, Windows asks for admin credentials, and without them the change is not applied.
Disable Remote Assistance
REG ADD "HKLM\SYSTEM\CurrentControlSet\Control\Remote Assistance" /v fAllowToGetHelp /t REG_DWORD /d 0 /f
netsh advfirewall firewall set rule group="Remote Assistance" new enable=no
⚠️ Requires admin privileges
As in the previous step, you must be an administrator to apply this change. When it finishes, open the Remote tab in System Properties to check that the checkbox shows the state you chose.
Option Three
Enable or Disable Remote Assistance Using Local Group Policy Editor
The Local Group Policy Editor is a tool that manages computer settings across your system. It lets you turn Remote Assistance on or off in Windows 11 Pro, Enterprise and Education. It is not included in Windows 11 Home, so Home users should use one of the other methods. You need administrator rights to make this change. The policy updates the system rules directly, so people can or cannot connect to your computer for help.
- Press Win + R, type gpedit.msc, and press Enter to open the Local Group Policy Editor. ⚠️ Requires admin privileges
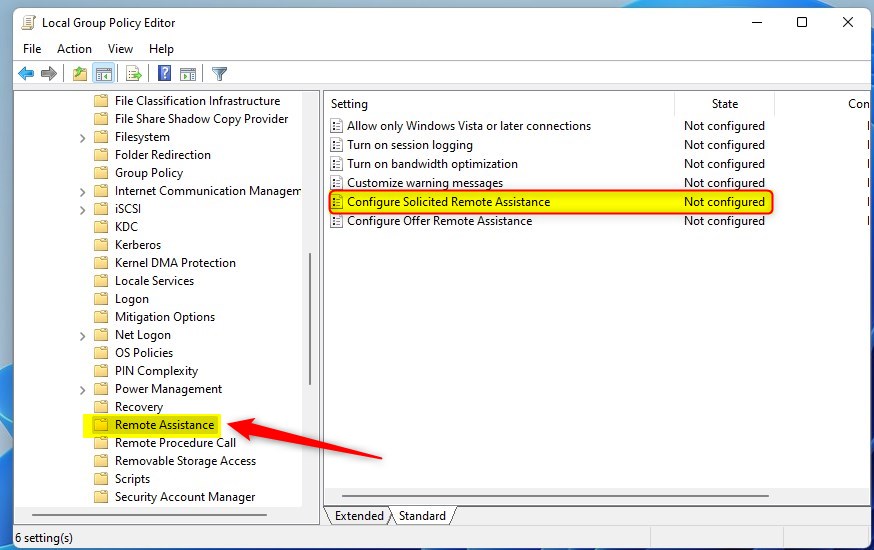
- In the left pane, go to the location below. Click the small arrow beside each folder to expand it.
Computer Configuration Administrative Templates System Remote Assistance
- In the right pane, double-click Configure Solicited Remote Assistance. A window opens with the options Not Configured, Enabled and Disabled.
Enable Remote Assistance
This is the default configuration. With Not Configured, Windows does not enforce any policy, and the checkbox in System Properties works normally.
- Select Not Configured.
- Click OK.
Disable Remote Assistance
While the policy is set to Disabled, the checkbox in System Properties is greyed out and nobody can change it from there.
- Select Disabled.
- Click OK.
- Close the Local Group Policy Editor.
The policy normally applies within a few minutes. If it does not seem to have taken effect, restart the PC. To undo it, return to the same setting and choose Not Configured.

Option Four
Enable or Disable Remote Assistance Using Registry
Enable Remote Assistance
This is the default configuration. Use it if you want to return the PC to how Windows ships, with Remote Assistance connections allowed but invitation-only.
reg delete "HKEY_LOCAL_MACHINE\SOFTWARE\Policies\Microsoft\Windows NT\Terminal Services" /v fAllowToGetHelp /f
Disable Remote Assistance
This turns off Remote Assistance. Afterwards, open the Remote tab in System Properties and check that Allow Remote Assistance connections to this computer is cleared. If you want to turn the feature back on, use the default configuration above.
reg add "HKEY_LOCAL_MACHINE\SOFTWARE\Policies\Microsoft\Windows NT\Terminal Services" /v fAllowToGetHelp /t REG_DWORD /d 0 /f
Summary
Windows Remote Assistance lets someone you trust resolve computer issues from afar. You can turn it on or off with any of the methods above. System Properties is the fastest and works on every edition. Group Policy suits Pro, Enterprise and Education PCs where you want the setting enforced. If you only use remote help occasionally, leave the feature off and enable it just before you need it, then disable it again afterwards.
Was this guide helpful?
100% of readers found this helpful (1 votes)

About the Author
Richard
Tech Writer, IT Professional
Richard is a writer at Geek Rewind who turns complex IT tasks into clear, step-by-step guides. He draws on years of hands-on experience in system administration and enterprise IT operations, focusing on Windows, Linux and WordPress: the problems people actually run into, and the fixes that work. His server and WordPress guides come from systems he runs himself. Richard builds and maintains the platform behind Geek Rewind, from its Ubuntu servers and Nginx configuration to its custom WordPress plugins. Many new tutorials start with readers' questions, and he's always glad to answer them in the comments.


No comments yet — be the first to share your thoughts!