How to Change Remote Desktop Port in Windows 11

Here’s how you can change the Remote Desktop listening port in Windows 11.
Open Registry Editor and navigate to 🗝️HKEY_LOCAL_MACHINE\System\CurrentControlSet\Control\Terminal Server\WinStations\RDP-Tcp. Modify the PortNumber value to your desired custom port. Then, update Windows Firewall by creating a new inbound rule for your chosen TCP port.
Why change the Remote Desktop port?
Changing your Remote Desktop port from the default 3389 makes it harder for hackers to find and attack your computer. This port number is the standard address for Remote Desktop connections.
What happens when done?
Step 1Back Up Your Registry (Required)
Step 2Change the Port in Registry Editor
You can change the Remote Desktop port by editing the Windows Registry, but you’ll need administrator rights to do this. First, open the Registry Editor by typing ‘regedit’ into the Windows search bar. Then, go to the specific path for Remote Desktop settings to find the port number you need to change.
- Click the Search icon and type
regeditto open the Registry Editor. - Navigate to this path:
HKEY_LOCAL_MACHINE\System\CurrentControlSet\Control\Terminal Server\WinStations\RDP-Tcp
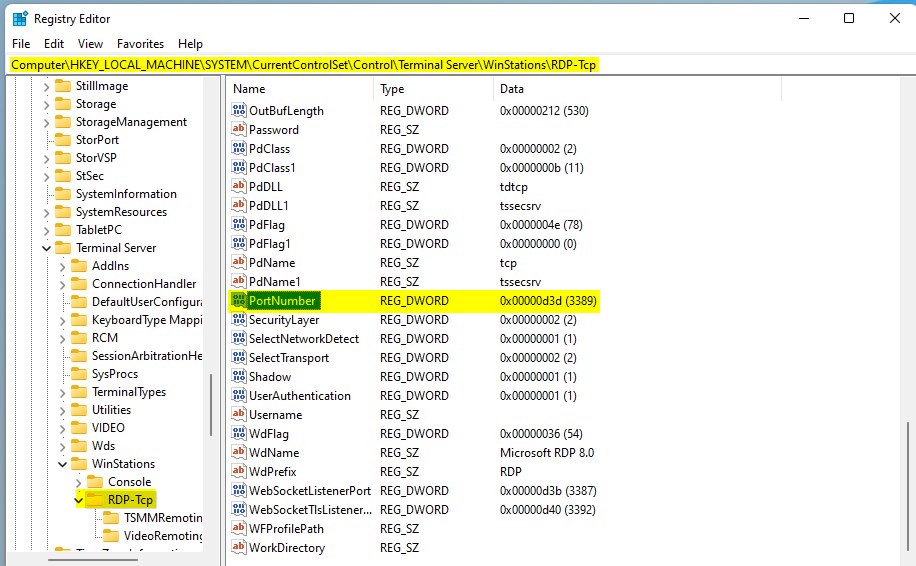
- Find the
PortNumberentry on the right side. - Right-click it and select Modify.
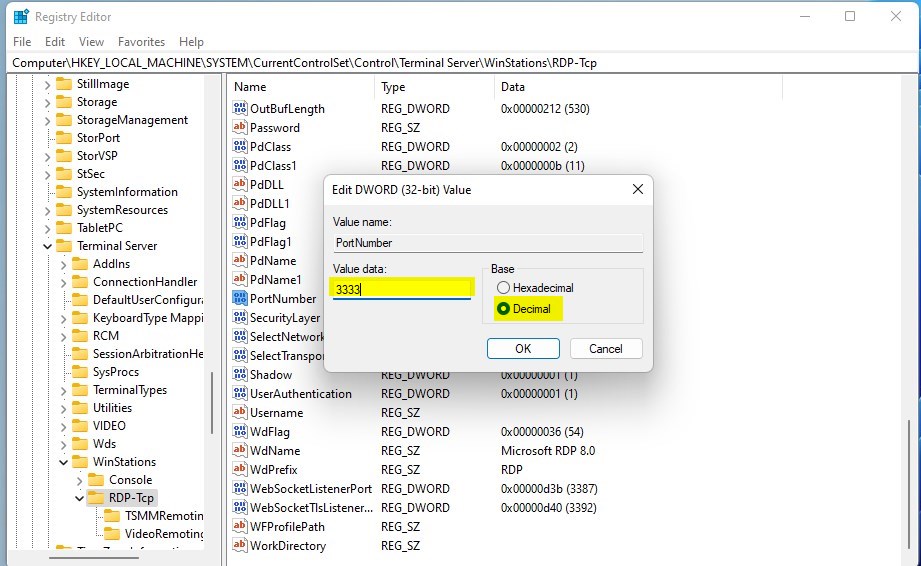
- Select the Decimal option.
- Type your new port number (e.g., 5555) and click OK.
Step 3Update Windows Firewall
After you change the Remote Desktop port, you must update Windows Firewall to let connections through on the new port. Open ‘Windows Firewall with Advanced Security’ and create a new inbound rule. Make sure to set it to allow TCP connections on your specific new port number for all network profiles.
- Open Windows Firewall with Advanced Security.
- Click Inbound Rules and then New Rule on the right.
- Select Port, click Next, and choose TCP.
- Enter your new port number in Specific local ports.
- Follow the prompts to Allow the connection for all profiles.
Step 4Verify and Connect
Restart your computer to apply changes. To verify it is working, open PowerShell as an administrator and run: netstat -ano | findstr :YOUR_NEW_PORT. To connect from a client, format your connection string as: 192.168.1.50:5555.
Summary
Changing your Remote Desktop port is a smart security move that stops bots from finding your computer easily.
Does changing the RDP port improve security?
Yes, it improves security by reducing “noise” from automated bots. While it is not a complete security solution, it hides your service from common port scanners that only look for the default 3389 port, effectively reducing the number of brute-force login attempts your system receives.
What happens if I forget the new RDP port?
If you forget your new Remote Desktop port, you won’t be able to connect remotely and will need to check the registry to find it again.
Was this guide helpful?

About the Author
Richard
Tech Writer, IT Professional
Richard, a writer for Geek Rewind, is a tech enthusiast who loves breaking down complex IT topics into simple, easy-to-understand ideas. With years of hands-on experience in system administration and enterprise IT operations, he’s developed a knack for offering practical tips and solutions. Richard aims to make technology more accessible and actionable. He's deeply committed to the Geek Rewind community, always ready to answer questions and engage in discussions.


No comments yet — be the first to share your thoughts!