How to Enable or Disable Password Expiration in Windows 11

Password expiration in Windows 11 can force you to change a local account password after 42 days, which is the default maximum password age. Turning it off stops Windows from demanding a new password at an awkward moment. Local Users and Groups (a built-in tool for managing accounts on the computer) is the easiest way to do it, and this tutorial also covers Command Prompt, PowerShell and the Microsoft account website.
Whichever method you pick, the change is per account. Disabling expiration for one user does not affect the others unless you use the “all accounts” version of the command.
Open Local Users and Groups (press Win plus R, type lusrmgr.msc, press Enter), double-click your account name, check or uncheck Password never expires on the General tab, then click OK. The change applies immediately without restart.
Why Password Expiration Matters
Password expiration is a security feature. If someone steals your login details, a forced change limits how long the stolen password stays useful. You can turn it off if you manage your own PC and find the regular prompts a nuisance. On a shared or work machine, check with whoever sets the security policy first.
Two settings control how this works:
- Maximum password age is how many days pass before Windows requires a new password. The default for local accounts is 42 days.
- Minimum password age is how long a password must be in use before it can be changed again. The default for local accounts is 0 days, so you can change it at any time.
Microsoft accounts work differently. Their default expiration cycle is 72 days, and you set it online rather than in Windows (see Option Four).
The 42-day limit only affects a local account that does not have Password never expires set. That is why the per-account setting below is the one that matters most.
Option One
Enable or Disable Password Expiration for Local Account in Local Users and Groups
Local Users and Groups lets you change password expiration for individual accounts in a normal window, with no commands to type. To open it, press the Windows key plus R, type lusrmgr.msc and press Enter. It only exists in Windows 11 Pro, Enterprise and Education. On Windows 11 Home the tool is missing and that command will fail, so use Option Two or Three instead.
All editions can use Option Two.
- Open Local Users and Groups (
lusrmgr.msc). You need to be signed in as an administrator. The Local Users and Groups window opens. - Select the account:
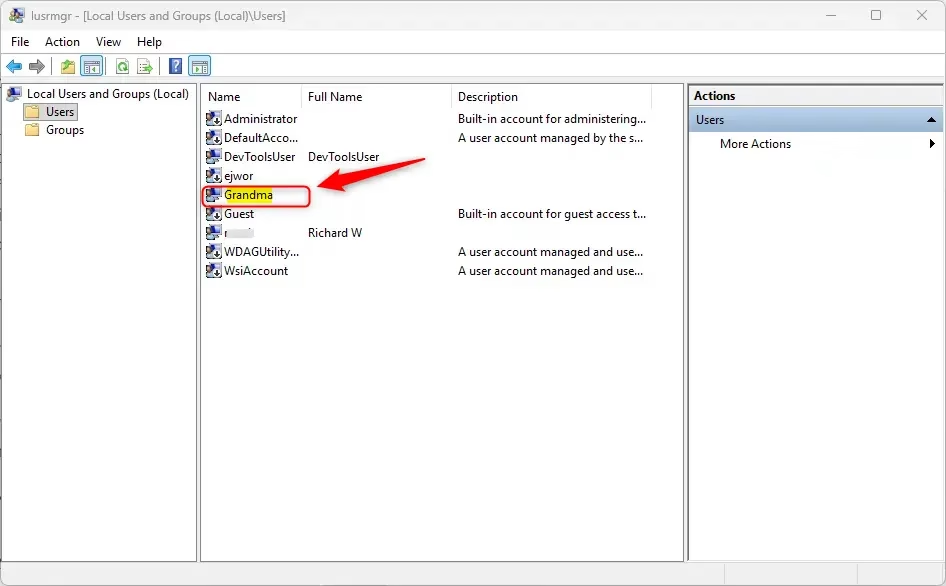
- Click the Users folder in the left panel. Your local accounts are listed in the middle panel.
- Double-click the local account name you want to change. Its properties window opens.
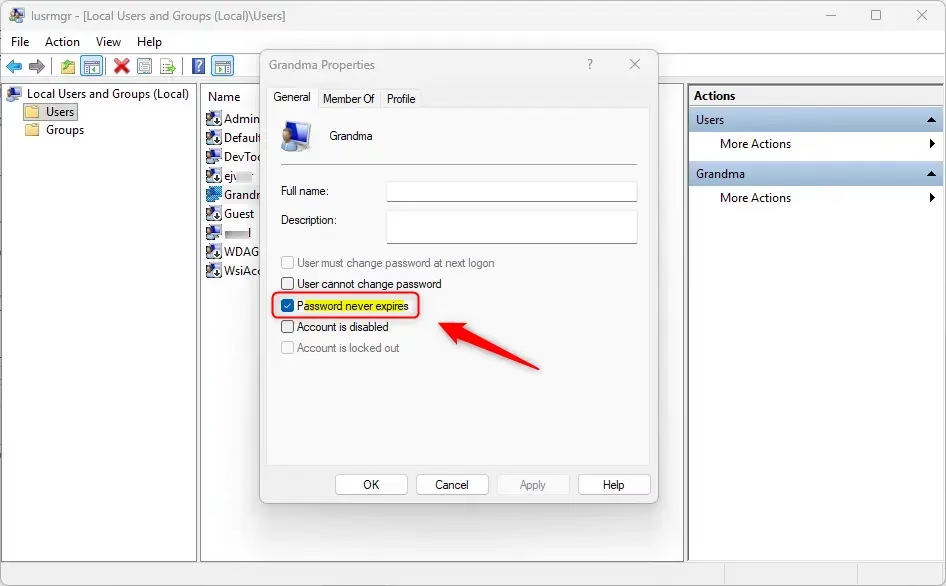
- On the General tab, check Password never expires to disable expiration (this is the default), or uncheck it to enable expiration. Then click OK.
Note: Password never expires is grayed out while User must change password at next logon is checked. Uncheck that box first, and the other option becomes available.
- If you want, you can also change the maximum and minimum password age for local accounts. These are system-wide limits that apply to all local accounts, not just the one you picked.
- Close Local Users and Groups if you want. The change applies straight away and does not need a restart. To undo it, reopen the account and flip the checkbox back.
Option Two
Enable or Disable Password Expiration for Local Account in Command Prompt
⚠️ Requires admin privileges
This method works on every edition of Windows 11, including Home. You will run the commands from an elevated terminal. The commands use WMIC, which Microsoft has deprecated. On newer Windows 11 builds, such as 24H2, WMIC may not be installed. If Command Prompt says the command is not recognized, use Option Three (PowerShell) instead.
- Open Windows Terminal (Admin), and select Command Prompt. Right-click the Start button and choose the Terminal (Admin) entry, then click Yes if User Account Control asks. A Command Prompt tab opens with administrator rights.
Enable Password Expiration for Local Account(s)
This part turns password expiration back on for your local accounts, so Windows asks for a new password once the maximum age passes. You can apply it to every local account at once or to one account only.
- Type one of the commands below into the command prompt and press Enter:
For all existing local accounts:
Get-LocalUser | Set-LocalUser -PasswordNeverExpires $falseOR
For a specific local account:
Set-LocalUser -Name 'adminuser' -PasswordNeverExpires $falseReplace
adminuserwith the actual username of the local account you want to enable password expiration for. If the command works, the window reports that it ran successfully. If you see an error, check that you opened the terminal as administrator and spelled the username correctly. - If you want, you can also change the maximum and minimum password age for local accounts.
Disable Password Expiration for Local Account(s)
This part stops a local account password from ever expiring, so Windows never asks you to change it. That is useful on shared computers, and on systems that run tasks unattended, because nothing blocks a sign-in with a surprise password prompt.
Turning off the expiration timer also stops Windows from forcing scheduled password changes. Keep in mind the trade-off: a password that never expires needs to be strong, because it stays valid until you change it yourself.
- Type one of the commands below into the command prompt and press Enter:
For all existing local accounts:
Get-LocalUser | Set-LocalUser -PasswordNeverExpires $trueOR
For a specific local account:
Set-LocalUser -Name 'adminuser' -PasswordNeverExpires $trueReplace
adminuserwith the actual username of the local account you want to disable password expiration for. The change takes effect immediately, with no restart. - Close Windows Terminal (Admin) if you want. To undo the change, run the enable command from earlier in this option.
Option Three
Enable or Disable Password Expiration for Local Account in PowerShell
⚠️ Requires admin privileges
PowerShell works on all editions of Windows 11 and is the better choice if WMIC is missing on your build.
- Open Windows Terminal (Admin), and select Windows PowerShell. Click Yes if User Account Control asks. A PowerShell tab opens with administrator rights.
Enable Password Expiration for Local Account(s)
What happens: Credentials require modification once the designated expiration window closes. In other words, the account must get a new password after the maximum age passes.
- Type one of the commands below into the PowerShell window and press Enter:
For all existing local accounts:
Get-LocalUser | Set-LocalUser -PasswordNeverExpires $falseOR
For a specific local account:
Set-LocalUser -Name 'adminuser' -PasswordNeverExpires $falseReplace
adminuserwith the actual username of the local account you want to enable password expiration for. If PowerShell prints a red error, check the username and confirm the window is running as administrator. - If you want, you can also change the maximum and minimum password age for local accounts.
- When finished, go to the final step below, which closes Windows Terminal (Admin).
Disable Password Expiration for Local Account(s)
Disabling expiration stops Windows from prompting for password changes. That keeps automated tasks and always-on machines from being interrupted by a password that has aged out. Use a strong password, since it will not be rotated for you.
- Type one of the commands below into the PowerShell window and press Enter:
For all existing local accounts:
Get-LocalUser | Set-LocalUser -PasswordNeverExpires $trueOR
For a specific local account:
Set-LocalUser -Name 'adminuser' -PasswordNeverExpires $trueReplace
adminuserwith the actual username of the local account you want to disable password expiration for. The change applies immediately and no restart is needed. - Close Windows Terminal (Admin) if you want. To undo the change, run the enable command from earlier in this option.
Option Four
Enable or Disable Password Expiration for Microsoft Account Online at Microsoft
A Microsoft account password is stored in the cloud, so the local tools and commands above do not change it. You have to sign in to the Microsoft website in a web browser and change the setting there. This works from any device and any edition of Windows 11.
- Go to the Change your password site at Microsoft for your Microsoft account.
- Sign in to the Microsoft site with your Microsoft account to verify. If you have two-step verification turned on, you will be asked for the code as well.
- On the change password page, do the following:
- Type your current password.
- Type a new password.
- Reenter the password to confirm.
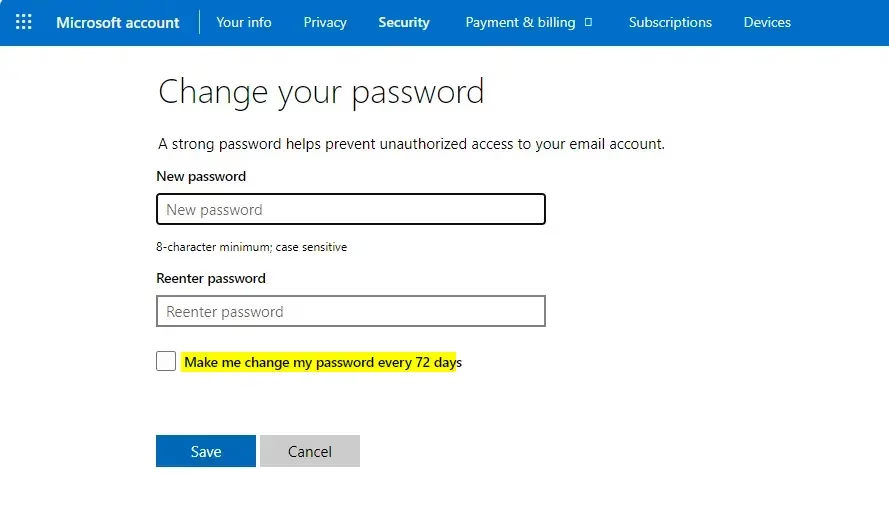
- Check Make me change my password every 72 days to enable expiration, or uncheck it to disable expiration (this is the default).
- Click Save.
- Sign in to the Microsoft site again with your Microsoft account's new password to verify that it works. On your PC, use the new password the next time you sign in to Windows with that account.
Summary
Windows 11 gives you several ways to manage password expiration, depending on whether you use a local account or a Microsoft account. Pick the one that fits your edition and how comfortable you are with commands.
- Option One: Use Local Users and Groups (easiest for beginners, Pro/Enterprise/Education editions only)
- Option Two: Use Command Prompt with WMIC commands (works on all editions, but WMIC may be missing on newer builds)
- Option Three: Use PowerShell commands (works on all editions)
- Option Four: Change settings online for your Microsoft account
Regular password changes are a baseline security measure, and an administrator can override them when a machine needs to stay available without prompts. Changing these settings on a local account needs administrator rights, so sign in as an administrator or open the terminal with Admin rights first.
Have a question about this guide?
Answered by AI from this guide. Good questions may be added to this page — please don't include personal details.
Did this guide fix your problem?

About the Author
Richard
Tech Writer, IT Professional
Richard is a writer at Geek Rewind who turns complex IT tasks into clear, step-by-step guides. He draws on years of hands-on experience in system administration and enterprise IT operations, focusing on Windows, Linux and WordPress: the problems people actually run into, and the fixes that work. His server and WordPress guides come from systems he runs himself. Richard builds and maintains the platform behind Geek Rewind, from its Ubuntu servers and Nginx configuration to its custom WordPress plugins. Many new tutorials start with readers' questions, and he's always glad to answer them in the comments.
No comments yet — be the first to share your thoughts!