How to Edit the Hosts File in Windows 11
Editing the Hosts file in Windows 11 lets you control website access and test server setups.
The Hosts file is a special system file found at 📁C:\Windows\System32\drivers\etc\hosts. It works like a personal address book for your computer, linking website names, like geekrewind.com, to their specific computer addresses called IP addresses.
This means your computer checks this file first, before asking the internet for directions to a website. You can use it to block websites, send traffic to a different address, or check how a local server acts before you put it online.
For example, you might use it to stop ads from showing up or to see how a new website works without it going live on the internet.
Open Notepad as administrator, then type notepad.exe C:WindowsSystem32Driversetchosts into the Command Prompt. Edit the file, and save your changes via File > Save.
Why Would You Edit the Hosts File?
You can edit the hosts file in Windows 11 to block websites you don’t want to visit or to test websites you’re building on your own computer before they go live. It’s a way to tell your computer exactly where to find a website, which can also help fix some network problems.- Block websites: Stop your computer from visiting certain websites by redirecting them.
- Test websites: Web developers use the Hosts file to test websites on their own computer before making them live.
- Fix network issues: Sometimes you want to link a name to a specific IP address for easier local access.
Where is the Hosts File Located?
The Hosts file is stored in this location on your computer:
C:\Windows\System32\Drivers\etc\hostsWhat Does the Hosts File Look Like?
The hosts file in Windows 11 is a simple text document that matches website names to their IP addresses. Each pairing sits on its own line, and any line starting with a ‘#’ symbol is just a note that your computer ignores.
# This is a comment - lines starting with # are ignored by your computer
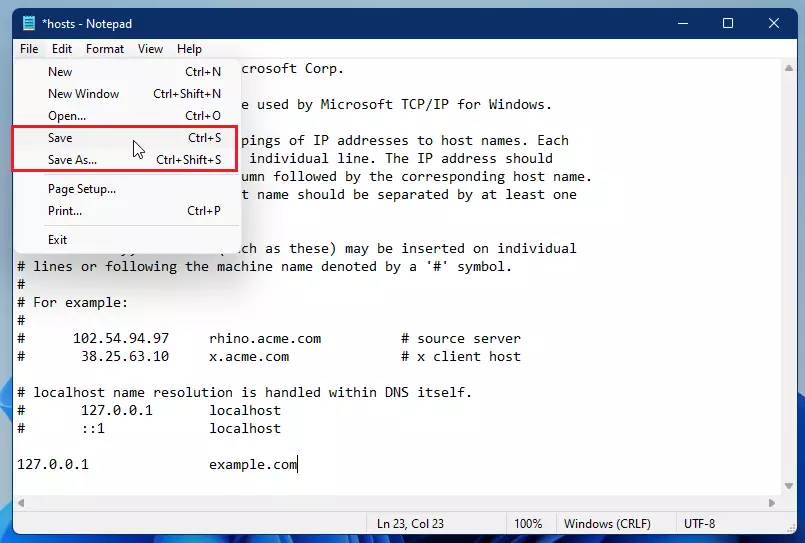
127.0.0.1 localhost
# 127.0.0.1 example.com (this line is ignored because it starts with #)
To edit the hosts file in Windows 11, ensure the IP address and website name you enter have at least one space or tab separating them. This spacing prevents incorrect mapping of IP addresses to domain names, which could stop you from reaching certain websites.
How to Edit the Hosts File: Step-by-Step
Step 1Open Notepad as Administrator
To edit the hosts file in Windows 11, you must open Notepad with administrator permissions. Giving Notepad special rights ensures you can save your changes. To give Notepad these rights, search for ‘Command Prompt’, right-click on it, and then choose ‘Run as administrator’.
- Click on the Start button or press the Windows key.
- Type
Command Promptin the search box. - Right-click on Command Prompt in the results and select Run as administrator.

Step 2Open the Hosts File in Notepad
In the Command Prompt window, type the following command and press Enter:
Opening the Hosts file in Notepad with administrative permissions lets you edit and save changes. This is necessary because the Hosts file needs elevated privileges to prevent unauthorized changes.
Step 3Add Your Changes
127.0.0.1 example.comStep 4Save Your Changes
Click File > Save in Notepad to save the file.
Tips and Things to Remember
Always run Notepad as an administrator when you edit the hosts file in Windows 11 to make sure you can save your changes. It’s also a good idea to make a copy of the original file before you start editing, just in case. Use the ‘#’ symbol to add notes or temporarily turn off lines without deleting them.- Always run Notepad as administrator to make sure you can save the changes.
- Make a backup: Before you edit, copy the original Hosts file somewhere safe. This way, you can restore it if something goes wrong.
- Use # for comments: If you want to disable a line without deleting it, just put a
#at the start of that line. - Changes are instant: After saving, your computer immediately uses the new settings.
Summary
- The Hosts file lets you control how your computer finds websites.
- You can block websites or test your own sites locally.
- You must run Notepad as an administrator to edit and save the file.
- Always save a backup before making changes.
The Hosts file in Windows 11 controls how your computer connects to websites, letting you block specific sites or test your own projects locally. Remember, you must run Notepad as an administrator to edit and save the file, and always save a backup before making any changes.
Is it safe to edit the hosts file?
Security teams use the hosts file to block malicious domains locally. Even regular users sometimes update the hosts file to restrict access to distracting websites. Because the hosts file is local, any changes you make apply only to that specific computer.
Was this guide helpful?

About the Author
Richard
Tech Writer, IT Professional
Richard, a writer for Geek Rewind, is a tech enthusiast who loves breaking down complex IT topics into simple, easy-to-understand ideas. With years of hands-on experience in system administration and enterprise IT operations, he’s developed a knack for offering practical tips and solutions. Richard aims to make technology more accessible and actionable. He's deeply committed to the Geek Rewind community, always ready to answer questions and engage in discussions.


No comments yet — be the first to share your thoughts!