How to Deny Removable Storage Access in Windows 11

Denying removable storage access in Windows 11 stops USB flash drives, external hard drives, and memory cards from working on your computer. This built-in security feature protects sensitive files from data theft and accidental loss. The Group Policy method below needs Windows 11 Pro or Enterprise. Windows 11 Home can get the same result through the registry.
The Local Group Policy Editor (a system tool that controls computer rules) lets you turn on this restriction in a few steps. Once it is on, nobody can plug in unauthorized hardware and copy your data. You need an administrator account for every step in this tutorial.
Deny access to removable storage in Windows 11 by opening gpedit.msc and navigating to Computer Configuration System Removable Storage Access, then enabling “All Removable Storage classes: Deny all access.” Windows Home users can achieve this via the Registry Editor at 🗝️HKEY_LOCAL_MACHINE\
Why Deny Removable Storage Access?
USB drives are convenient, but they are a real security risk. A drive can carry malware or viruses that infect your computer as soon as you plug it in. The same drive can also walk out the door with a copy of your company files.
Restricting removable storage access in Windows 11 prevents unauthorized data copying and keeps malicious files off your computer. It is a common setting on shared PCs, kiosks, and office machines.
What Happens When You Restrict Access?
When you block removable storage access in Windows 11, your computer won’t let anyone use USB drives, so they won’t be usable from File Explorer . You’ll see an ‘Access Denied’ message if you try to open one.
Two things to keep in mind:
- The block applies to all removable storage classes, including USB flash drives, external hard drives, and memory cards. Your internal drives are not affected.
- If a drive was already plugged in when you changed the setting, unplug it and plug it back in so the new rule takes effect.
Using Group Policy to Block USB Drives
Windows 11 Pro and Enterprise users can block removable storage access with the Local Group Policy Editor (a built-in tool for managing system settings). This method restricts USB drives and external memory cards across your computer, so other users cannot plug in unauthorized storage devices.
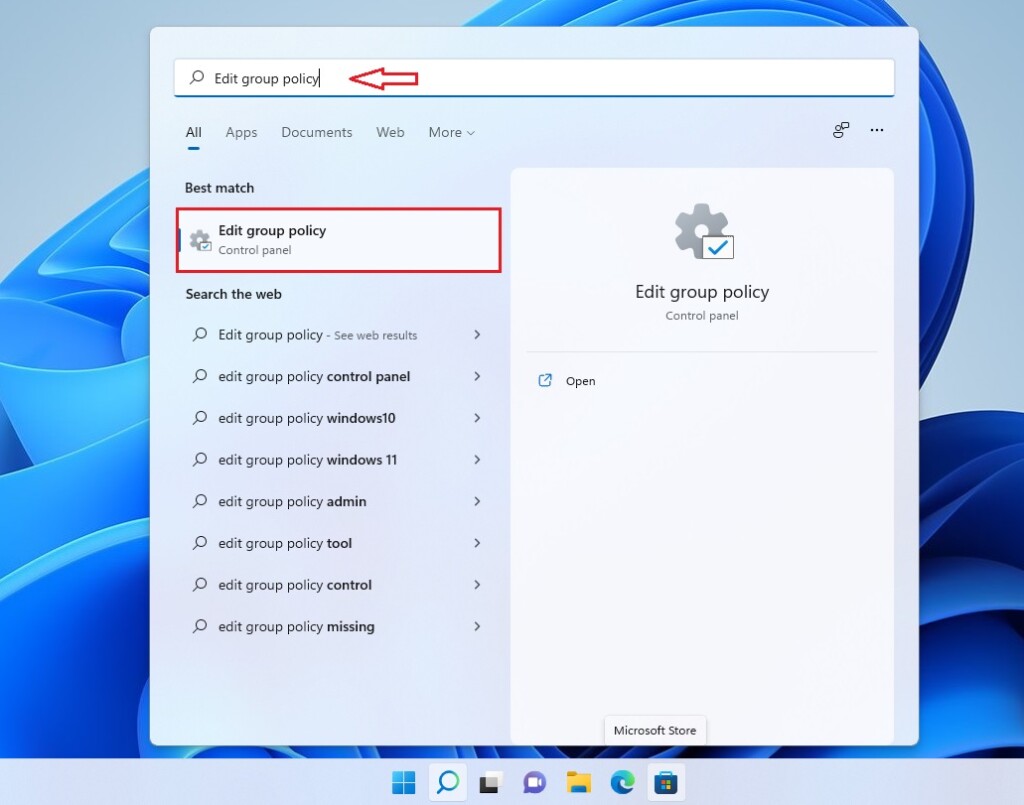
The Local Group Policy Editor is not included in Windows 11 Home. If the command below returns an error that Windows cannot find the file, skip to the registry method further down.
- Press Win + R to open the Run dialog.
- Type
gpedit.mscand press Enter. The Local Group Policy Editor window opens. If a User Account Control prompt appears, click Yes.
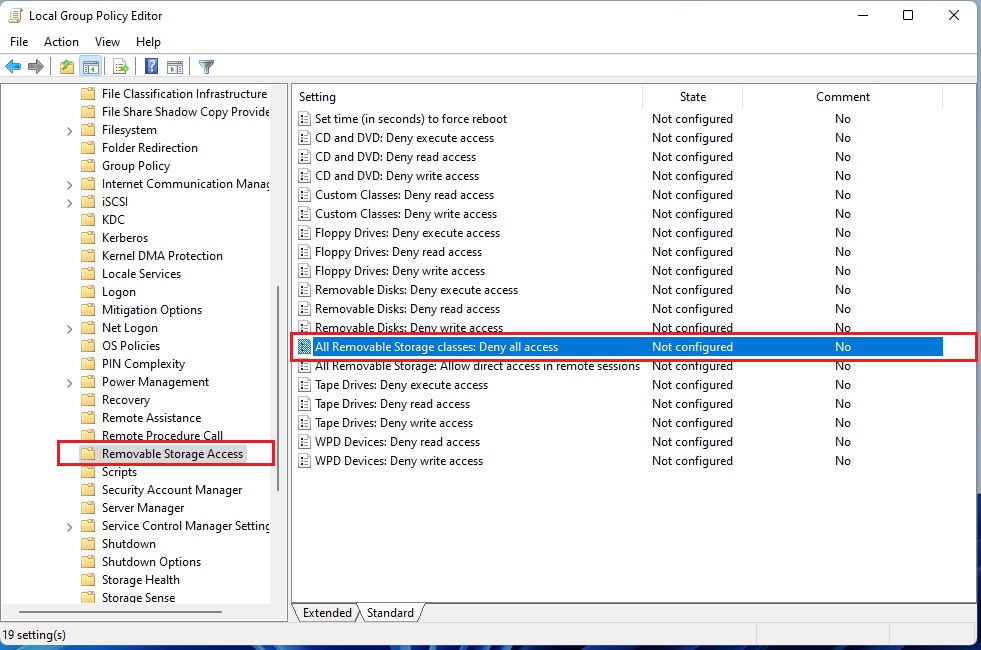
- In the left pane, navigate to:
Computer Configuration > Administrative Templates > System > Removable Storage Access. Click the final folder in that path. Its settings appear in the right pane. - Find All Removable Storage classes: Deny all access in the right pane. Its State column should say Not configured for now.
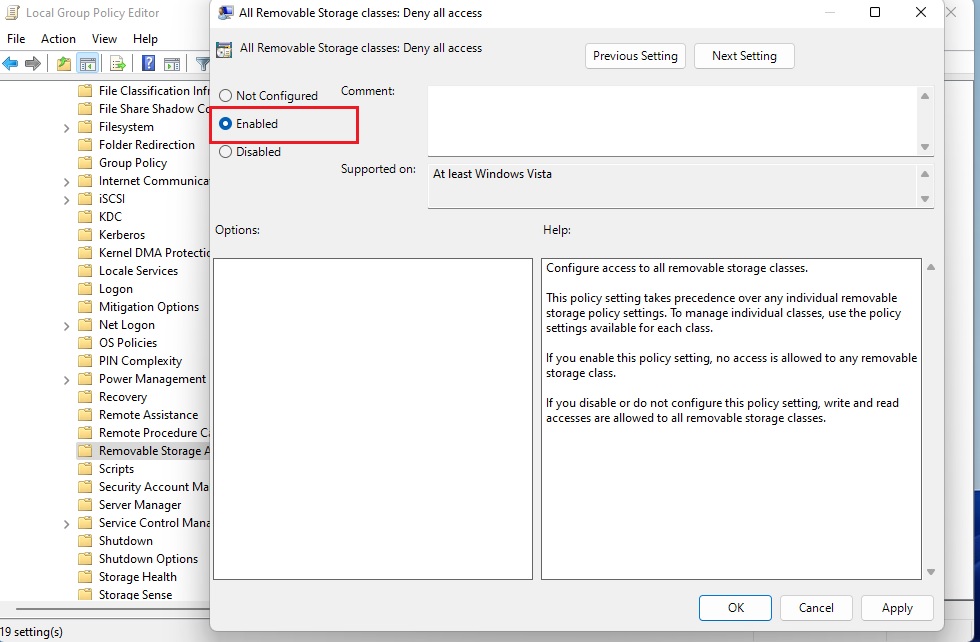
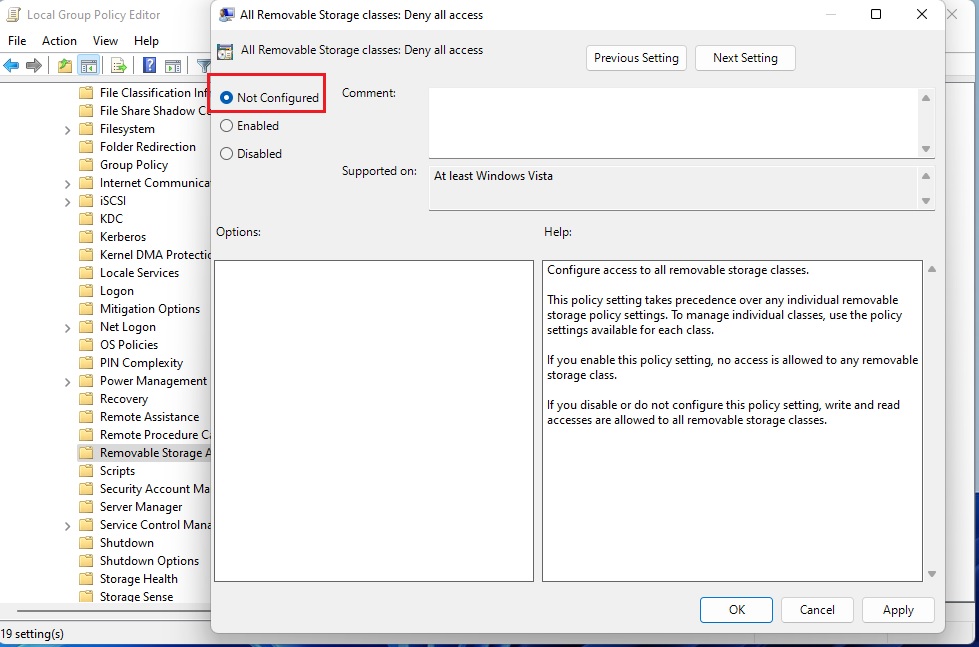
- Double-click All Removable Storage classes: Deny all access. A settings window opens.
- Select Enabled.
- Click OK. The State column now shows Enabled.
The policy normally applies within a few minutes, and a restart or sign-out and sign-in applies it right away. Test by plugging in a USB drive. You should get the 'Access Denied' message.
- To undo the change, open the same setting again and select Not configured, then click OK. Selecting Disabled also lifts the block. Unplug and reconnect the drive afterward.
Registry Editor Method for Windows Home
Windows 11 Home users can block removable storage access by editing the Windows registry (a database that stores low-level system settings). Home lacks the policy editor, so you create the same settings by hand. Once they are in place, Windows stops allowing access to plugged-in USB flash drives and external hard disks.
Operating systems running Windows 11 Home require the Registry Editor. It also works on Pro and Enterprise if you prefer it.
A wrong registry change can cause problems. Before you start, back up the registry or create a restore point. In Registry Editor, you can use File Export for a backup.
- Press Win + R to open the Run dialog.
- Type
regeditand press Enter. Click Yes if User Account Control asks for permission. Registry Editor opens. - Go to:
HKEY_LOCAL_MACHINE\SOFTWARE\Policies\Microsoft\Windows\RemovableStorageDevices. You can paste the path into the address bar at the top of the window. - Check whether the RemovableStorageDevices key exists under that location. If it isn't there, right-click Windows in the left pane. Choose New, then Key, and name it RemovableStorageDevices. The new key appears under Windows.
- Right-click your new key and select New, then Key. Name it {53f5630d-b6bf-11d0-94f2-00a0c91efb8b}. Type it exactly, including the curly braces.
- Select that new key. Right-click an empty area in the right pane, select New, then DWORD (32-bit) Value, and name it
Deny_Read. - Double-click the new value, type 1 in the Value data box, and click OK. Setting its value to 1 blocks reading data from the drive.
- Repeat the process in the same key for
Deny_Write. That blocks saving files to the drive. - Close Registry Editor, then restart the computer or sign out and back in. Plug in a drive to test it.
To undo the change, return to the same key and set each value to 0, or right-click the value and choose Delete. Then restart or sign out.
Best Practices for Administrators
- Always test policies on a single machine before deploying to a network. A wrong setting can lock people out of drives they need.
- Use Deny write access if you want to allow users to read files but prevent them from stealing sensitive company data. In the registry method, that is the job of
Deny_Write. - Document all changes made to the registry or GPO to avoid confusion during troubleshooting. Note the date, the machine, and the setting you changed.
- If a drive still works after you apply the block, unplug it, plug it back in, and restart or sign out of the PC.
- Keep a way to undo the change. Write down the steps to set the policy back to Not configured, or the registry values back to 0.
Summary
Restricting removable storage helps prevent data loss. Whether you use the Group Policy Editor on Pro and Enterprise or the Registry Editor on Home, blocking unauthorized USB access works reliably. Administrator privileges remain mandatory for configuring these settings.
Have a question about this guide?
Answered by AI from this guide. Good questions may be added to this page — please don't include personal details.
Did this guide fix your problem?

About the Author
Richard
Tech Writer, IT Professional
Richard is a writer at Geek Rewind who turns complex IT tasks into clear, step-by-step guides. He draws on years of hands-on experience in system administration and enterprise IT operations, focusing on Windows, Linux and WordPress: the problems people actually run into, and the fixes that work. His server and WordPress guides come from systems he runs himself. Richard builds and maintains the platform behind Geek Rewind, from its Ubuntu servers and Nginx configuration to its custom WordPress plugins. Many new tutorials start with readers' questions, and he's always glad to answer them in the comments.
No comments yet — be the first to share your thoughts!