How to Compress Images in Windows 11 for Sharing
You can compress images in Windows 11 by reducing their file size, making them easier to share and store.
Image compression is the process of encoding information about an image using fewer bits than the original representation. Windows 11 offers built-in tools and workflows to achieve this without needing third-party software for common tasks.
Reducing image file size is crucial when sending photos via email, uploading to social media, or freeing up valuable hard drive space on your PC. For example, a 5MB photo can often be reduced to under 1MB with effective compression.
This guide shows you straightforward methods to shrink your image files directly within Windows 11.
You can compress images in Windows 11 by right-clicking a file, selecting Share, then choosing a quality option like High, Medium, or Low from the sharing window’s More options. This built-in feature reduces file size for easier sharing. Enable it first with ViVeTool if needed.
Why Compress Images?
When you compress an image, you reduce its file size. Smaller files send faster over email or messaging apps. They also take up less storage space on your devices. Windows 11 makes this simple by letting you pick how much compression you want.
What’s New in 🪟 Windows 11?
Windows 11 has a feature called Windows Share. It helps you send files to apps, emails, phones, and nearby devices. Microsoft recently added an easy way to compress images when sharing. Instead of picking a number from 0 to 100, you simply choose High, Medium, or Low quality.
This feature is available starting with Windows 11 build 26120.4151. To use it, you need to turn it on using a small tool called ViVeTool (don’t worry, it’s easy!).
Step 1Enable the Compression Feature with ViVeTool
ViVeTool unlocks hidden or new features in Windows 11. Here’s how to get started:
- Download and learn how to use ViVeTool here: How to enable hidden features with ViVeTool
- 🔒 ADMIN REQUIRED: Open the Windows Terminal app as an administrator. Click the Start button and type “Windows Terminal.” Right-click the result and choose Run as administrator. Need help? Check here: Open Windows Terminal as admin
- In the terminal, type this command and press Enter:
vivetool /enable /id:55390938 - Restart your computer to apply the change.
Note: Only do this if you feel comfortable typing commands. If not, you can wait for Microsoft to release this feature automatically in future updates.
Step 2Compress Images When Sharing
Now that the feature is enabled, here’s how to compress an image when you share it:
- Find the image file you want to share (like a photo or screenshot).
- Right-click on the image file.
- Choose Share from the menu.
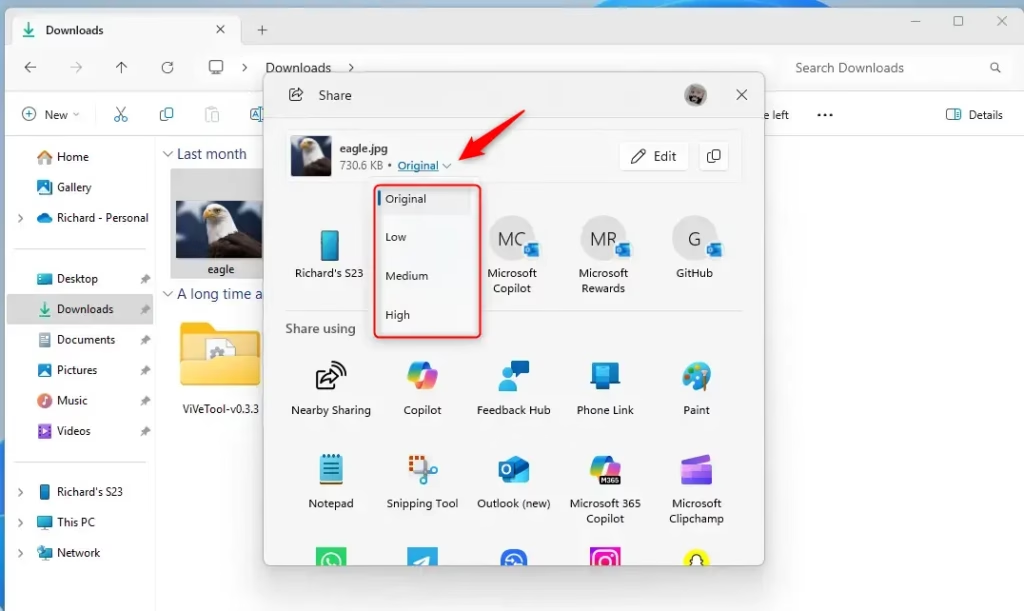
- In the sharing window, click on More options (usually a dropdown menu).
- Pick the quality you want: Original (no compression), High, Medium, or Low.
This lets you make the file smaller if you choose Medium or Low. Smaller files send faster and save storage space.

Summary
- Windows 11 lets you pick image quality when sharing pictures to control file size.
- You can choose from High, Medium, or Low compression levels.
- Use ViVeTool and a simple command to enable this feature if you don’t see it yet.
- Compressing images helps you share pictures faster and saves storage space.
Want to read more? Check out the official Microsoft blog here: Microsoft Blog on Windows 11 build 26120.4151
How to decrease image file size in 🪟 Windows 11?
One best for profile pictures and thumbnails. Gives you the resolution that that would be 682 384. And an approximate file size of 357.1.
Does 🪟 Windows 11 have a compression tool?
Windows 11 has a built-in compression and extraction tool that handles everything for you. Below, I'll guide you through the process of zipping and unzipping files and folders; no extra software or PowerShell commands are required.
How do I reduce the MB of a picture in Windows?
The compression options in Microsoft Picture Manager reduce both file size and picture dimensions based on how you intend to use the picture, such as in Web pages or e-mail messages. Select the picture you want to compress. Click the Picture Tools Format tab, and then click Compress Pictures.
Was this guide helpful?

About the Author
Richard
Tech Writer, IT Professional
Richard, a writer for Geek Rewind, is a tech enthusiast who loves breaking down complex IT topics into simple, easy-to-understand ideas. With years of hands-on experience in system administration and enterprise IT operations, he’s developed a knack for offering practical tips and solutions. Richard aims to make technology more accessible and actionable. He's deeply committed to the Geek Rewind community, always ready to answer questions and engage in discussions.


No comments yet — be the first to share your thoughts!