How to Compress Images in Windows 11 for Sharing

Image compression in Windows 11 can reduce large photo file sizes by up to 80 percent. That makes photos quicker to email or upload, usually without a noticeable drop in picture quality. You do not need third-party software for the compression itself, because the option sits inside the Windows sharing menu. Depending on your build, you may need one small utility to make that option appear. The sections below cover what you need and how to do it.
Right-click your photo, select Share, then choose High, Medium, or Low quality to compress the image before sending. Windows 11 build 26120.4151 or newer is required; if unavailable, use ViVeTool to enable the feature, then restart your PC.
Why Compress Images?
Camera and phone photos are often several megabytes each. Shrinking them cuts each file to a fraction of its original size. That matters in three common situations:
- Email attachments upload and download faster, and are less likely to hit a mail provider’s size limit.
- Chat and messaging apps send the pictures quicker, especially on a slow or metered connection.
- Copies you keep for sharing take up less room on your solid-state drive.
Your original photo is not meant to be touched. Compression applies to the copy that gets shared, so keep the original if you may need full quality later.
What’s New in 🪟 Windows 11?
Windows 11 can compress an image from the sharing menu, so you shrink the file before you send it. You pick a quality level of High, Medium or Low. High keeps the most detail. Low gives the smallest file.
The feature is new and not available to everyone yet. You need Windows 11 build 26120.4151 or newer. That is an Insider preview build, so a normal, fully updated Windows 11 PC may not have it. To check your build, open Settings, go to System, then About, and read the OS build line under Windows specifications.
If you are on a supported build and the option is still not visible, it is probably switched off. You can turn it on with a free open-source utility called ViVeTool. If you are not on an Insider build, the simplest choice is to wait for Microsoft to release the feature in a regular update.
Step 1Enable the Compression Feature with ViVeTool
ViVeTool is a free, open-source program that switches on hidden Windows features. Here you use it to enable the image compression quality options. The process has four parts: download the tool, extract it, open Windows Terminal as administrator, and run the enable command from the folder where you extracted it. The steps below walk through them in order.
Take care with two things:
- Download ViVeTool only from its official project page, and make sure you get the correct version.
- Type or paste the command exactly as shown. A wrong value can enable the wrong feature or cause errors.
If it fails with an access error, close the window and reopen Windows Terminal using Run as administrator. After the command succeeds, restart the PC. Most feature changes of this kind only take effect after a reboot.
- Download and learn how to use ViVeTool here: How to enable hidden features with ViVeTool
- 🔒 ADMIN REQUIRED: Open the Windows Terminal app as an administrator. Click the Start button and type "Windows Terminal." Right-click the result and choose Run as administrator. Need help? Check here: Open Windows Terminal as admin
- In the terminal, type this command and press Enter:
vivetool /enable /id:55390938 - Restart your computer to apply the change.
If not, wait for Microsoft to roll out the feature in a future public update. Because this is a preview feature, it may behave oddly. Consider creating a restore point first, so you have an easy way back if something goes wrong.
Step 2Compress Images When Sharing
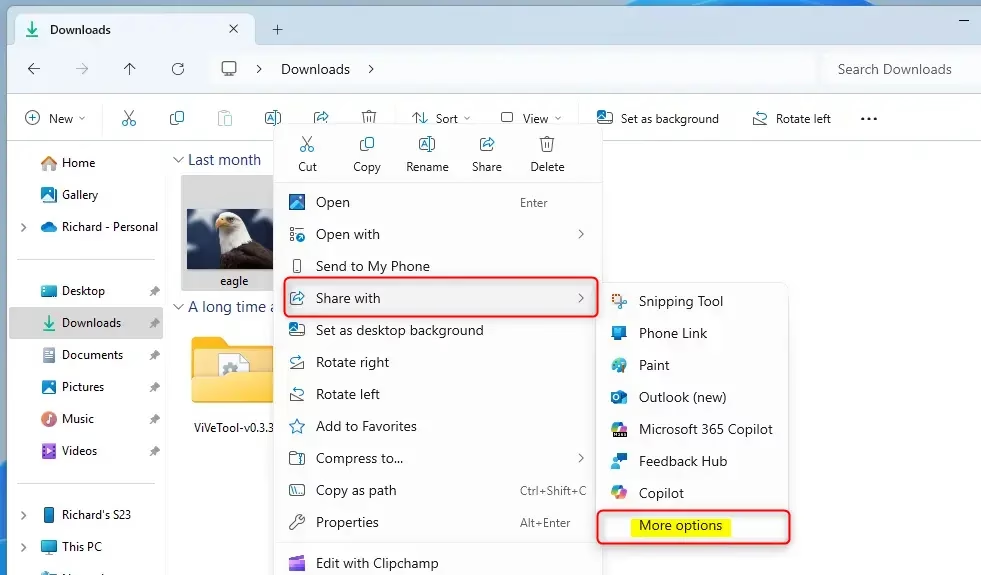
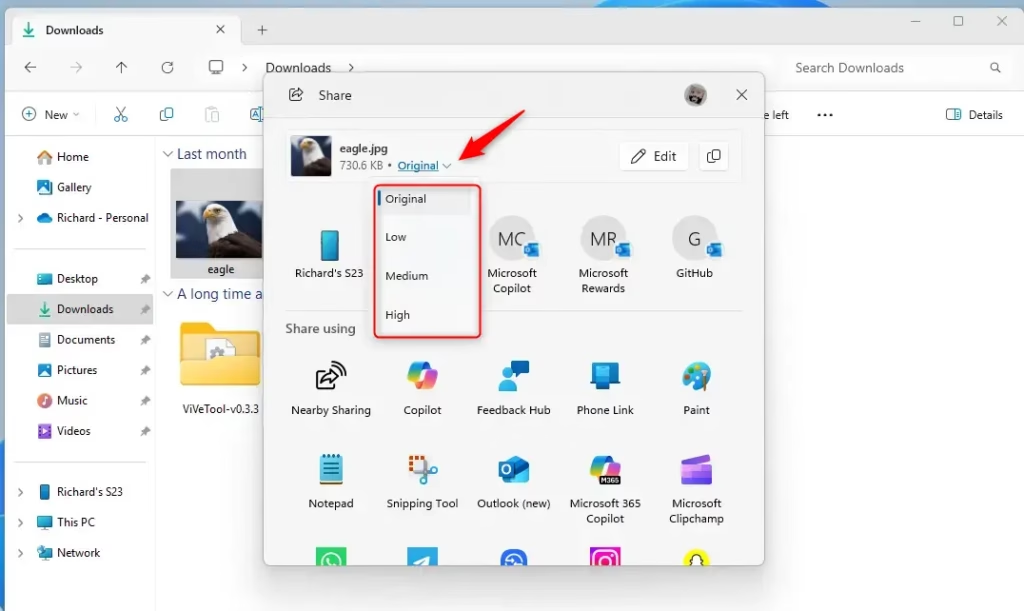
Once the option is available, compressing an image takes only a few clicks. Right-click your photo and open the share menu. The share window gives you a choice of High, Medium or Low quality, which shrinks the picture before it goes to the other person. You do not need a separate photo editor.
If you do not see the quality choices, the feature is probably not enabled yet. Check that you are on build 26120.4151 or newer and that you restarted after running the ViVeTool command. The steps below show the full sequence.
- Find the image file you want to share (like a photo or screenshot).
- Right-click on the image file.
- Choose Share from the menu.
- In the sharing window, click on More options (usually a dropdown menu).
- Pick the quality you want: Original (no compression), High, Medium, or Low.
Choosing Medium or Low cuts file size substantially. The smaller files send faster and take up less disk space. As a rule of thumb, use High for photos someone may want to print or edit, and Medium for everyday email and messaging. Keep Low for quick snapshots where detail does not matter. Check the result before you send it. If the picture looks too soft, share it again at a higher setting.
Summary
- Windows 11 lets you pick image quality when sharing pictures to control file size.
- You can choose from High, Medium, or Low compression levels.
- Use ViVeTool and a simple command to enable this feature if you don't see it yet.
- Compressing images helps you share pictures faster and saves storage space.
In short, Windows 11 can compress images from the sharing menu, with High, Medium and Low quality levels. This helps you send pictures faster and save storage space without installing extra software. If the feature is hidden on your computer, you can turn it on with ViVeTool and a single command in Windows Terminal. Remember that you need build 26120.4151 or newer, an administrator terminal, and a restart afterwards.
Have a question about this guide?
Answered by AI from this guide. Good questions may be added to this page — please don't include personal details.
Did this guide fix your problem?

About the Author
Richard
Tech Writer, IT Professional
Richard is a writer at Geek Rewind who turns complex IT tasks into clear, step-by-step guides. He draws on years of hands-on experience in system administration and enterprise IT operations, focusing on Windows, Linux and WordPress: the problems people actually run into, and the fixes that work. His server and WordPress guides come from systems he runs himself. Richard builds and maintains the platform behind Geek Rewind, from its Ubuntu servers and Nginx configuration to its custom WordPress plugins. Many new tutorials start with readers' questions, and he's always glad to answer them in the comments.
No comments yet — be the first to share your thoughts!