How to Change the Registered Owner Name in Windows 11
To change the registered owner name in Windows 11, you’ll need to edit the Windows Registry.
Windows stores your registered owner name and organization as metadata, usually reflecting what you used during setup. While you won’t see this information during normal use, some older applications might display it.
Updating these details ensures accuracy, especially if the PC has changed hands or if you want to refresh your personal information. You can modify these settings yourself.
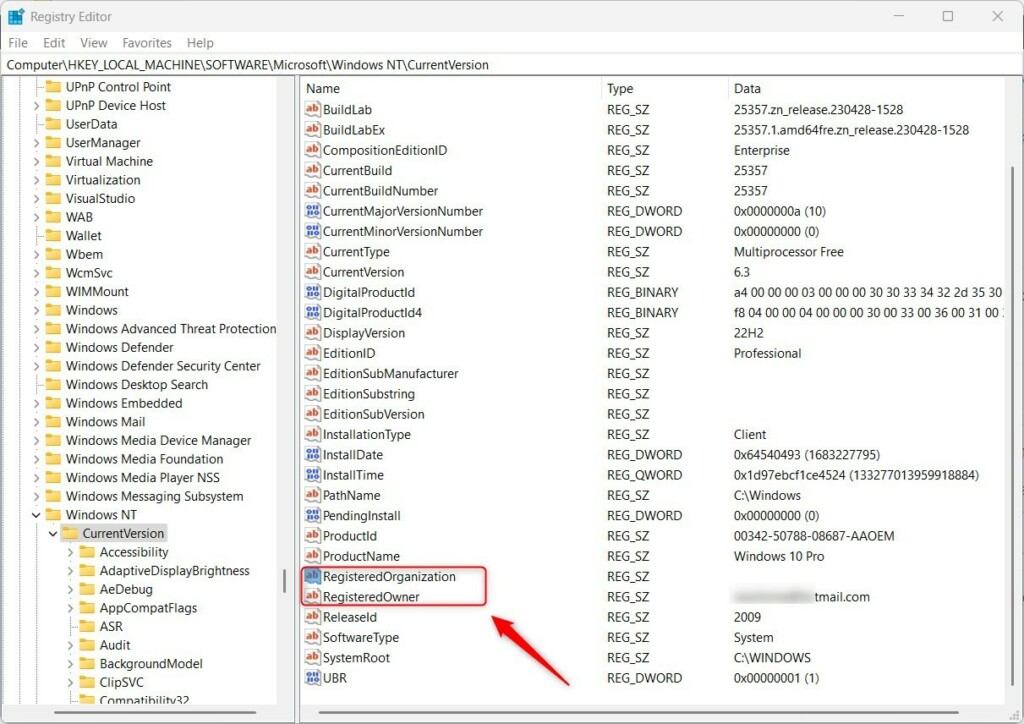
Edit the Windows Registry to change the registered owner name in Windows 11. Open Registry Editor, navigate to 🗝️HKEY_LOCAL_MACHINESOFTWAREMicrosoftWindows NTCurrentVersion, and update the RegisteredOwner value. You can verify the change by typing winver in the Run box.
Step-by-Step: Change Owner and Organization Name
⚠️ IMPORTANT: Admin Privileges Required — Changing these settings involves editing the Windows Registry. Be careful and follow the steps exactly. It’s a good idea to back up your registry before you start.
Open the Registry Editor:
- Click the Start button or press the Windows key.
- Type
regeditand press Enter. - If a security box pops up, click Yes.
Go to the Registry folder:
- Find this folder inside the Registry Editor:
HKEY_LOCAL_MACHINE\SOFTWARE\Microsoft\Windows NT\CurrentVersion
Find the owner and organization names:
- In the right-hand pane, look for
RegisteredOwnerandRegisteredOrganization. - If you don’t see
RegisteredOrganization, right-click on an empty space on the right. Choose New → String Value. Name itRegisteredOrganization. - Do the same for
RegisteredOwnerif it’s missing.
Change the names:
- Double-click on
RegisteredOwner. Enter the new owner name you want. Click OK. - Double-click on
RegisteredOrganization. Enter the organization name or leave it blank. Click OK. - Close the Registry Editor.
Check your changes:
- Press ⊞ Win+R to open the Run box.
- Type
winverand press Enter. - A window will pop up showing the Windows version. You’ll see the registered owner and organization names.
Why Change This Information?
- Some apps use this info to show who owns the PC.
- It helps keep your computer details accurate. This is especially helpful if you’re using it at work or in a company.
- It can be useful when troubleshooting or managing licenses for software.
You might want to change the owner name in Windows 11 if you bought a used computer and need to update the details, or if you simply need to correct your personal information. Some programs use this owner name, and keeping it accurate can help with managing software licenses or troubleshooting issues.
Summary
You can change the registered owner name in Windows 11 by editing the Windows Registry, which is helpful for keeping your PC details accurate.
How to change registered owner name in 🪟 Windows 11?
How do I change the Registered Owner in Windows 11 or Windows 10? Open the Registry Editor (regedit), navigate to 🗝️HKEY_LOCAL_MACHINE\SOFTWARE\Microsoft\Windows NT\CurrentVersion, double-click RegisteredOwner, edit the value, and click OK.
Was this guide helpful?

About the Author
Richard
Tech Writer, IT Professional
Richard, a writer for Geek Rewind, is a tech enthusiast who loves breaking down complex IT topics into simple, easy-to-understand ideas. With years of hands-on experience in system administration and enterprise IT operations, he’s developed a knack for offering practical tips and solutions. Richard aims to make technology more accessible and actionable. He's deeply committed to the Geek Rewind community, always ready to answer questions and engage in discussions.


No comments yet — be the first to share your thoughts!