How to Change Mouse Scrolling Direction in Windows 11


Changing the mouse scrolling direction in Windows 11 lets you decide how your mouse wheel moves content on your screen. The setting controls whether rolling the wheel down moves the page down or up. Windows may have reversed your scrolling after an update, or you may simply prefer a different feel, for example the same as on a Mac or a phone.
You can change it in two ways. The Settings app is the quickest and works for most people. The Registry Editor is the fallback for when the Settings option is missing or does not affect your mouse. It is also useful if you want to set the direction for one particular mouse.
Open Settings Bluetooth & devices Mouse, then select your preferred option from the Scrolling direction dropdown menu. Down motion scrolls down is the Windows default; Down motion scrolls up reverses it. The change applies immediately.
Option 1Change Scroll Direction Using Windows Settings (The Easy Way!)
This is the method to try first. It needs no extra software and no restart. It lets you choose whether scrolling down moves the page down (the Windows default) or moves it up.
Open Windows Settings
- Press Win+I on your keyboard.
- Or click the Start button and select the gear icon labeled Settings.
The Settings window should now be open, with a list of categories down the left side.

Go to Mouse Settings
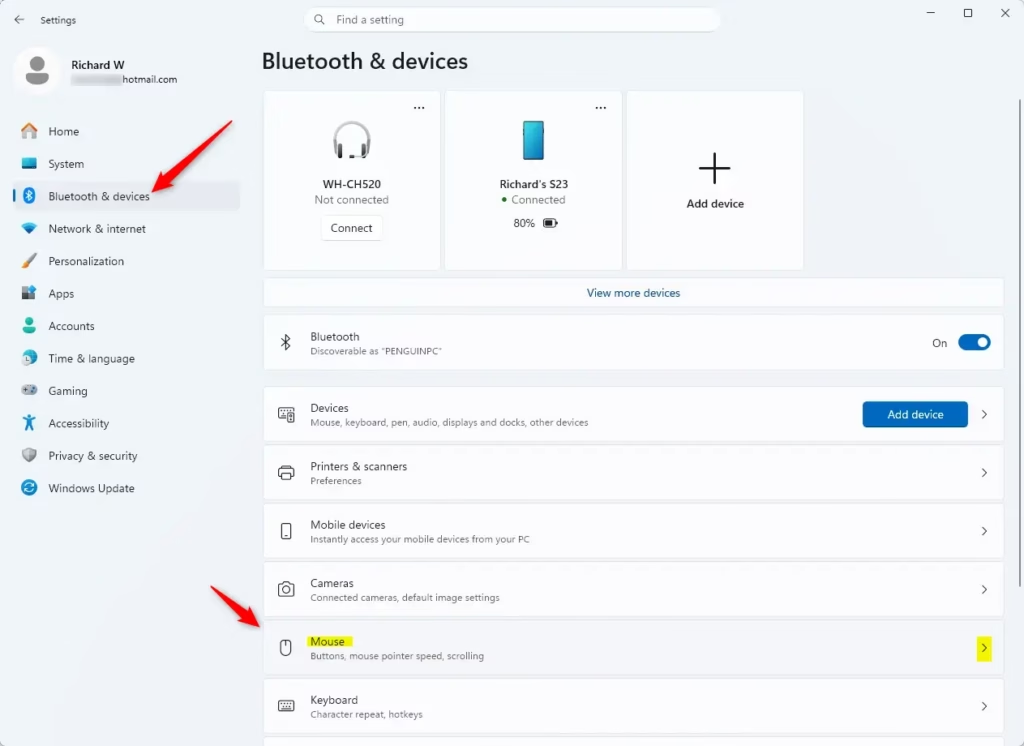
- Click Bluetooth & devices in the left-hand navigation pane.
- On the right side, click Mouse.
You should now see the mouse options, such as the primary mouse button and the pointer speed. The scrolling options are further down the same page. If you are on a laptop, the page is only useful for a connected mouse. Touchpad scrolling is set separately under Bluetooth & devices Touchpad Scroll & zoom.
Choose Your Scrolling Direction
The Mouse page has a Scrolling direction drop-down menu. Open it and you will see two options:
- Down motion scrolls down: This is the traditional Windows behavior and the default. When you roll the wheel towards you, the page moves down. When you roll it away from you, the page moves up.
- Down motion scrolls up: This is the reverse, often called "natural scrolling." It works like dragging a page with your finger on a touchscreen or a Mac. When you roll the wheel towards you, the content moves up. When you roll it away from you, the content moves down.
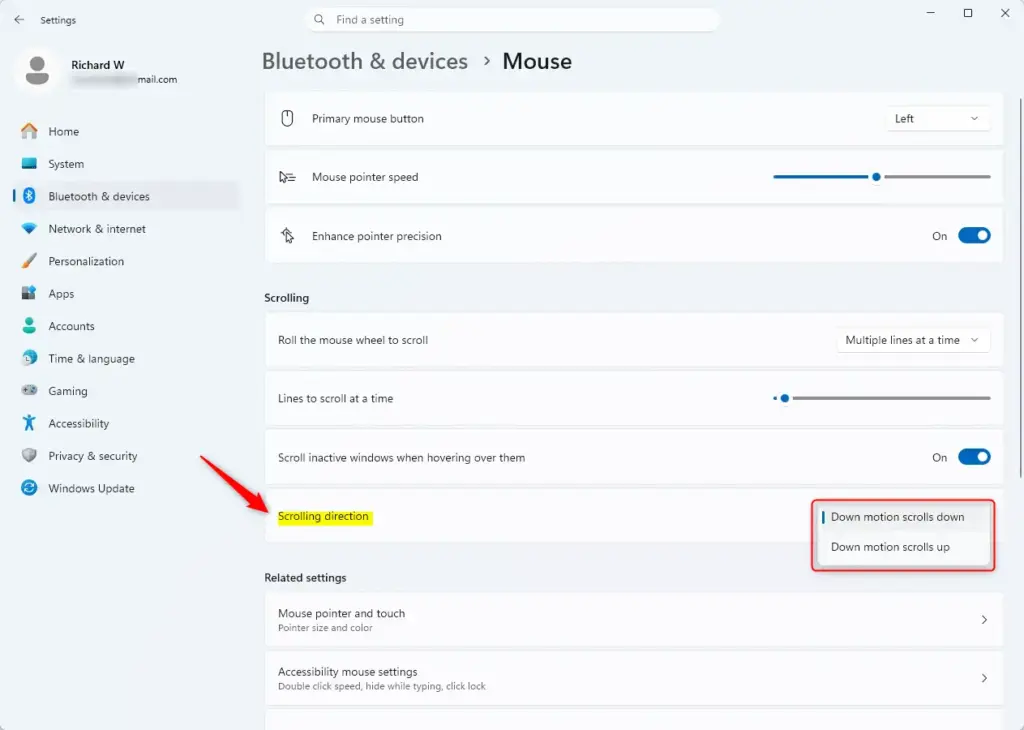
Pick the option that feels most comfortable. You can come back and change it at any time. To undo the change, choose the other option in the same menu.
Close Settings
Close the Settings window. The change applies immediately, with no restart or sign-out. Open a long document or a website and roll the wheel to test it. If the direction did not change, the Registry method below may help. This can happen with some mice that ship with their own driver software.
Option 2Change Scroll Direction Using the Registry Editor (For Advanced Users)
The Registry Editor is the fallback for when the Settings option does not work for your mouse. The scroll direction is stored per device, under the HKEY_LOCAL_MACHINE\SYSTEM\CurrentControlSet\Enum\HID key. Because of this, the change applies only to the mouse whose entry you edit. This method works on both Windows 11 Home and Pro.
It means editing one value in the Registry. The steps below take you to the right place and show you what to change.
Open Registry Editor
- Press Windows key + R to open the Run dialog box.
- Type
regeditand press Enter, or click OK. - If a User Account Control prompt appears, click Yes.
The Registry Editor window should now open, with a folder tree in the left pane.
A wrong change can cause serious problems with Windows. Back up first. In Registry Editor, click File Export, choose All as the export range, and save the file somewhere safe. To restore it later, double-click the saved file and confirm the merge. Creating a restore point beforehand is also a good idea.
Go to the Desktop Key
In the left pane, expand HKEY_LOCAL_MACHINE\SYSTEM\CurrentControlSet\Enum\HID. You can click through the folders, or paste the path into the address bar at the top of the Registry Editor and press Enter.
Under HID you will see several device folders, usually named like VID_xxxx&PID_xxxx. Each one has one or more sub-folders for individual device instances. Inside those, look for a key called Device Parameters. Your mouse is the one whose Device Parameters key contains the scroll value in the next step. You may need to check a few entries. If you have more than one mouse, each has its own entry.
Find the ReverseMouseWheelDirection Value
Once you have found the right Device Parameters key, look in the right-hand pane at the list of values. Find the one named FlipFlopWheel.
Change the Value
A data value of 0 keeps the default scrolling direction. A data value of 1 reverses it. Double-click the value to open a small window where you can change its data.
- To keep the default direction, make sure the Value data is
0. - To reverse the direction, change the Value data to
1.
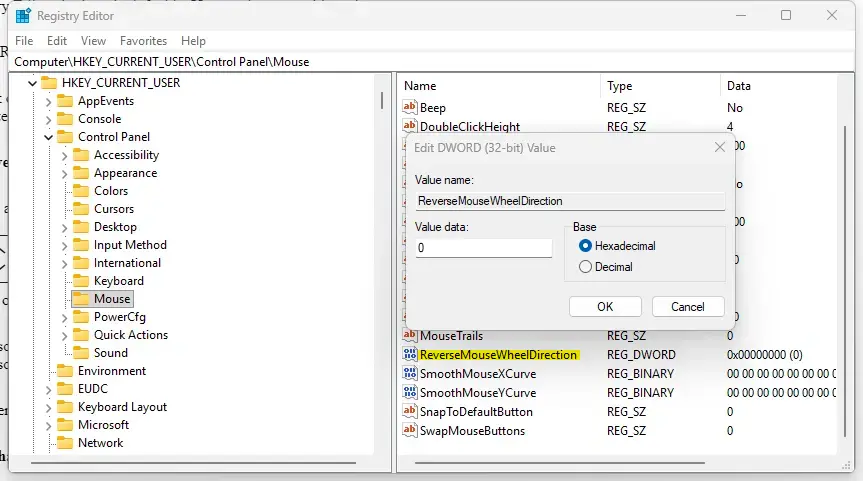
Click OK after entering your value. The window closes and the new data appears next to the value name in the right-hand pane.
Apply the Changes
The change does not take effect straight away. Restart your computer, which is usually the most reliable option. Signing out and back in, or unplugging and reconnecting the mouse, can also work. Restarting is the simplest choice if you are unsure.
Test Your Mouse
After the restart, open a document or a website and test the scroll wheel. It should now scroll in the direction you chose. If it did not change, you may have edited the wrong device entry, so go back and check the other VID_ folders. To undo the change, set the value data back to its previous number and restart again, or import the backup file you exported earlier.
Summary
Changing the scrolling direction in Windows 11 is a small tweak that can make daily use much more comfortable. Try the Settings app first, since it is fast and easy to undo. Use the Registry Editor only if Settings does not work for your mouse, and back up before you start.
Was this guide helpful?

About the Author
Richard
Tech Writer, IT Professional
Richard is a writer at Geek Rewind who turns complex IT tasks into clear, step-by-step guides. He draws on years of hands-on experience in system administration and enterprise IT operations, focusing on Windows, Linux and WordPress: the problems people actually run into, and the fixes that work. His server and WordPress guides come from systems he runs himself. Richard builds and maintains the platform behind Geek Rewind, from its Ubuntu servers and Nginx configuration to its custom WordPress plugins. Many new tutorials start with readers' questions, and he's always glad to answer them in the comments.




No comments yet — be the first to share your thoughts!