How to Change Mouse Hover Time in Windows 11

Mouse hover time controls how long your pointer has to rest on an item before Windows acts on it. Windows 11 uses it, and the same setting also exists in Windows 7 and Windows 8, so the idea carries over if you work on older machines.
Press Win+R, type regedit and press Enter. Navigate to 🗝️HKEY_CURRENT_USER\
What is Mouse Hover Time?
Mouse hover time is the short pause between the moment you stop moving the pointer over an item and the moment Windows reacts. It is measured in milliseconds (1,000 milliseconds is one second). A shorter time makes the interface feel quicker. A longer time makes it feel more deliberate, which helps if you often trigger previews by accident.
You will notice hover time in two places:
- On the taskbar, where you hover over an icon and wait for the small preview of the open window to appear.
- In File Explorer , if you use the “Single-click to open an item (point to select)” option. In that case, hovering over a file or folder selects it automatically.
The default hover time in Windows 11 is 400 milliseconds, a bit under half a second. You can make it faster or slower to match how you work. If you change it and don’t like the result, set it back to 400 to return to the default.
New in 🪟 Windows 11
If you don’t see them, your PC is probably on an older build, so run Windows Update and check again. Hover time is not one of those options, so for this change you still have to use the Registry Editor.
Before you start, keep a few things in mind:
- Sign in with an account that has administrator rights. Without them, the Registry Editor may open but refuse to save your change.
- Back up the registry or create a restore point first. A wrong edit in the Registry Editor can cause problems, and a backup gives you an easy way to undo it.
- Write down the current value before you change it. That makes it simple to put things back.
- After you save a new value, you may need to sign out and back in, or restart, before Windows applies it.
How to Change Mouse Hover Time
Changing your mouse hover time in Windows 11 is possible using a built-in tool called the Registry Editor. This lets you adjust the delay before actions happen after you stop moving your mouse. You'll need to open the Registry Editor and locate a specific setting to adjust this hover time, influencing how quickly your computer responds to mouse movements.- Open Registry Editor:
- PressWindows key + Ron your keyboard.
- Typeregeditand pressEnter.
- If prompted, click Yes to allow changes.
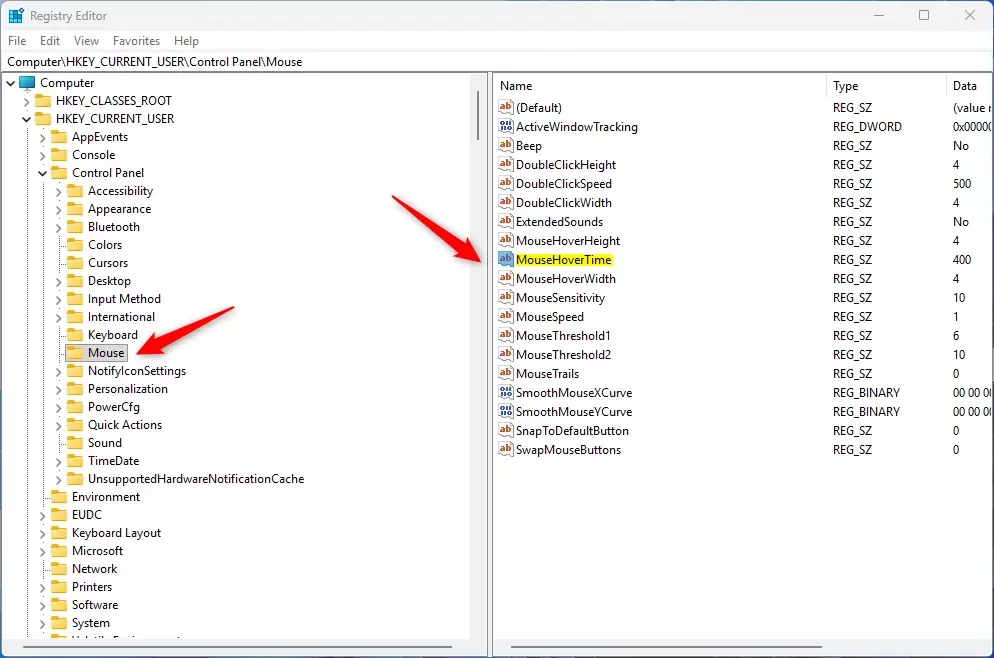
- Go to this folder in Registry Editor:
HKEY_CURRENT_USER\Control Panel\Mouse
You can expand the folders on the left side to find it.
- Change the hover time:
- On the right side, find the entry namedMouseHoverTime.
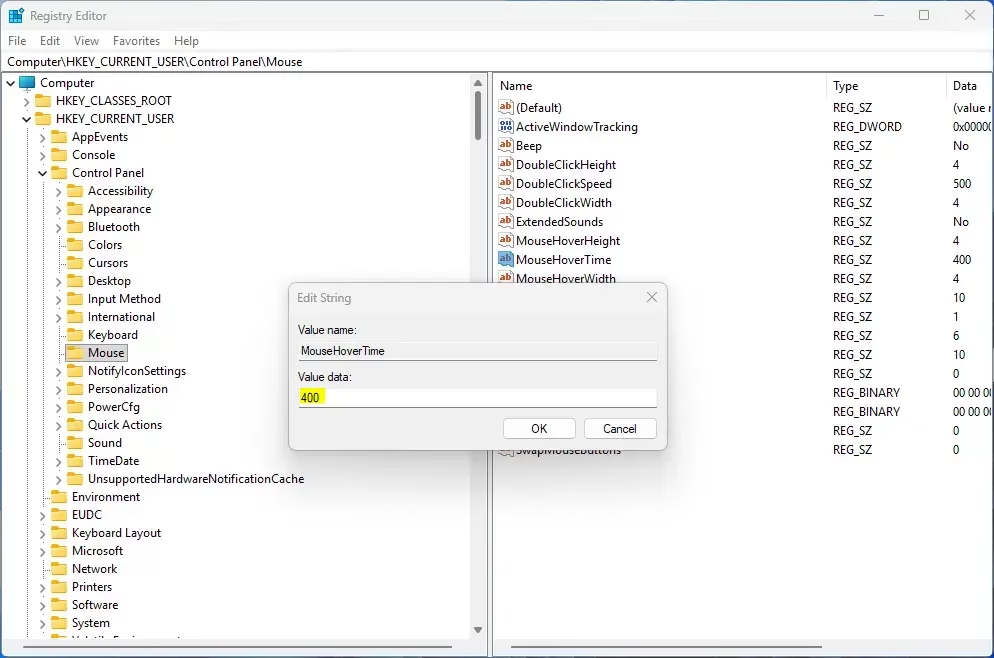
- Double-click it to open.
- Enter the number of milliseconds you want (for example, 1000 = 1 second).
- Click OK.
- Close Registry Editor.
- Restart your PC or sign out and sign back in to apply the change.
Quick Tips
- Default Time: 400 milliseconds (0.4 seconds)
- Faster Response: Use smaller numbers (like 200) for quicker hover reactions.
- Slower Response: Use larger numbers (like 1000) if you want more time before things happen.
Summary
Adjusting your mouse hover time can make your computer easier to use by speeding up actions or preventing accidental clicks. If you want to explore other mouse adjustments in Windows 11, you can find more options. Go to Settings, then Accessibility, and finally Mouse pointer and touch to see what else you can customize.
If you want to explore more mouse settings, go to Settings Accessibility Mouse pointer and touch in Windows 11.
Here’s a Microsoft guide: How to open and use Registry Editor
Have a question about this guide?
Answered by AI from this guide. Good questions may be added to this page — please don't include personal details.
Did this guide fix your problem?

About the Author
Richard
Tech Writer, IT Professional
Richard is a writer at Geek Rewind who turns complex IT tasks into clear, step-by-step guides. He draws on years of hands-on experience in system administration and enterprise IT operations, focusing on Windows, Linux and WordPress: the problems people actually run into, and the fixes that work. His server and WordPress guides come from systems he runs himself. Richard builds and maintains the platform behind Geek Rewind, from its Ubuntu servers and Nginx configuration to its custom WordPress plugins. Many new tutorials start with readers' questions, and he's always glad to answer them in the comments.
No comments yet — be the first to share your thoughts!