How to Change Your Screen Resolution in Windows 11

Screen resolution controls how sharp text looks and how much space you have on your desktop by changing the total number of pixels on your display. Standard 1080p screens use 1920 by 1080 pixels, while higher 4K displays pack in even more detail for much clearer images.
Right-click any empty space on your desktop, select Display settings, and choose the size that works best for your eyes whenever things look too small to read or icons take up too much room.
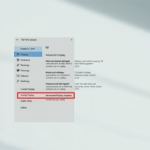
Open Settings by pressing Win+I, then navigate to System Display. Select your desired screen resolution from the drop-down menu under Display resolution and click Keep changes. Your screen will revert to the previous setting if you don’t confirm within 15 seconds.
What is Screen Resolution?
Screen resolution refers to the total number of individual dots, known as pixels, that make up the image on your display. Packing more pixels onto the panel gives you a sharper picture with smaller text and icons, while dropping the pixel count makes items larger at the cost of some clarity. Choosing the right screen resolution helps you balance text readability with workspace size.
For example:
- 1600 x 1200 pixels: Clear and sharp, but items look smaller.
- 800 x 600 pixels: Items look bigger but less sharp.
Your monitor can only use certain resolutions, depending on its type:
- Old monitors (CRT) usually work well at 800×600 or 1024×768.
- Newer monitors (LCD, LED) and laptops often support higher resolutions like 4K and look best at their “native” resolution (the one made for them).
How to Change Screen Resolution in 🪟 Windows 11 Settings
- Press
Win + Ion your keyboard to open Settings. - Click on System on the left, then select Display on the right.
- If you have more than one screen, click on the display number you want to change.
- Under Display resolution, click the drop-down menu and pick the resolution you want.
- Click Keep changes if the new resolution looks good. If not, wait 15 seconds and it will switch back automatically.
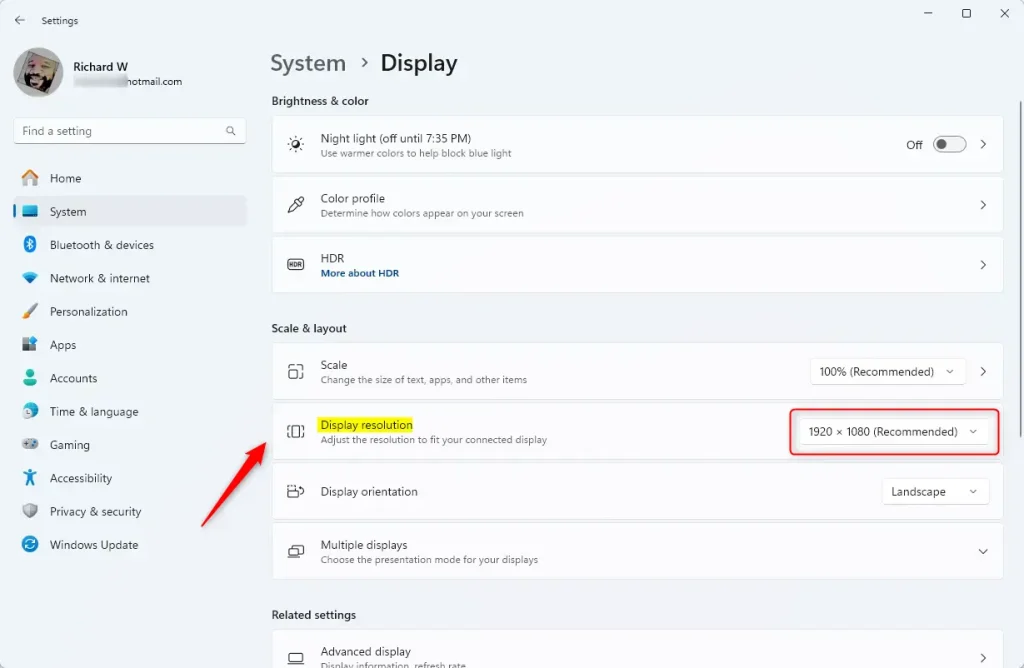
You can change screen resolution in Windows 11 through the main system settings app. Press Win + I on your keyboard to open Settings, go to System, and click Display. From there, find the display resolution drop-down menu and pick the size that looks best for your monitor before confirming the changes.
More Ways to Change Resolution
1Using Advanced Display Settings
- Open Settings (
Win + I) > System > Display. - Click Advanced display.
- Select your display, then click Display adapter properties.
- In the new window, go to the Adapter tab and click List All Modes.
- Choose the resolution and refresh rate you want, then click OK twice.
- Click Keep changes if it looks good, or it will revert in 15 seconds.
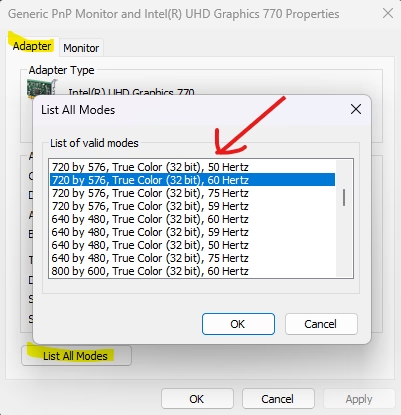
You can use advanced display settings to change screen resolution when standard options do not show the mode you need. Open Settings, go to System, click Display, and open the Advanced display menu. This path lets you open adapter properties and view every single resolution and refresh rate your graphics card supports.
2Using NVIDIA Control Panel (if you have NVIDIA Graphics)
You can change screen resolution using the NVIDIA Control Panel if your computer uses an NVIDIA graphics card. Open the control panel from your Start menu, click Change resolution under the Display list on the left side, select your monitor, and apply your preferred settings to update the display.
- Open the NVIDIA Control Panel from the Start menu.
- Click on Change resolution under Display on the left side.
- Select your display, pick a resolution from the Resolution list, and click Apply.
- Confirm by clicking Yes within 20 seconds or it will revert.
3Using Intel Graphics Control Panel (if you have Intel Graphics)
You can change screen resolution using the Intel Graphics Control Panel if your computer runs on Intel graphics hardware. Open the control panel by right-clicking your desktop or launching the app, click the Display icon, and choose your preferred monitor resolution from the available options.
- Open the Intel Graphics Control Panel Intel Graphics Control Panel.
- Click on the Display icon.
- If you have multiple displays, select the one you want to change from the drop-down menu.
- Choose a resolution from the list and click Apply.
- Confirm by clicking Yes within 15 seconds.
Helpful Tips
You should try different settings when you change screen resolution to see what looks clearest on your monitor. Your screen's native resolution almost always offers the sharpest picture, and you do not need to worry if a new setting looks wrong because Windows automatically reverts the change after a few seconds.- Try different resolutions to find what looks best for you.
- If your screen goes blank or looks wrong, don't worry! Windows will automatically go back to the old settings after a few seconds.
- Use the native resolution for the sharpest and clearest screen.
- Remember: Higher resolutions fit more on the screen, but items look smaller.
Need More Help?
If you want to learn more about screen resolution and display settings, check out the official Microsoft guide here: Change your screen resolution and layout in Windows - Microsoft Support
Summary
Changing your screen resolution in Windows 11 affects how clear and large things appear on your screen.
Was this guide helpful?

About the Author
Richard
Tech Writer, IT Professional
Richard, a writer for Geek Rewind, is a tech enthusiast who loves breaking down complex IT topics into simple, easy-to-understand ideas. With years of hands-on experience in system administration and enterprise IT operations, he’s developed a knack for offering practical tips and solutions. Richard aims to make technology more accessible and actionable. He's deeply committed to the Geek Rewind community, always ready to answer questions and engage in discussions.

No comments yet — be the first to share your thoughts!