How to Add or Remove Mixed Reality Pane in Windows 11
Adding or removing the Mixed Reality pane in Windows 11 lets you control whether this specific section for virtual reality hardware appears in your Settings app.
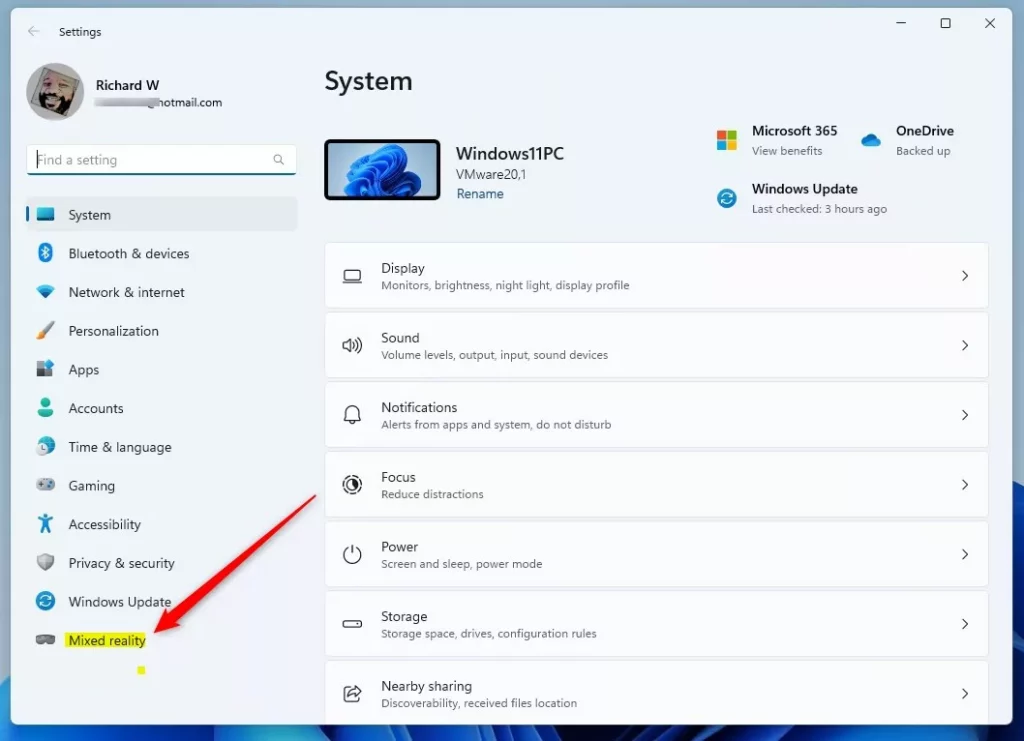
The Mixed Reality pane is a dedicated area within Windows 11 Settings used to set up and manage your VR devices, like defining your play space.
You can find this setting under the System section of the Settings app. If you don’t use VR equipment, removing the pane can make your Settings app quicker to open and less cluttered.
To add or remove the Mixed Reality pane, open the Registry Editor and navigate to 🗝️HKEY_CURRENT_USER\Software\Microsoft\Windows\CurrentVersion\Holographic. Create or modify the DWORD value named FirstRunSucceeded, setting it to 1 to show the pane or 0 to hide it.
Important Deprecation Notice: Windows Mixed Reality
Important Notice: Windows Mixed Reality is being removed from Windows 11. After updating to version 24H2, the old Mixed Reality Portal will stop working. You’ll need to use a different platform. If you own a VR headset, look into alternatives such as SteamVR or software from the headset’s manufacturer.
Mixed Reality Portal vs. Mixed Reality Link
Windows 11 previously offered a Mixed Reality Portal for VR. Now, a newer app called Mixed Reality Link helps connect specific hardware.
| Feature | Mixed Reality Portal | Mixed Reality Link |
|---|---|---|
| Status | Deprecated | Active/Transitionary |
| Function | Full VR Environment | Connection Bridge |
| Compatibility | Legacy Headsets | Modern VR Hardware |
Connecting Your Meta Quest 3
Many users now use the Meta Quest 3 for PC streaming. The old Mixed Reality Portal isn’t necessary for this. Instead, use the Meta Quest Link software or third-party streaming apps. This provides a better experience than the older Windows tools.
Manually Adding or Removing the Mixed Reality Pane
You can add or remove the Mixed Reality pane in Windows 11 by changing a setting in the Registry Editor. This requires administrator permissions. You’ll need to open the Registry Editor and go to a specific location to make the change.
- Open the Windows Registry by pressing the Windows key, typing
regedit, and pressing Enter. - Navigate to this path:
HKEY_CURRENT_USER\Software\Microsoft\Windows\CurrentVersion\Holographic - If you do not see the
Holographicfolder, right-click on theCurrentVersionfolder, select New, and create a Key namedHolographic.
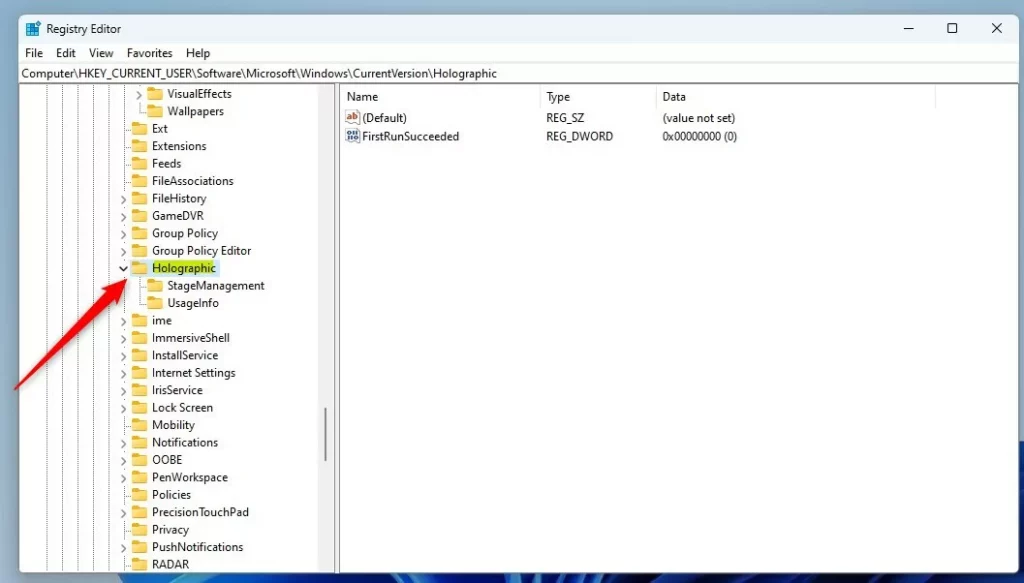
- Right-click inside the empty space on the right side of the
Holographicfolder. - Select New then DWORD (32-bit) Value.
- Name this new value
FirstRunSucceeded. - Double-click
FirstRunSucceededto change its settings. - Set the Value data to
1to show the Mixed Reality button. Set it to0to remove the button.
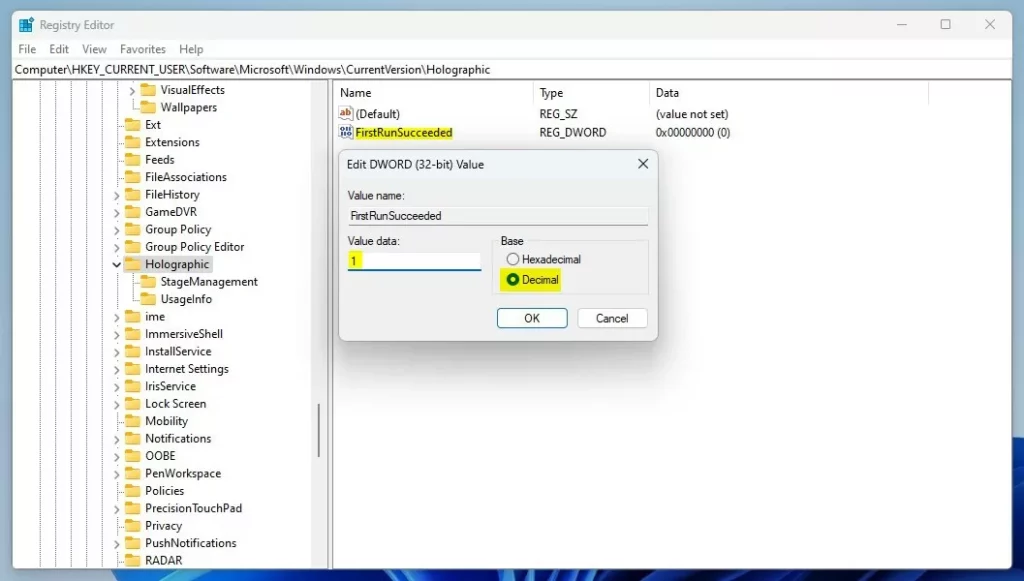
Once you save your changes, open your Windows Settings app to see the results.
Summary
Changing the Mixed Reality pane in Windows 11 is done via the Registry. Keep in mind that Windows Mixed Reality is being replaced, so exploring newer options like Mixed Reality Link is a good idea.
Is Windows Mixed Reality being removed from 🪟 Windows 11?
Yes, Microsoft has officially deprecated Windows Mixed Reality. It is being removed from the operating system starting with the Windows 11 24H2 update. Users are encouraged to transition to alternative VR platforms and software solutions to maintain access to their virtual reality content and hardware functionality.
Can I still use my VR headset after the 🪟 Windows 11 24H2 update?
If your headset relies on the legacy Windows Mixed Reality Portal, it will stop working after the 24H2 update. However, if your device supports SteamVR or uses its own proprietary software, you may still be able to use it by bypassing the Windows-specific VR tools entirely.
Was this guide helpful?

About the Author
Richard
Tech Writer, IT Professional
Richard, a writer for Geek Rewind, is a tech enthusiast who loves breaking down complex IT topics into simple, easy-to-understand ideas. With years of hands-on experience in system administration and enterprise IT operations, he’s developed a knack for offering practical tips and solutions. Richard aims to make technology more accessible and actionable. He's deeply committed to the Geek Rewind community, always ready to answer questions and engage in discussions.


[…] you have finished enabling or installing Windows Mixed Reality, you can remove the software using the Settings […]