How to Enable or Disable Do Not Disturb in Teams During Screen Sharing

Teams usually sets your status to Do Not Disturb automatically during screen sharing. You can confirm or change this by going to Settings Privacy and toggling “Set my status to do not disturb when I’m sharing my screen.
Enable or Disable Do Not Disturb During Screen Sharing
To turn on Do Not Disturb in Teams during screen sharing, open Microsoft Teams and go to Settings Privacy When this option is on, Teams switches your status to Do Not Disturb as soon as you start sharing. Popup notifications and chat banners stay off your screen while you present, so the people in the meeting never see them.
The setting is per account and per device. You only need to set it once on your computer, and it covers every meeting you share in from that machine. The steps below use the current Teams desktop app. Menu labels can differ slightly between the classic and new Teams apps, so if something is named a little differently, look for the closest match.
- Open Microsoft Teams from the Start menu . Type “Teams” in the search box if you can’t find it in the list. Sign in if asked. You should see the main Teams window with your chats and calendar.

- Click the Settings and more (…) button, the three dots at the top of the window, usually next to your profile picture. A drop-down menu opens.

- Select Settings. The settings window opens.
- Click the Privacy tab in the list on the left. The privacy options appear on the right.
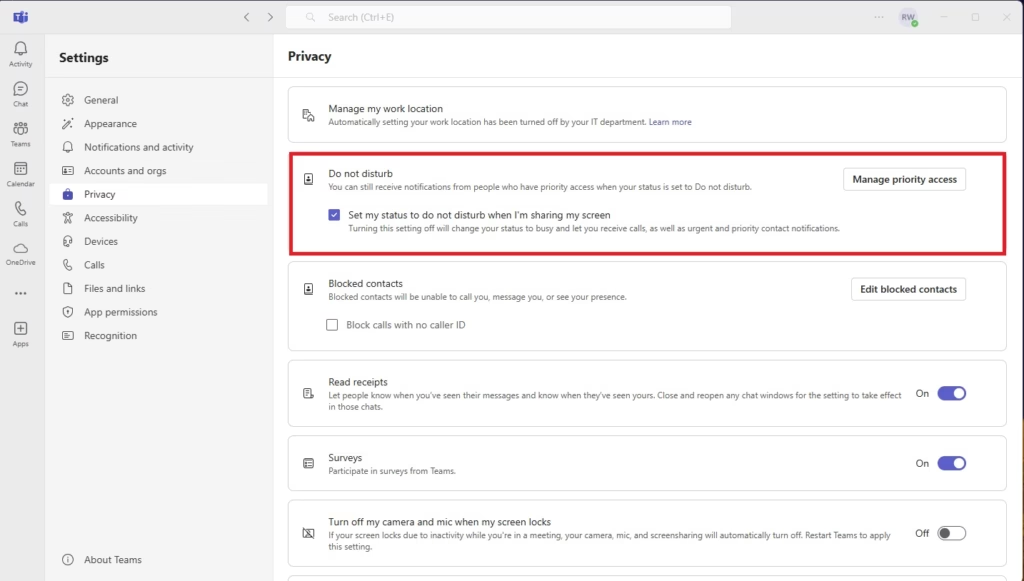
- Find the option ‘Set my status to do not disturb when I’m sharing my screen‘ and switch it on. The toggle should now show as enabled.
No restart is needed. The change applies the next time you share your screen. To undo it, come back to this page and switch the toggle off. If you can’t find the option on the Privacy page, check that Teams is up to date. Some work or school accounts also have settings locked by an administrator.
Managing Priority Access
Some people can still reach you during Do Not Disturb. Priority Access lets you pick specific contacts whose messages get through. A manager or a teammate on the same project is a typical choice. Keep the list short, because every person you add can show a banner on your shared screen.
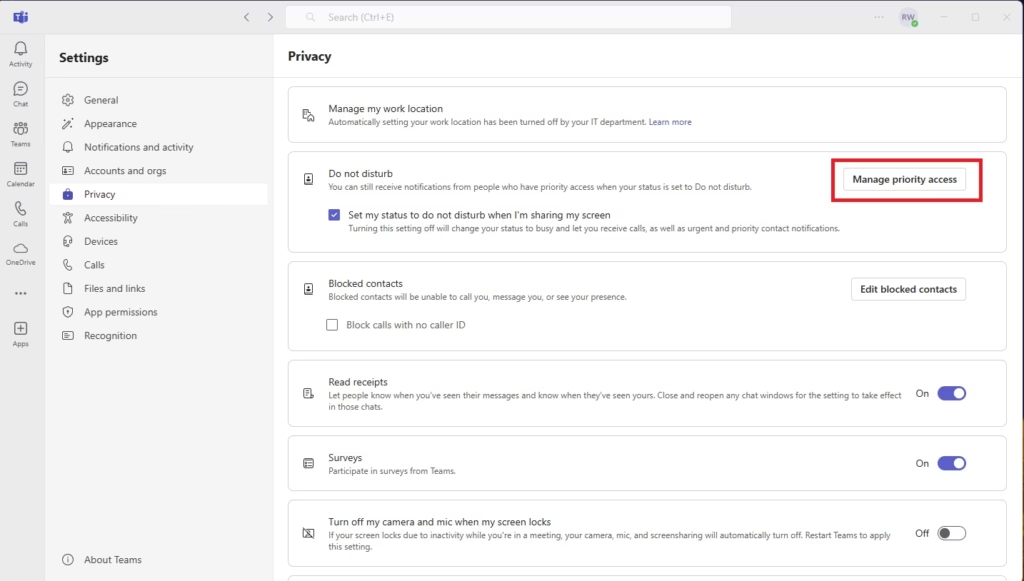
- Open Settings Privacy in Teams, the same page you used above.
- Click Manage priority access. A panel opens where you can add and remove contacts.
- Add the names of the people who should always be able to reach you. Each name you add should appear in the list. To remove someone later, return to this panel and delete their name.
Mobile vs. Desktop Configuration
Settings you configure on your computer may not carry over to your phone automatically, so check the mobile app separately. Open the Teams mobile app, tap your profile picture, and select Notifications. Review the options there.
You can also use Quiet Hours to silence alerts during set times of the day, such as evenings or weekends. This is useful if your phone buzzes while you present from a laptop that is already in Do Not Disturb.
Troubleshooting Notification Bugs
If notifications still appear while Do Not Disturb is active, check the Windows notification settings. Teams needs permission there to display alerts at all, and Windows has its own rules that can override or add to what Teams does. In Windows 11, open Settings System Notifications and look for Microsoft Teams in the app list. Then confirm the notification settings match what you want.
Also check whether another app is the source of the popup. Teams Do Not Disturb only controls Teams alerts, not banners from your email client or other programs.
Status Duration and Scheduling
Status duration and scheduling control how long Do Not Disturb stays on before your status resets. This matters if you set the status by hand rather than relying on screen sharing. A status with no expiry can leave you unreachable long after the meeting ends. Choose a sensible duration and check your status when you finish presenting.
You can also link your Teams status to your computer’s built-in focus tools, so your availability updates automatically.
Go to Settings System Focus in Windows and enable the integration. That helps keep your work and personal time separate without you having to change your status by hand.
Consult the official Microsoft Support status page for further details.
Summary
Teams uses Do Not Disturb to manage notifications and protect your focus. The privacy setting turns it on automatically whenever you share your screen. Priority Access lets chosen contacts still reach you. Check your mobile app and Windows notification settings too, so no alerts slip through on other devices.
Have a question about this guide?
Answered by AI from this guide. Good questions may be added to this page — please don't include personal details.
Did this guide fix your problem?

About the Author
Richard
Tech Writer, IT Professional
Richard is a writer at Geek Rewind who turns complex IT tasks into clear, step-by-step guides. He draws on years of hands-on experience in system administration and enterprise IT operations, focusing on Windows, Linux and WordPress: the problems people actually run into, and the fixes that work. His server and WordPress guides come from systems he runs himself. Richard builds and maintains the platform behind Geek Rewind, from its Ubuntu servers and Nginx configuration to its custom WordPress plugins. Many new tutorials start with readers' questions, and he's always glad to answer them in the comments.
No comments yet — be the first to share your thoughts!