How to Change Mouse Pointer Image in Windows 11

Changing the mouse pointer image in Windows 11 lets you swap the standard white arrow for a custom graphic, a larger size, or a different color scheme. The mouse pointer is the small on-screen icon that tracks your hand movements and shows where you click.
Windows 11 includes 8 built-in pointer color schemes and size options ranging from 1 to 15. You can also pick your own custom picture files to use as pointers for everyday tasks. The steps below are the same on Windows 11 Home and Pro.
Open Settings, click Accessibility, then select Mouse pointer and touch. Under Customize pointer image, choose a built-in style or click Browse to load your own.cur.ani file. The new pointer takes effect immediately without restarting.
Why Change Your Mouse Pointer?
A different pointer can make your computer feel more personal. It can also be easier to see on your screen if you pick a larger or brighter style. This helps on high-resolution displays, where the default arrow can look small, and on busy backgrounds where a white arrow gets lost.
What File Types Do Mouse Pointers Use?
Windows uses two types of pointer files:
- .anianimated pointers that move or blink
- .curstill pointer images that don’t move
C:\Windows\Cursors.But you can use pointer files from anywhere on your computer. If you download a pointer pack, put it in a folder you won’t delete later. Windows reads the file from the location you pick, so if you move or delete it, the pointer can revert to a default.
How to Change Your Mouse Pointer Image
Open Settings, go to Accessibility, and select Mouse pointer and touch. From there, you can pick a different style, make the pointer bigger, or switch to a custom design in just a few clicks.
- Open the Settings app. Click the Start menu (the Windows icon at the bottom left), then click Settings. You can also press the Win+I to open Settings faster. The Settings window should now be open with a list of categories on the left.
- Go to Accessibility. Look at the left side of the Settings window and click Accessibility. The accessibility options appear on the right.
- Find the mouse pointer settings. On the right side, click Mouse pointer and touch. This opens the pointer options. Here you will see the pointer style choices and a size slider (1 to 15) if you only want to change how big or what color the pointer is.
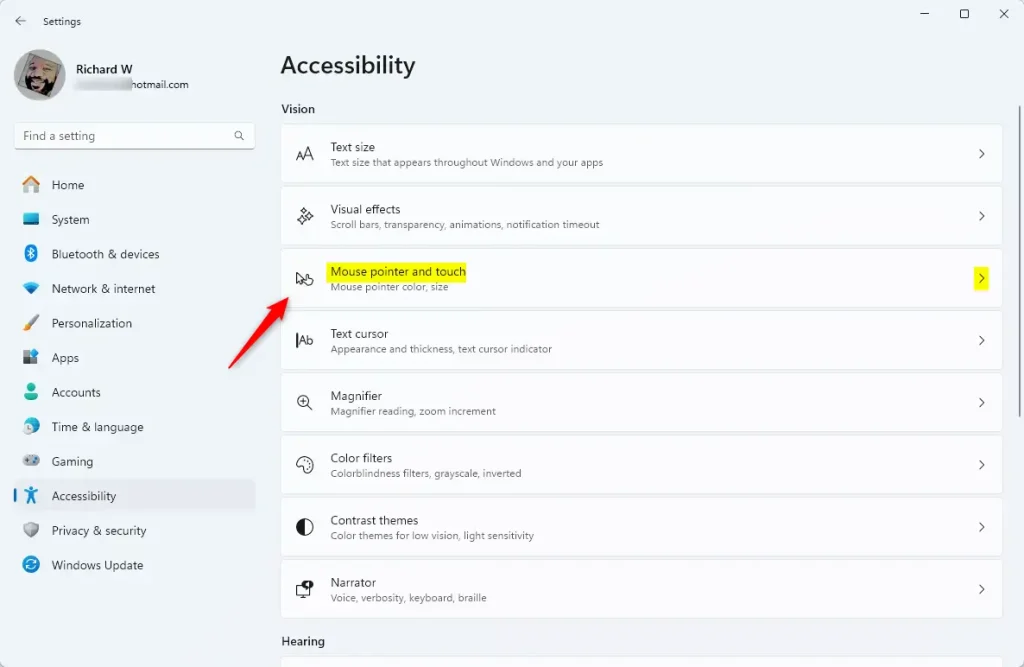
Windows 11 Mouse pointer and touch settings - Expand Customize pointer image. Scroll down and click Customize pointer image. The section opens and shows all the pointer images you can choose from. If you don’t see this section, your build of Windows 11 may be older. Run Windows Update and check again.
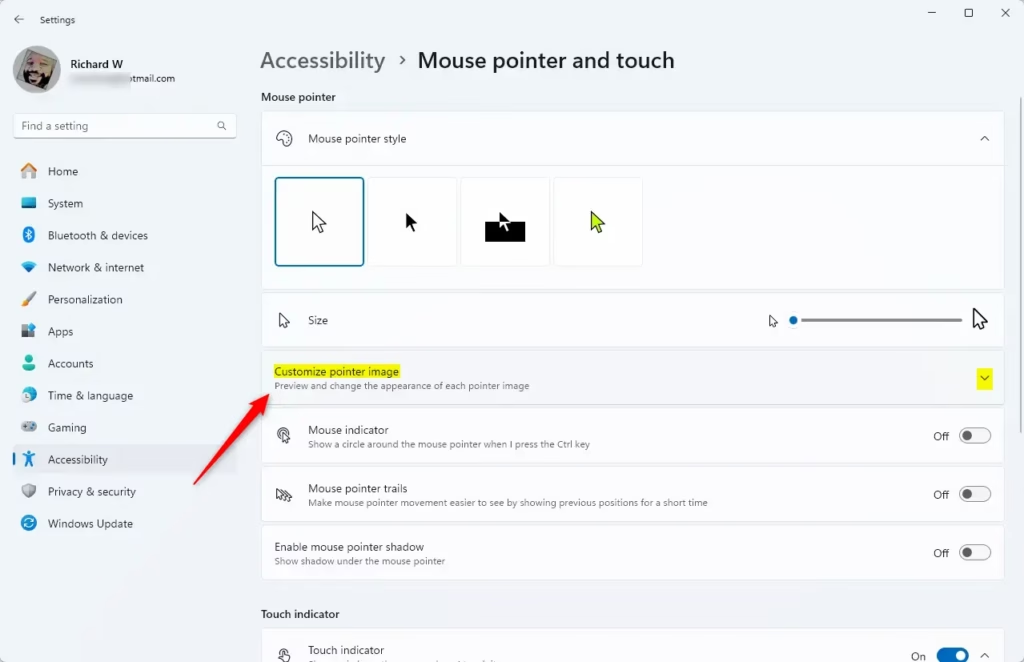
On the Mouse pointer and touch settings pane, expand customize pointer image tile - Pick a pointer image. Look through the pointer images and move your mouse over each one. This shows you what it looks like and what it’s used for. Click the one you want to change, and the new image is applied.
- Use your own pointer image (optional). If you want to use your own picture, click the Browse button. Find and pick a .ani or .cur file from your computer, then confirm your choice. If the file won’t load, check the extension. Ordinary image files such as .png or .jpg won’t work as pointers and must first be converted to .cur.
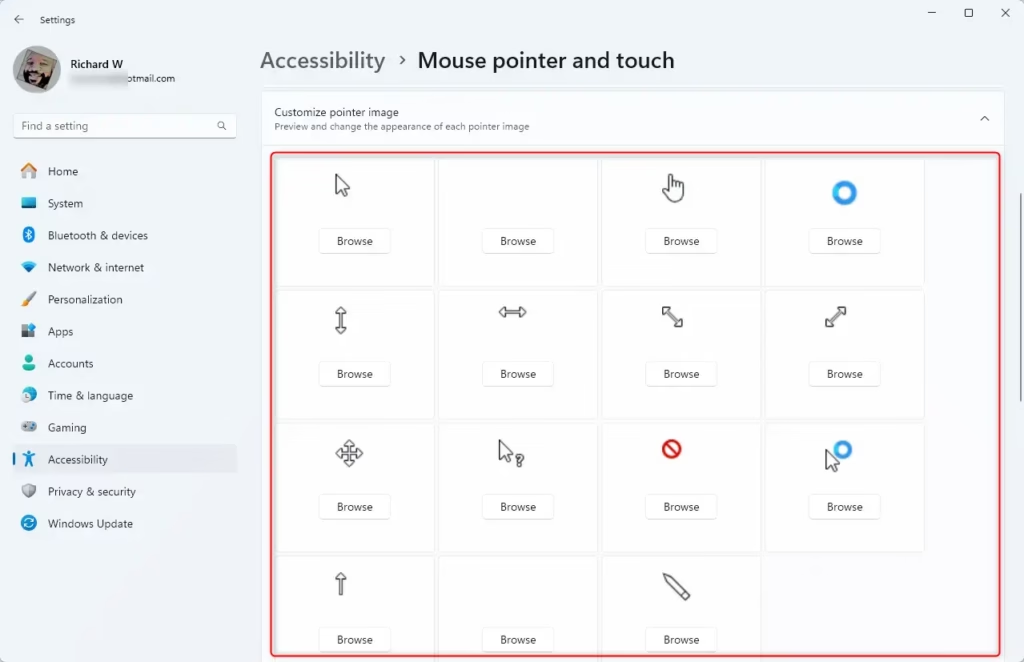
Browse for custom mouse pointer image
Your new pointer starts working right away. You don’t need to restart Windows.
To undo the change, return to Mouse pointer and touch and choose the default white pointer style again. If you swapped in a custom file, you can also pick the original image from the list.
Summary
Customizing your mouse cursor in Windows 11 lets you personalize your screen or improve visibility using built-in themes and sizes. You can use the standard options in the Settings app or load your own cursor files that end with the .cur or .ani format to replace the default pointer completely.
- Windows 11 has built-in mouse pointers you can choose from
- You can also add your own custom pointer images
- Animated pointers use .ani files
- Still pointers use .cur files
- Find these settings in Settings Accessibility Mouse pointer and touch
- You can preview pointers by moving your mouse over them
- You can browse for custom files from your computer
- Your choice takes effect right away, with no restart
You can now customize your mouse pointer appearance in Windows 11 so it matches the way you like to work, whether that means a bigger arrow, a higher-contrast color, or your own design. Further Windows 11 tips are available in a separate guide.
Have a question about this guide?
Answered by AI from this guide. Good questions may be added to this page — please don't include personal details.
Did this guide fix your problem?

About the Author
Richard
Tech Writer, IT Professional
Richard is a writer at Geek Rewind who turns complex IT tasks into clear, step-by-step guides. He draws on years of hands-on experience in system administration and enterprise IT operations, focusing on Windows, Linux and WordPress: the problems people actually run into, and the fixes that work. His server and WordPress guides come from systems he runs himself. Richard builds and maintains the platform behind Geek Rewind, from its Ubuntu servers and Nginx configuration to its custom WordPress plugins. Many new tutorials start with readers' questions, and he's always glad to answer them in the comments.
No comments yet — be the first to share your thoughts!