How to Hide the Mouse Pointer While Typing in Windows 11

Hiding the mouse pointer while typing in Windows 11 keeps the cursor out of your way so it never sits on top of the words you are writing. This built-in setting makes the pointer vanish the moment you press a key.
The pointer comes back as soon as you move the mouse again. You can turn the feature on or off in a few clicks from the Mouse Properties window. The same window is available on Windows 11 Home and Pro, and you do not need a restart.
Open Control Panel Hardware and Sound Mouse, click the Pointer Options tab, then check the box labeled “Hide pointer while typing” and click OK. The pointer disappears immediately when you type and reappears when you move the mouse.
Why Hide the Mouse Pointer While Typing?
Windows 11 hides the mouse pointer during text entry by default, so on most PCs you only need to check that the setting is still on. A clear screen makes typed documents easier to read. If you would rather keep the pointer visible all the time, you can turn the setting off.
If the pointer does not disappear when you type, the box has probably been unchecked, either by you, by another user, or by a mouse driver utility. The methods below show you how to check and change it.
How to Turn On or Off “Hide Pointer While Typing” Using Control Panel
The classic Control Panel is the simplest way to change this setting. The path is Control Panel Hardware and Sound Mouse From there, open the Pointer Options tab and use the Hide pointer while typing check box to control the behavior.
If your Control Panel is set to Large icons or Small icons view instead of Category, you will not see Hardware and Sound. Pick Mouse straight from the list. You can also reach the same window from Settings Bluetooth & devices Mouse Additional mouse settings
- Open the Control Panel from the Start menu on your Windows 11 PC. Type "Control Panel" in the search box and select the result. You should see the Control Panel window with its list of categories. Open the Control Panel
- Click on Hardware and Sound. The page now lists devices, sound, power and similar options.
- Under Devices and Printers, click on Mouse. The Mouse Properties window opens.
- In the Mouse Properties window, click on the Pointer Options tab. This tab holds the pointer speed, snap-to and visibility settings.
- Look for the Visibility section at the bottom of the tab. It lists options such as pointer trails and showing the pointer location.
- Check the box that says "Hide pointer while typing" to turn it on. Uncheck it to turn it off, which is how you undo the change later.
- Click OK to save your changes. The window closes and the setting takes effect right away. Open a text editor such as Notepad and type a few letters to test it. The pointer should disappear while you type and return when you move the mouse.
Here is what the mouse settings window looks like:
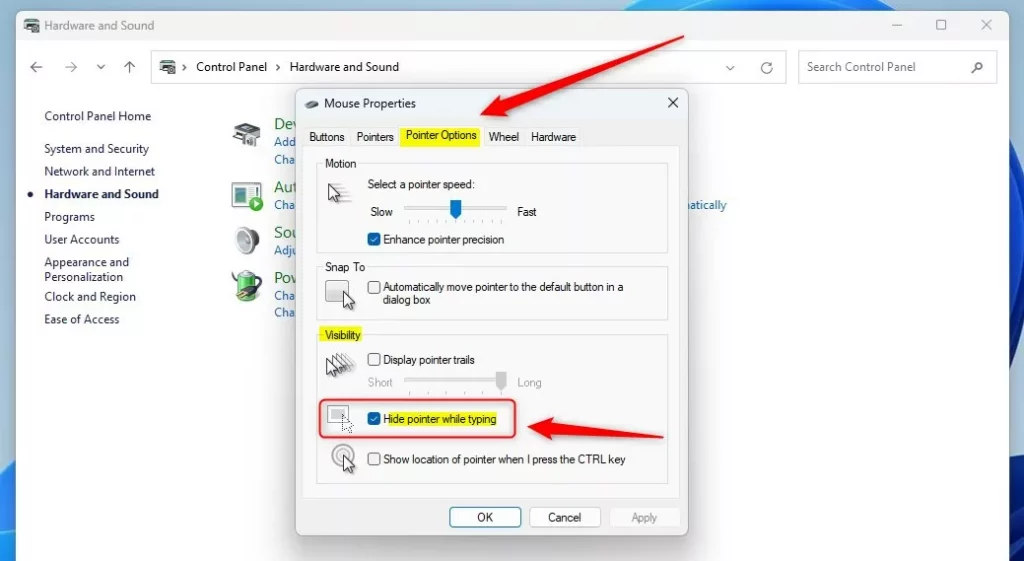
Mouse settings to hide pointer while typing
Alternative: Change the Setting Using Windows Registry Editor
You can also change this setting by editing the Windows Registry, the database where Windows stores its configuration. Use this method only if the Control Panel option does not work for you, for example when the check box is missing or the setting keeps reverting. Open the Registry Editor by typing regedit in the Start menu and pressing Enter. Windows may ask you to confirm with the User Account Control prompt, and you need administrator permissions to make the change.
In Registry Editor, choose File Export, save a copy, and keep it somewhere safe. If something goes wrong, you can double-click that file to restore it. Here's how:
- Open the Registry Editor by typing
regeditin the Start menu search and pressing Enter. Approve the User Account Control prompt if it appears. Open the Windows Registry Editor - Navigate to this folder key:
HKEY_CURRENT_USER\Control Panel\Desktop. You can expand the keys in the left pane one by one, or paste the path into the address bar at the top of the editor. - In the right pane, find UserPreferencesMask. The list is sorted by name, so you may need to scroll.
- Double-click UserPreferencesMask to edit its value. An edit window opens with the current data.
- The setting for "Hide pointer while typing" is part of this value. This guide describes it as follows:
- 0 = feature OFF (show mouse pointer)
- 1 = feature ON (hide mouse pointer)
- Change the value accordingly and click OK. Change only the part that controls this setting. UserPreferencesMask holds several user interface options in one value, so altering other parts can change unrelated behavior.
- Close the Registry Editor and restart your PC for the changes to take effect. To undo the change, set the value back to what it was, or import the backup file you exported earlier.
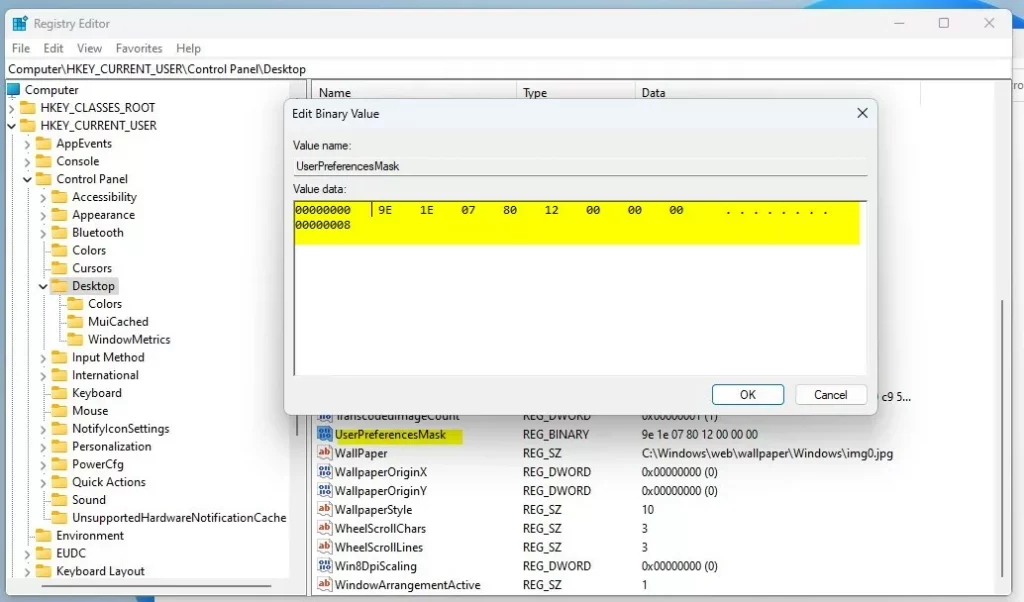
Editing the registry to hide mouse pointer while typing
Things to Remember
Some apps will still show the mouse pointer while typing even after you turn on the setting. Certain third-party programs override system preferences and keep the cursor visible during text entry. Behavior varies from app to app, so do not worry if the pointer stays on screen in some programs. If it happens everywhere, go back to the Control Panel method and confirm the box is checked.
- Not all apps follow this setting. Some might still show the mouse pointer while typing. Test in a basic app like Notepad first to see whether the setting itself is working.
- If you want to try other mouse pointer settings, like showing the pointer location or adding trails, you can explore more options in the Control Panel or online guides. The pointer location and trails options are in the same Visibility section as this setting.
- Changing the registry is for advanced users. A wrong edit can affect other settings, so export a backup first. If you're not comfortable with it, stick to the Control Panel method.
Summary
Hiding the mouse pointer while typing in Windows 11 reduces screen clutter and helps you focus on your text. The Control Panel check box is the quickest way to turn it on or off, and the registry is a fallback for the rare case where that option does not work.
Have a question about this guide?
Answered by AI from this guide. Good questions may be added to this page — please don't include personal details.
Did this guide fix your problem?

About the Author
Richard
Tech Writer, IT Professional
Richard is a writer at Geek Rewind who turns complex IT tasks into clear, step-by-step guides. He draws on years of hands-on experience in system administration and enterprise IT operations, focusing on Windows, Linux and WordPress: the problems people actually run into, and the fixes that work. His server and WordPress guides come from systems he runs himself. Richard builds and maintains the platform behind Geek Rewind, from its Ubuntu servers and Nginx configuration to its custom WordPress plugins. Many new tutorials start with readers' questions, and he's always glad to answer them in the comments.
No comments yet — be the first to share your thoughts!