How to Add or Remove Recycle Bin to Windows 11 File Explorer
Adding or removing the Recycle Bin icon from Windows 11 File Explorer makes it easier to manage deleted files.
The Recycle Bin is a special folder that holds files you delete, letting you get them back if you change your mind. In Windows 11, you can choose to show this handy bin directly in the File Explorer’s side menu.
This small change can speed up how you work by giving you one-click access to your deleted items. It’s a simple way to customize your PC for better efficiency.
Add the Recycle Bin to File Explorer by editing the Windows Registry. Navigate to the specified CLSID folder, create or modify the System.IsPinnedToNameSpaceTree value, setting its data to 1. Restart your PC to see the Recycle Bin in the navigation pane.
What is File Explorer?
File Explorer is the built-in Windows app for finding and managing files and folders on your computer.
What is the Recycle Bin?
The Recycle Bin temporarily stores deleted files. Usually, you find the Recycle Bin icon on your desktop.
Why add Recycle Bin to File Explorer’s side menu?
- Quickly open the Recycle Bin without minimizing or searching for the desktop icon.
- Easily restore deleted files right from File Explorer.
- Keep your desktop clean by removing the Recycle Bin icon from there.
How to add the Recycle Bin to File Explorer’s navigation pane
Adding the Recycle Bin to File Explorer means you can quickly open deleted files. Take your time with this step.
Step 1Open the Windows Registry Editor
- Press Windows key + R on your keyboard.
- Type
regeditand press Enter. - ⚠️ Admin privileges required: If a message pops up asking for permission, click Yes.
The Registry guide on opening the Registry in Windows 11 provides further details for users needing them. This guide explains the steps to access and modify system settings, a key step for customizing File Explorer’s appearance.
Step 2Find the right folder in the Registry
To add or remove the Recycle Bin from File Explorer, you need to locate a specific folder within the Registry Editor.
Computer\HKEY_CURRENT_USER\Software\Classes\CLSID\{645FF040-5081-101B-9F08-00AA002F954E}If the folder {645FF040-5081-101B-9F08-00AA002F954E} isn’t visible, you can create it:
- Right-click on CLSID folder in the left panel.
- Select New > Key.
- Name the new key exactly:
{645FF040-5081-101B-9F08-00AA002F954E}.
Step 3Add or change a value to show Recycle Bin
Changing a specific value in the Registry folder shows or hides the Recycle Bin in File Explorer.
Look for an item named System.IsPinnedToNameSpaceTree (this setting controls showing the Recycle Bin).
- If it’s there, double-click it.
- If it’s NOT there, right-click on a blank space, then choose New > DWORD (32-bit) Value, and name it exactly
System.IsPinnedToNameSpaceTree. - Set the value data to 1 to turn this feature ON:
- Value data:
1
- Value data:
- Then click OK.
Step 4Close Registry Editor and restart your PC
Save all your work, close everything, and restart your computer to apply the changes.
Step 5Check File Explorer
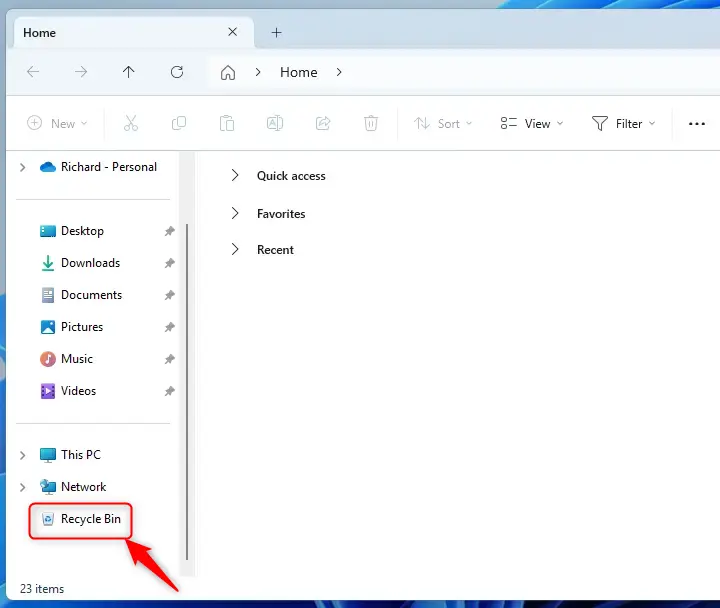
Open File Explorer (press Windows key + E) and look at the left side navigation pane. The Recycle Bin should now appear there, offering quick access!
Summary
Adding the Recycle Bin to File Explorer gives you quick access to deleted files directly from the sidebar, keeping your desktop tidy.- Adding Recycle Bin to File Explorer helps you open deleted files quickly.
- You need to carefully edit the Windows Registry and restart your PC.
- This keeps your desktop neat by removing the Recycle Bin icon from there.
- After this, the Recycle Bin icon is always ready in File Explorer’s side menu.
- If you want to put the Recycle Bin back on your desktop later, you can do that easily from Personalization > Themes > Desktop icon settings.
Was this guide helpful?

About the Author
Richard
Tech Writer, IT Professional
Richard, a writer for Geek Rewind, is a tech enthusiast who loves breaking down complex IT topics into simple, easy-to-understand ideas. With years of hands-on experience in system administration and enterprise IT operations, he’s developed a knack for offering practical tips and solutions. Richard aims to make technology more accessible and actionable. He's deeply committed to the Geek Rewind community, always ready to answer questions and engage in discussions.


No comments yet — be the first to share your thoughts!