Hide Message Previews in Chat list on Microsoft Teams
You can hide message previews in the Microsoft Teams chat list to enhance your privacy, preventing snippets of conversations from appearing next to contact names.
Message previews show the beginning of your latest message directly in your chat list, giving you a quick glance at unread conversations. This feature, while convenient, can expose sensitive information if your screen is visible to others.
For example, if you’re in a public space or sharing your screen during a video call, these previews can inadvertently reveal confidential details. Fortunately, Microsoft Teams allows you to disable this preview feature for better control over your displayed information.
Why hide message previews?
Why: You may want to hide these snippets to prevent sensitive information from appearing on your screen during meetings or when others walk by your desk. What happens when done: The chat list will only show the sender’s name and the time, keeping the actual content of your messages private until you click on the conversation.
How to hide message previews in New Teams vs. Classic Teams
The interface for Microsoft Teams has evolved. Whether you are using the New Microsoft Teams or the Classic Teams, the steps are similar but the menu layout may vary slightly.
1. Launch the Microsoft Teams app from your Start menu or Taskbar.

2. Click the Settings and more (…) icon located at the top right, next to your profile picture.

3. Select Settings from the dropdown menu.
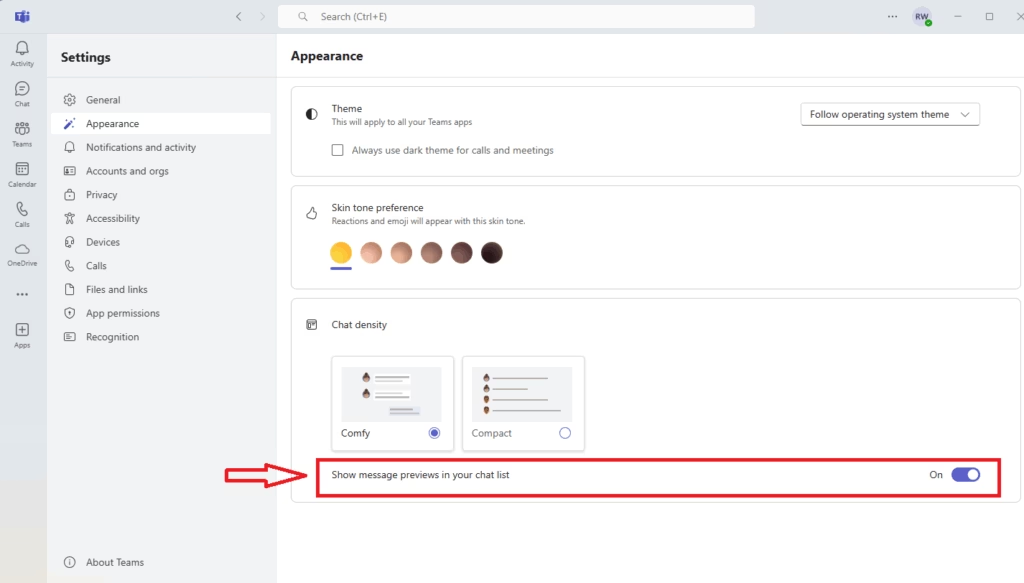
4. Navigate to the Appearance tab on the left sidebar.
5. Look for the Chat density section. Toggle the switch for Show message preview in your chat list to the Off position.
Troubleshooting: Missing settings
If you cannot find the toggle, ensure your app is fully updated. Sometimes, organizational policies set by your IT department may restrict certain Teams privacy settings. If you are on a work computer, you may need admin privileges to update the application or change specific global policies.
Privacy in public spaces
Using Teams display settings to hide previews is a best practice for anyone working in coffee shops, airports, or open-plan offices. It ensures that even if you leave your computer unlocked for a moment, your private chats remain obscured from passersby.
Summary
- Hiding message previews protects your privacy during screen sharing.
- The setting is found under Settings > Appearance.
- This change does not affect your standard desktop notification banners.
- If the setting is missing, check for app updates or consult your IT administrator.
For more information, visit the official Microsoft Support documentation.
Can I hide the message content but still see the sender’s name in New Teams?
Yes. By disabling the message preview toggle in your Appearance settings, Teams will remove the snippet of text from the chat list. However, the name of the person or group you are chatting with will remain visible, allowing you to identify the conversation without exposing the actual message content.
Does disabling message previews affect desktop notifications?
No. Disabling message previews only affects the chat list view within the main application window. It does not change how your desktop notifications appear. You can manage those separately under the Notifications and Activity settings if you wish to hide content from pop-up banners as well.
Was this guide helpful?

About the Author
Richard
Tech Writer, IT Professional
Richard, a writer for Geek Rewind, is a tech enthusiast who loves breaking down complex IT topics into simple, easy-to-understand ideas. With years of hands-on experience in system administration and enterprise IT operations, he’s developed a knack for offering practical tips and solutions. Richard aims to make technology more accessible and actionable. He's deeply committed to the Geek Rewind community, always ready to answer questions and engage in discussions.

No comments yet — be the first to share your thoughts!