How to Change PowerShell Execution Policies in Windows 11
This guide shows you how to manage PowerShell execution policies on Windows 11. These settings apply to both the standard Windows PowerShell and PowerShell Core.
Open PowerShell as an administrator. Type Get-ExecutionPolicy -List to view current policies. Use Set-ExecutionPolicy RemoteSigned -Scope CurrentUser to change it for the current user, or Set-ExecutionPolicy RemoteSigned -Scope LocalMachine for the entire machine.
Why does 🪟 Windows 11 block PowerShell scripts by default?
Windows 11 blocks scripts to prevent malicious code from running automatically. This PowerShell security model acts as a barrier, ensuring only trusted or verified scripts execute. By default, the system prevents unauthorized script execution. This protects your computer from potential threats and accidental damage.
What happens when you change the execution policy?
When you modify the execution policy, you change the rules for which scripts can run on your system. Altering these settings can either strengthen security or expose your computer to risks. Always make sure you understand the implications before lowering your security posture.
Understanding PowerShell Execution Policies
PowerShell execution policies in Windows 11 are like security guards for your computer, deciding if it’s okay to run scripts.
- Restricted: Default setting. No scripts allowed.
- RemoteSigned: Scripts created locally run; downloaded scripts must be signed by a trusted publisher.
- AllSigned: Every script must be signed by a trusted publisher.
- Bypass: Nothing is blocked. Use only for specific, trusted automation tasks.
- Unrestricted: All scripts run. This is a major security risk.
How to Check and Change Policies
Checking and changing your PowerShell execution policy in Windows 11 is straightforward, letting you control script security.
Note: Changing system-wide policies requires Administrator privileges.
To set a policy for the current user, use: Set-ExecutionPolicy RemoteSigned -Scope CurrentUser. To change it for the entire machine, you must run PowerShell as an administrator and use: Set-ExecutionPolicy RemoteSigned -Scope LocalMachine.
Safer Alternatives: Unblock-File
Instead of changing your global policy, you can unblock a specific script. This is a best practice for security. Use this command:
Unblock-File -Path "C:\Scripts\MyScript.ps1"
Troubleshooting and Group Policy
If you get an error that PowerShell script execution is disabled, a Group Policy Object (GPO) might be enforcing a stricter rule than your local settings.
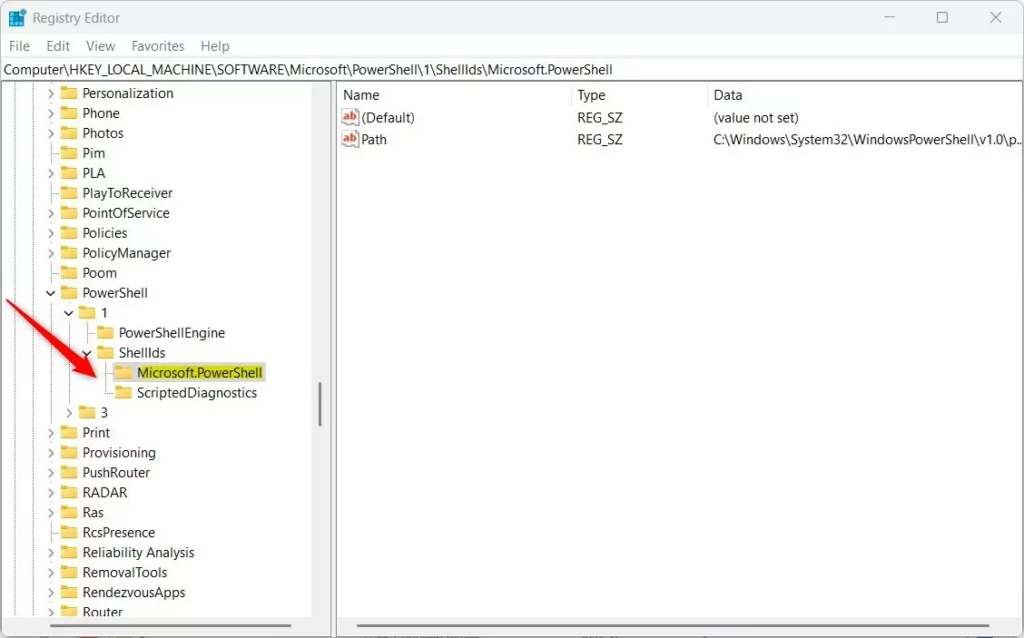
Registry Editor Method
Requires Administrator privileges.
- Open the Windows Registry Editor.
- Navigate to:
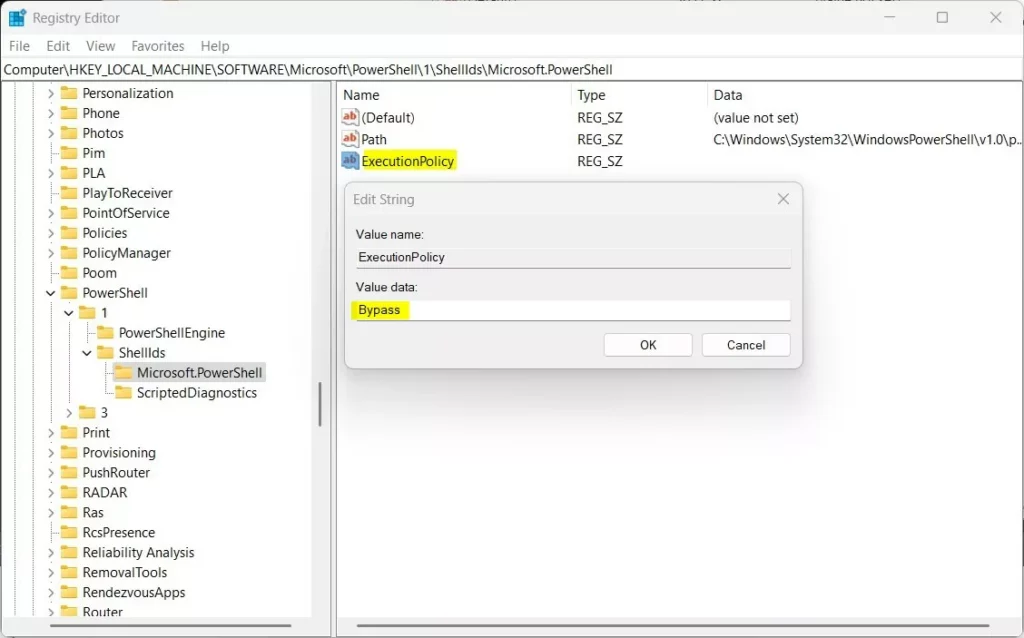
HKEY_LOCAL_MACHINE\SOFTWARE\Microsoft\PowerShell\1\ShellIds\Microsoft.PowerShell - Create a new String Value named
ExecutionPolicy. - Set the value to
RemoteSigned.
Summary
Managing your PowerShell execution policy in Windows 11 is important for keeping your computer secure while letting you run needed scripts.
Is it safe to set execution policy to Unrestricted?
No, setting your policy to Unrestricted is not safe. It removes all security checks, allowing any script to run on your system. This makes your computer vulnerable to malicious software and unauthorized automation. Always prefer RemoteSigned for a balance of security and functionality.
Was this guide helpful?

About the Author
Richard
Tech Writer, IT Professional
Richard, a writer for Geek Rewind, is a tech enthusiast who loves breaking down complex IT topics into simple, easy-to-understand ideas. With years of hands-on experience in system administration and enterprise IT operations, he’s developed a knack for offering practical tips and solutions. Richard aims to make technology more accessible and actionable. He's deeply committed to the Geek Rewind community, always ready to answer questions and engage in discussions.


No comments yet — be the first to share your thoughts!