How to Enable or Disable Delete to Recycle Bin Confirmation Dialog in Windows 11

You enable or disable the delete confirmation dialog in Windows 11 to control whether you see a prompt asking “Are you sure you want to move this file to the Recycle Bin?” This setting prevents accidental deletion of important files by requiring explicit confirmation before they are sent to the Recycle Bin.
This prompt appears by default after a fresh installation of Windows 11. You can quickly toggle this feature on or off directly from your Recycle Bin settings window.
Why This Matters
The Recycle Bin is like a safety net for deleted files. When you delete something, Windows puts it in the Recycle Bin instead of removing it forever. This gives you a chance to change your mind and get your file back.
By default, Windows does not ask you to confirm when you delete something to the Recycle Bin. Some people like to have a confirmation dialog pop up to make sure they really want to delete a file. This tutorial shows you how to turn that confirmation on or off.
What Happens
If you turn on the delete confirmation dialog, Windows will ask you “Are you sure?” every time you delete a file or folder to the Recycle Bin. If you turn it off, files will go straight to the Recycle Bin without asking.
Important to know: If you delete a file that is larger than your Recycle Bin’s size limit, Windows will always show a confirmation dialog. It will ask if you want to permanently delete it.
Each user account on your computer has its own separate Recycle Bin. Each hard drive or partition also has its own Recycle Bin settings.
USB flash drives and memory cards do not have a Recycle Bin by default. Files deleted from these drives are gone forever unless you enable the Recycle Bin for them.
Option 1Use Recycle Bin Properties
This method is the easiest. You change the setting just for your own account.
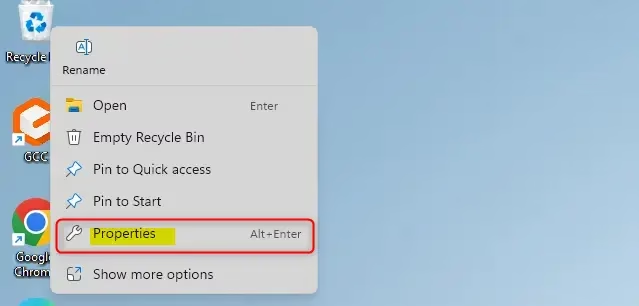
- Right-click on the Recycle Bin icon on your desktop.
- Click Properties. (see screenshot below)
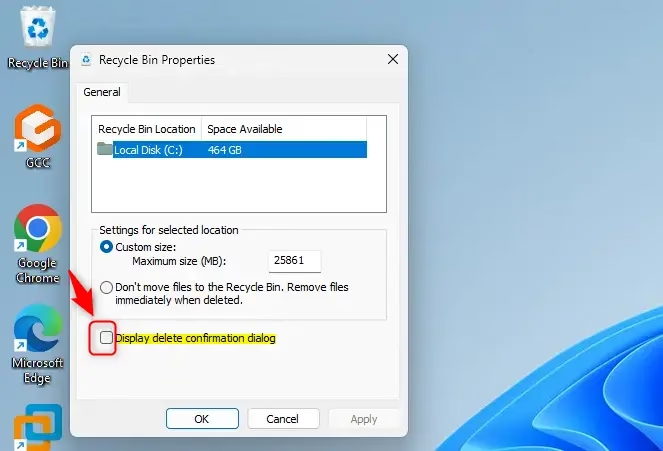
- Check the box next to Display delete confirmation dialog to turn it on. Uncheck it to turn it off.
- Click OK.
Option 2Use Group Policy Editor
⚠️ Admin privileges required.
This method works for all users on the computer or for specific user groups. It also applies to all your hard drives and partitions.
Note: Group Policy Editor is only available in Windows Pro, Enterprise, and Education editions. If you have Windows Home edition, use Option Three instead.
- Open the Group Policy Editor for all users, specific users, or all users except administrators. The choice depends on who you want this setting to apply to.
- In the left pane, navigate to:
User Configuration > Administrative Templates > Windows Components > File Explorer
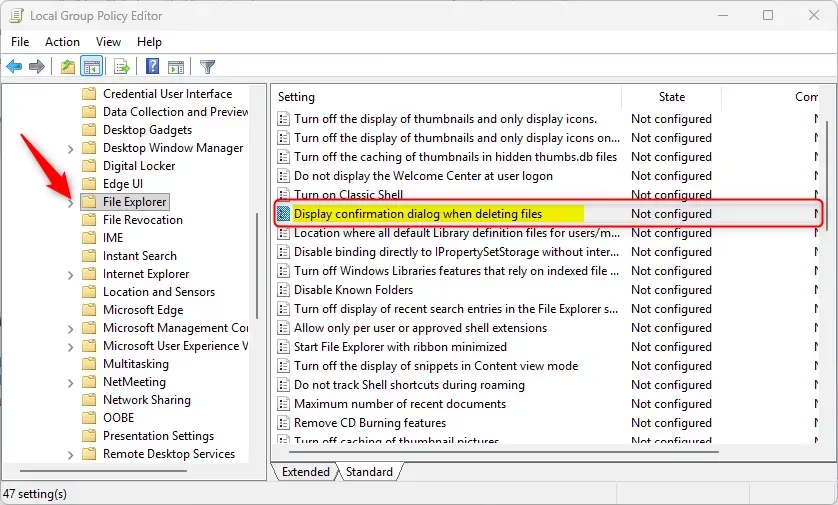
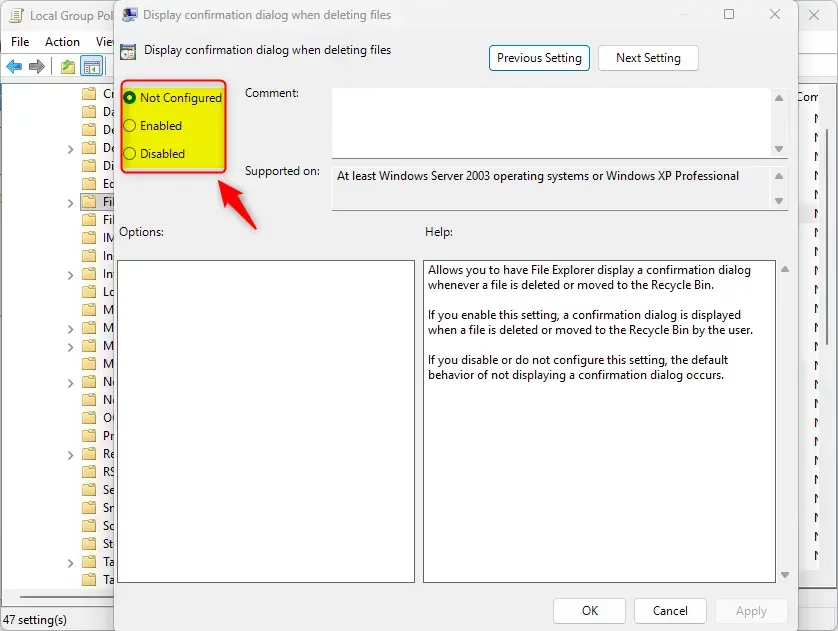
- In the right pane, find and double-click the policy called Display confirmation dialog when deleting files.
To Always Show the Delete Confirmation Dialog
Select Enabled and click OK.
Note: This setting will override the Recycle Bin Properties option from Option One. Users will not be able to turn off the confirmation dialog.
To Use the Default Setting (No Confirmation Dialog)
Select Not Configured and click OK. This lets users choose their own setting using Option One.
- You can now close the Group Policy Editor.
Option 3Use Registry Editor
⚠️ Admin privileges required.
This method works for all users on the computer. It also applies to all your hard drives and partitions. Use this method if you have Windows Home edition.
- Open Windows Terminal as an administrator. (Right-click it and select Run as administrator.)
- Run one of the commands below, depending on what you want.
To Always Show the Delete Confirmation Dialog
Copy and paste this command:
reg add "HKCU\Software\Microsoft\Windows\CurrentVersion\Policies\Explorer" /v ConfirmFileDelete /t REG_DWORD /d 1 /f
reg add "HKLM\SOFTWARE\Microsoft\Windows\CurrentVersion\Policies\Explorer" /v ConfirmFileDelete /t REG_DWORD /d 1 /f
To Use the Default Setting (No Confirmation Dialog)
Copy and paste this command:
reg delete "HKCU\Software\Microsoft\Windows\CurrentVersion\Policies\Explorer" /v ConfirmFileDelete /f
reg delete "HKLM\SOFTWARE\Microsoft\Windows\CurrentVersion\Policies\Explorer" /v ConfirmFileDelete /f
Summary
Windows allows you to choose whether you see a confirmation dialog when you delete files to the Recycle Bin. There are three ways to change this setting:
- Option One is the simplest. Right-click the Recycle Bin icon and check or uncheck the confirmation box in Properties. This only affects your account.
- Option Two uses Group Policy Editor. It works for all users or specific user groups. It only works on Windows Pro, Enterprise, and Education editions.
- Option Three uses the Registry. It works for all users and works on all Windows editions, including Home. You must run Windows Terminal as an administrator.
Choose whichever method works best for your needs. All three methods accomplish the same thing—they just work for different situations.
How do I delete confirmation in 🪟 Windows 11?
To enable delete confirmation in Windows 11, right-click the Recycle Bin icon on your desktop and select Properties. Check the box labeled 'Display delete confirmation dialog' and click Apply. This ensures Windows prompts you with an 'Are you sure?' message every time you move a file or folder to the bin.
How to display delete confirmation dialog?
You can display the delete confirmation dialog by right-clicking the Recycle Bin icon and choosing Properties. In the settings window that appears, check the 'Display delete confirmation dialog' option. Once you click OK, Windows will require your manual confirmation before moving any files or folders into the Recycle Bin.
When we delete a file, the dash file dialog box appears to confirm the deletion.?
The delete confirmation dialog box appears when the 'Display delete confirmation dialog' setting is enabled in your Recycle Bin properties. This safety feature prevents accidental deletions by prompting you to verify the action. If this box is unchecked, files will move directly to the Recycle Bin without any additional confirmation prompts.
How do I turn off delete confirmation?
To turn off the delete confirmation, right-click the Recycle Bin icon on your desktop and select Properties. Uncheck the box labeled 'Display delete confirmation dialog' and click OK. Once disabled, Windows will no longer prompt you for confirmation, and files will move instantly to the Recycle Bin when you delete them.
Was this guide helpful?

About the Author
Richard
Tech Writer, IT Professional
Richard, a writer for Geek Rewind, is a tech enthusiast who loves breaking down complex IT topics into simple, easy-to-understand ideas. With years of hands-on experience in system administration and enterprise IT operations, he’s developed a knack for offering practical tips and solutions. Richard aims to make technology more accessible and actionable. He's deeply committed to the Geek Rewind community, always ready to answer questions and engage in discussions.

No comments yet — be the first to share your thoughts!