Stuck in a Boot Loop After Enabling Secure Boot In Windows 11


- 39 steps
- Needs administrator rights
- Includes a restart or sign-out
A Windows 11 boot loop traps your PC in an endless restart cycle instead of opening the desktop. It often starts right after you turn on Secure Boot, a firmware security feature that some modern games, Valorant among them, require.
The fix is to open your computer’s BIOS (basic input/output system) screen during startup, then turn Secure Boot off or reset your security keys. Your files and apps stay on the drive, and in most cases you can do this in a few minutes with only the keyboard. This guide also covers the permanent fix, so you can run Secure Boot without the loop coming back.
Secure Boot causes a Windows 11 boot loop when Windows is installed on an MBR drive while the firmware runs in Legacy or CSM mode. To stop the loop, open your BIOS (basic input/output system) screen by pressing Delete, F2, F12 or F1 during startup, then set Secure Boot to Disabled and save. This gets you back to the desktop.
Understanding Why Secure Boot Causes a Boot Loop
Secure Boot causes a boot loop when Windows is installed on an older MBR-partitioned drive and the firmware is running in Legacy mode. Secure Boot only works with UEFI firmware, and Windows on UEFI must be installed on a GPT drive. The firmware cannot verify an MBR drive at startup, so Windows never loads and the PC restarts over and over.
Older computers used a system called CSM or Legacy boot. Newer computers use UEFI. If you installed Windows 11 under CSM and then turned on Secure Boot, the firmware starts looking for an operating system in UEFI mode. It finds no match and cannot start Windows. It assumes you want to change your settings, so it opens the BIOS screen again. That is the endless cycle.
Several fixes follow. If you only want your PC working again, start with the Secure Boot section. If you want to keep Secure Boot on, work through the MBR to GPT conversion and the UEFI mode change as well.
How to Access Your Computer Settings When You Are Stuck
When Windows will not load, you can still reach the BIOS. Power the PC off completely, turn it back on, and press your manufacturer’s BIOS key (F2, F12, Delete, or F1) repeatedly before the Windows logo appears.
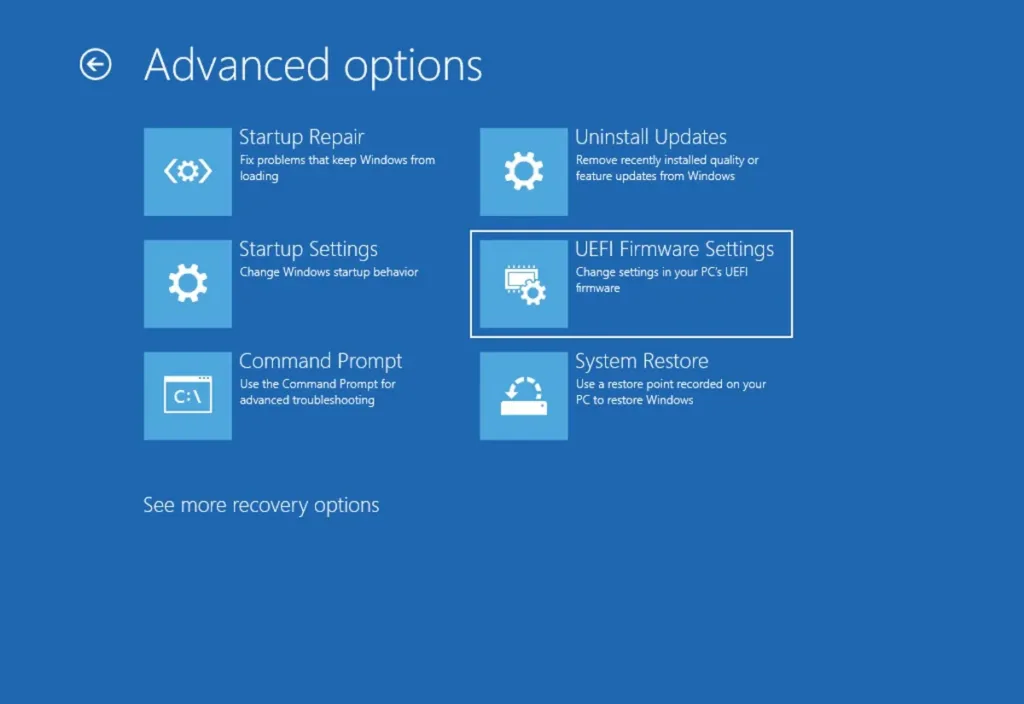
- Hold the power button for about ten seconds until the PC turns off completely.
- Press the power button to turn the PC back on.
- Press the BIOS key right away and keep tapping it. This key opens the BIOS or UEFI menu, and it is usually Delete, F2, F12, or F1.
- Watch the first screen after power-on. Many PCs show a short message such as “Press DEL to enter Setup” that tells you the exact key.
You should now see the BIOS or UEFI settings screen. If the Windows logo appears first, you were too late. Power off and try again, and start tapping the key as soon as you press the power button. If it keeps failing, check the manual for your motherboard or laptop model. Laptops from some makers use a different key than desktops.
Solution 1: Temporarily Turn Off Secure Boot to Regain Access
Turning Secure Boot off is the quickest way back to your desktop. You go into the BIOS, find the Secure Boot option, disable it, and save. This is a temporary fix. It gets you into Windows, but it does not remove the cause of the loop.
- Turn on the PC and open the BIOS with your key, such as Delete or F2.
- Look for a tab named Security, Boot, or Authentication. If you only see a simplified screen, switch to advanced mode. Many boards use F7 for this.
- Find the option labeled Secure Boot.
- Change it from Enabled to Disabled. If the option is greyed out, look for a setting such as OS Type or a Secure Boot Mode entry. On some boards you must change that first, or set an administrator password in the BIOS.
- Save your changes and restart. The screen usually shows the save-and-exit key at the bottom, often F10.
Your PC should now start normally and load the Windows 11 desktop. To undo this later, return to the same option and set it back to Enabled, but only after the drive and boot mode are fixed using the next two sections.
If Windows asks for a BitLocker recovery key after you change firmware settings, this is expected. BitLocker or Device Encryption notices the change. Find your key in your Microsoft account under your devices before you continue.
Solution 2: Change Your Hard Drive Format from MBR to GPT
Converting the drive from MBR to GPT lets you keep Secure Boot on permanently without a boot loop. Windows 11 includes the MBR2GPT tool for this. It converts the partition style in place and keeps your personal files. You need administrator rights to run it.
The conversion is designed to be safe, but a power cut or a drive fault mid-process can cause data loss.
You need to be able to run commands, so do this once Secure Boot is off and Windows starts again:
- Click the Start button and type Command Prompt.
- Right-click the result and select Run as administrator. Click Yes if User Account Control asks. You should see a command window with a title that includes “Administrator”.
- Type the following command and press Enter to check that your disk can be converted:
mbr2gpt /validate /allowfullos - Read the result. If validation succeeds, continue. If it reports an error, stop here and do not run the conversion.
- Type the following command to convert the drive and press Enter:
mbr2gpt /convert /allowfullos - Wait for the process to finish completely. Do not turn off the PC while it runs.
- Restart the computer and open the BIOS.
Before you turn Secure Boot back on, switch the firmware to UEFI mode. A converted GPT drive will not start in Legacy mode. The next section covers that. Then turn Secure Boot back on using the steps from the previous section.
If Windows will not start at all, you can also run these commands from the Command Prompt in the USB recovery environment described later in this guide.
Solution 3: Switch from Legacy Boot to UEFI Mode
Switching from Legacy to UEFI mode lets your PC read a GPT drive and start Windows 11 with Secure Boot on. Do this after the drive has been converted to GPT, not before. On an MBR drive, UEFI mode will not find Windows and the PC will fail to boot.
- Turn on the PC and open the BIOS.
- Go to the Boot tab or menu.
- Find the setting named Boot Mode Selection, OS Type, or CSM. The name depends on the manufacturer.
- Change it from Legacy, CSM, or Both to UEFI Only or UEFI. If you see a CSM option, set it to Disabled.
- Turn Secure Boot back on if it was switched off automatically. Changing the mode often resets it.
- Save your changes and restart.
Windows 11 should now load with Secure Boot active. To check, press the Win, type System Information, open it, and look at Secure Boot State and BIOS Mode. They should read On and UEFI. To undo the change, set the boot mode back to the old value.
Advanced Rescue: Fixing Boot Loops Using a USB Installation Drive
If you cannot get into Windows at all, a USB rescue drive lets you repair the startup files or reinstall Windows. You build the drive on another working PC with the official Windows 11 installation tool, then boot your broken PC from it.
Creating the installer erases everything on it.
- On a working computer, download the official Windows 11 installation tool from the Microsoft website.
- Insert your blank USB flash drive into that computer.
- Run the downloaded tool and follow the on-screen instructions to create a bootable USB drive.
- With the broken PC turned off, insert the finished USB drive.
- Turn on the PC and press the boot menu key, often F12 or F11, then select the USB drive as the startup device.
- When the Windows setup window appears, click Next, then select Repair your computer in the bottom-left corner.
- Go to Troubleshoot, select Advanced options, and click Command Prompt.
- Type
diskpartand press Enter. - Type
list diskand press Enter to see your drives. Look for the disk number that holds Windows, usually Disk 0. - Type
select disk 0and press Enter. Replace 0 with your actual disk number if it is different. - Type
list volumeand press Enter to find your small system partition. - Type
exitand press Enter to leave the disk tool.
Take care with the disk number. Working on the wrong disk is the most common mistake in this process, so check the list from the earlier step before you type anything. When you finish, close the Command Prompt, remove the USB drive, and restart the PC.
Preventing Future Boot Loops When Updating Motherboard Software
A BIOS or firmware update can bring the boot loop back. Manufacturers often reset security options to factory defaults during an update, so you need to check Secure Boot and UEFI mode before Windows starts again.
Before you update, open the BIOS and write down your current settings. Note these three things:
- Whether Secure Boot is enabled.
- Whether your keys are in standard or custom mode.
- Whether CSM is disabled.
After the update, open the BIOS again before letting Windows load. If you end up back at the settings screen, go to the security tab, restore your previous Secure Boot and key settings, and save before restarting. Keeping your notes on paper or on your phone helps, because you cannot read a file from a PC that will not boot.
Managing Custom Security Keys and Platform Keys
Secure Boot relies on security keys stored in the firmware, including the platform key. If these are deleted or changed, Windows 11 can be blocked at startup. Setting Secure Boot Mode back from custom to standard restores the factory keys, so the PC trusts the Windows startup files again.
If you suspect you altered these advanced keys, do this:
- Open the BIOS during startup.
- Go to the Secure Boot settings page. It is often under Security or Boot.
- Find Secure Boot Mode and make sure it is set to Standard, not Custom.
- If you see Restore Factory Keys or Reset Secure Boot Keys, select it and confirm.
- Save your changes and restart.
This restores the official digital certificates that Windows 11 needs, and it ends the loop if bad keys were the cause. Menu names differ between manufacturers, so look for the closest match. Resetting to factory keys does not touch your files.
Summary
A boot loop after enabling Secure Boot in Windows 11 almost always comes down to an MBR drive or Legacy boot mode. You have four ways to fix it. Turn off Secure Boot in the BIOS for a quick fix. Convert the drive from MBR to GPT. Switch the boot mode to UEFI. If you cannot reach Windows at all, use a USB rescue drive. For a lasting fix, convert to GPT, switch to UEFI, and then turn Secure Boot back on.
Have a question about this guide?
Answered by AI from this guide. Good questions may be added to this page — please don't include personal details.
Did this guide fix your problem?

About the Author
Richard
Tech Writer, IT Professional
Richard is a writer at Geek Rewind who turns complex IT tasks into clear, step-by-step guides. He draws on years of hands-on experience in system administration and enterprise IT operations, focusing on Windows, Linux and WordPress: the problems people actually run into, and the fixes that work. His server and WordPress guides come from systems he runs himself. Richard builds and maintains the platform behind Geek Rewind, from its Ubuntu servers and Nginx configuration to its custom WordPress plugins. Many new tutorials start with readers' questions, and he's always glad to answer them in the comments.
No comments yet — be the first to share your thoughts!