Installing OpenSSH on Ubuntu 24.04

Installing OpenSSH on Ubuntu 24.04 lets you securely manage your computer from afar using a network connection.
OpenSSH is a tool that creates an encrypted connection, making it safe to control your Ubuntu machine remotely. It’s the go-to for secure shell (SSH) links, keeping your conversations private, and also helps move files securely (SCP, SFTP).
After you install it, OpenSSH on Ubuntu 24.04 typically lets you log in using your username and password right away. For extra safety, logging in directly as the root user with a password is often turned off by default. You’ll usually find this set to `PermitRootLogin prohibit-password` in the SSH settings.
Install OpenSSH server on Ubuntu 24.04 by opening the terminal and running ‘sudo apt update’ followed by ‘sudo apt install openssh-server’. This enables secure remote access to your machine.
Install OpenSSH server
OpenSSH packages are available in Ubuntu default repositories so there’s no need to install additional packages.
Run the command below to install OpenSSH server.
sudo apt update
sudo apt install openssh-server
Once installed, access is granted to users on the computer. Users with valid credentials can then log on.
Configure OpenSSH
You can configure the OpenSSH server on Ubuntu 24.04 by editing the `sshd_config` file located at `/etc/ssh/sshd_config`. Changing settings in this file, like preventing the root user (the administrator account) from logging in without a password, makes your computer more secure. This protection helps guard your system from unauthorized access.
You can enhance your device’s security by tweaking the settings in this configuration file. An example would be denying the root account login without password authentication.
As mentioned, the root user cannot log on by default when you install OpenSSH server using a password, due to the [PermitRootLogin prohibit-password] setting. However, you can further enhance your device security by prohibiting the root account from logging in via other means.
To do that, open the OpenSSH configuration file by running the command below.
To stop the root user from logging on, change the `PermitRootLogin` setting. You will find this setting by uncommenting and changing the highlighted line to `no`. This change helps make your server more secure.
#line 33
PermitRootLogin no
Save and exit.
Then, restart OpenSSH server.
sudo systemctl restart ssh
Access OpenSSH server
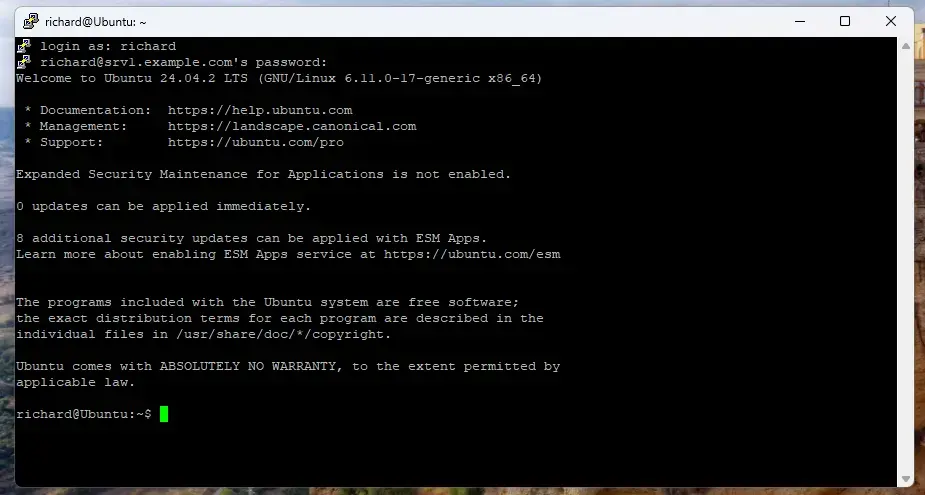
After setting up the OpenSSH server on your Ubuntu 24.04 computer, you can access it from other devices using its network name or address. On Windows 11, you can use the Terminal app with the `ssh` command. Alternatively, use a program like PuTTY by entering the server’s name. You’ll then need to enter your username and password to get in.
On Windows 11, open the Terminal app and run the ssh command.
ssh richard@srv1.example.com
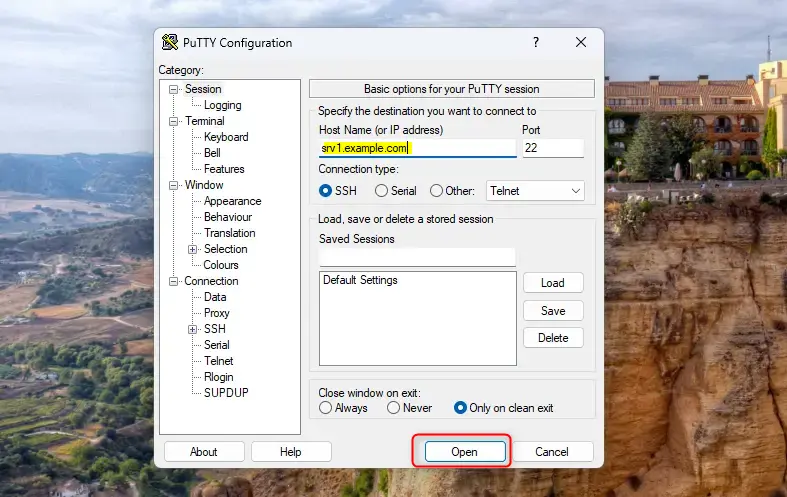
Using PuTTY, enter the server hostname and click Open.
Access should be granted after entering the correct username and password.
That should do it!
Conclusion:
So, installing and configuring the OpenSSH server on Ubuntu 24.04 is a process that enhances your server’s security. Here are the key points to remember:
- OpenSSH provides secure access to servers through encrypted connections.
- Password authentication is enabled by default upon installation, simplifying the login process.
- For improved security, the root account is prohibited from logging in with password authentication.
- Configuration adjustments in the
/etc/ssh/sshd_configfile can further enhance security. - Remote access is possible using SSH commands or tools like PuTTY.
- Ensuring you manage your user accounts and authentication methods is crucial for maintaining a secure server environment.
Setting up the OpenSSH server on Ubuntu 24.04 creates a strong, secure connection. This process helps you tailor security settings to your specific needs.
Was this guide helpful?

About the Author
Richard
Tech Writer, IT Professional
Richard, a writer for Geek Rewind, is a tech enthusiast who loves breaking down complex IT topics into simple, easy-to-understand ideas. With years of hands-on experience in system administration and enterprise IT operations, he’s developed a knack for offering practical tips and solutions. Richard aims to make technology more accessible and actionable. He's deeply committed to the Geek Rewind community, always ready to answer questions and engage in discussions.


[…] How to install OpenSSH server on Ubuntu […]