How to Use Drag-and-Drop File Sharing in Windows 11
You can share files in Windows 11 with the built-in drag-and-drop functionality.
This feature lets you quickly send files, photos, or documents to contacts and apps right from your desktop or File Explorer. You can bypass complex steps this way.
For example, Windows 11’s File Sharing works with apps like Microsoft Teams. You can drag a document straight onto a chat window to share it instantly with a colleague.
This method is significantly faster than traditional copy-pasting or using cloud services for quick transfers.
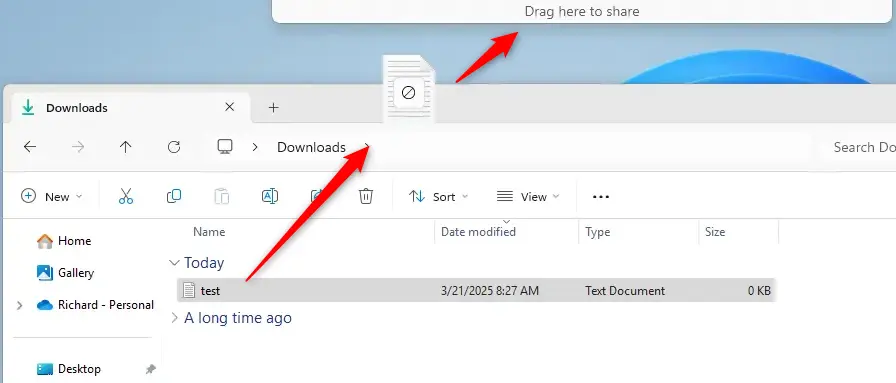
Drag and drop files by clicking a file and holding, then dragging it to the top of your screen to reveal the sharing tray. Drop the file onto your desired app in the tray to share it. This feature requires enabling via ViVeTool in Windows Insider builds.
What is Drag-and-Drop Sharing?
When you drag a file from your File Explorer or desktop, a small tray pops up at the top of your screen. This tray shows apps you can drop your file onto. This offers a quick way to share.
Why Use This Feature?
It saves time. Instead of opening an app and hunting for the file, you just drag and drop. Sharing becomes faster and more efficient.
How to Turn On This Feature
This feature is new and currently only available in special versions of Windows 11 called Insider Builds (these are preview versions for testing new features). To get it working, you’ll need a tool called ViVeTool (this helps unlock hidden features). Don’t worry, it’s not complicated!
Step 1Download ViVeTool
First, learn how to get and use ViVeTool by following this guide:
How to Enable Hidden Features with ViVeTool
Step 2Open Command Prompt or Windows Terminal
Press the Windows key + S on your keyboard. Then type ‘Command Prompt’ or ‘Windows Terminal’ and select it to open.
⚠️ You’ll need administrator privileges. Right-click on the app and select ‘Run as administrator.’
Step 3Enable Drag-and-Drop Sharing
Type or copy this command and press Enter:
vivetool /enable /id:45624564,53397005
After running the command, restart your computer.
How to Share Files Using Drag-and-Drop
- Find the file you want to share on your desktop or in File Explorer.
- Click and hold the file. Drag it towards the top of your screen.
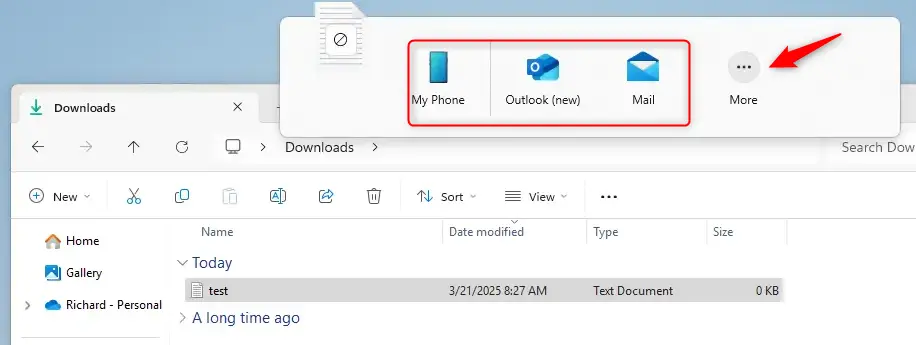
- The sharing tray will appear. It shows apps you can drop your file onto.
- Drop the file on the app you want to share it with. Need more options? Select “More…” to open the Windows share window.
Windows 11 drag and drop file sharing lets you send files quickly by dragging them to the top of your screen.

Windows 11 drag and drop file sharing lets you send files quickly by dragging them to the top of your screen.
Summary
Windows 11 drag and drop file sharing makes sending files simpler by letting you drag them to a share tray at the top of your screen.
More info from Microsoft: Windows 11 Insider Preview Build 22635.4950 (Beta)
How to enable drag to share in 🪟 Windows 11?
You can turn on drag to share in Windows 11 by opening the file you want to send and dragging it to the top of your screen.
Does 🪟 Windows 11 support drag and drop?
It will work once Microsoft officially announces it. You can also drag and drop files to the Snipping Tool, for example. If you want to make simple edits to an image, you can do that too.
Was this guide helpful?

About the Author
Richard
Tech Writer, IT Professional
Richard, a writer for Geek Rewind, is a tech enthusiast who loves breaking down complex IT topics into simple, easy-to-understand ideas. With years of hands-on experience in system administration and enterprise IT operations, he’s developed a knack for offering practical tips and solutions. Richard aims to make technology more accessible and actionable. He's deeply committed to the Geek Rewind community, always ready to answer questions and engage in discussions.


No comments yet — be the first to share your thoughts!