How to Share Files with an App in Windows 11
You can share files with an app in Windows 11 using the built-in Share feature. This Windows 11 feature lets you send documents, photos, links, and more directly to compatible apps already on your PC.
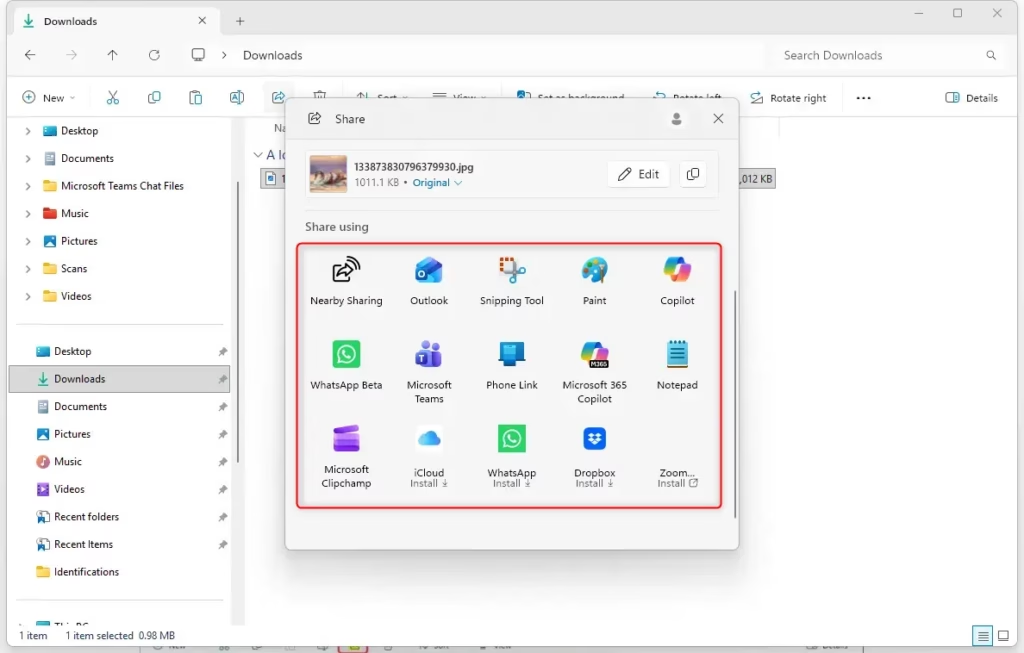
The Share dialog in Windows 11 presents a list of apps that can accept the content you’re sending. For instance, if you share a photo, you might see options like Paint, Photos, or your preferred image editor.
Mastering this feature can really streamline your workflow. Rather than saving a file and then opening another app to upload or attach it, you can choose your target app from the share menu. This saves you valuable time.
Share files in Windows 11 by clicking the Share button on the file or webpage. Then, select “(…) More apps” in the sharing panel to see a list of compatible applications on your PC. Choose the desired app to send the content.
Sharing with an App: The Easy Way
Think of this as a shortcut for sending digital items. Instead of saving something, hunting it down, and then attaching it to an email or message, you can send it directly from where it is to your chosen app. This saves you time and clicks.
Find What You Want to Share
To share files in Windows 11, first locate the item you want to send, whether it’s a photo, document, or even a webpage.
Tip: Don’t have File Explorer open? No problem! You can usually open it by pressing the Windows key + E on your keyboard.
Start the Share Action
After finding your file, the next step to share files in Windows 11 is to initiate the sharing process by clicking the ‘Share’ button or option.
- In File Explorer: Click on the file you want to share. Look for a “Share” option. In Windows 11, this is often at the top of the File Explorer window. You can also right-click the file and select “Share” from the menu that appears.
- In a Web Browser: Many browsers have a share icon (it might look like an arrow pointing out of a box) or a “Share” option in their menus.
- From Other Apps: Some apps have their own sharing features. Look for a share icon or menu option inside the app itself.
Warning: Make sure you are sharing the right file! Check the name and type before you continue, especially if it’s private information.
See More Sharing Options
Clicking the ‘Share’ button in Windows 11 opens a panel showing ways to share your item, including options like email or nearby devices.
To share with an app that you don’t see right away, look for a button or link that says something like “(…) More apps” or “More options.” Click this to see a longer list of apps on your computer that can receive shared content.
Tip: If you don’t see the app you want, it might not be set up to get shared content, or it might not be installed. Some apps need to be installed from the Microsoft Store to work with Windows sharing.
Choose Where to Send It
Windows 11 presents a list of apps to share your files with, such as your email client or cloud storage services.
Click on the icon of the app you want to use. For example, if you want to send a photo to a friend using a messaging app, click that app’s icon.
Explanation: When you select an app here, you’re telling Windows to open that app and hand over the file or content you chose. This direct link is what makes sharing so quick.
Finish in the App
Once you choose an app to share files in Windows 11, it opens automatically, often with the content pre-filled, ready for you to complete.
- If you share a file to an email app, a new email will likely open with the file already attached. You just need to add the recipient’s email, a subject, and your message, then click send.
- If you share a link to a webpage to a note-taking app, a new note might be created with the link already there.
- If you share an image to a photo editing app, the image might open right up for you to edit.
Practical Tip: Pay attention to what the app does! Sometimes it might ask for more information, like where to save a file or which contact to send it to. Always check the details before confirming.
Review and Send
Before sending, review the prepared message or note to ensure the correct files or content are included and recipients are accurate when sharing in Windows 11.
Warning: Be careful when sharing files with personal or private information. Always make sure you are sending it to the right person and understand the privacy settings of the app you are using.
Reference:
Summary
Sharing files with apps in Windows 11 involves finding your item, using the ‘Share’ command to select an app, and then completing the task within that app.
Does 🪟 Windows 11 have file sharing?
Yes, Windows 11 has robust file sharing capabilities. You can share files directly with compatible apps using the built-in Share feature. This allows you to send documents, photos, links, and more to other applications installed on your PC without needing to save and re-open them.
What is the Microsoft app for sharing files?
The primary Microsoft feature for sharing files directly with apps in Windows 11 is the built-in Share dialog. This feature integrates with compatible applications installed on your PC, allowing you to send content like photos, documents, and links directly from one app to another.
Is there a Quick Share app for Windows?
Yes, Windows 11 includes a feature called ‘Nearby Sharing’ which functions similarly to a quick share app. It allows you to wirelessly share files, photos, and links between Windows devices that are physically close to each other, making it easy to send content between PCs.
What no longer works in 🪟 Windows 11?
While Windows 11 introduces many improvements, some older features or functionalities might be deprecated or changed. For instance, certain legacy apps might not be compatible, and some specific sharing methods from older Windows versions may no longer function as they did previously.
Was this guide helpful?

About the Author
Richard
Tech Writer, IT Professional
Richard, a writer for Geek Rewind, is a tech enthusiast who loves breaking down complex IT topics into simple, easy-to-understand ideas. With years of hands-on experience in system administration and enterprise IT operations, he’s developed a knack for offering practical tips and solutions. Richard aims to make technology more accessible and actionable. He's deeply committed to the Geek Rewind community, always ready to answer questions and engage in discussions.

No comments yet — be the first to share your thoughts!