How to Turn On or off the Notifications Bell Icon in Windows 11

The notifications bell icon in Windows 11 shows unread app alerts and messages in the bottom-right corner of your taskbar. It is a shortcut to your Notification Center. On Windows 11 version 22H2 and newer, you can turn this icon on or off to clear taskbar clutter and hide alerts you do not want to see.
Where the setting lives depends on your build. If you do not see a bell option in Personalization settings, use one of the two methods below. Both work on Home and Pro editions.
Open Settings Personalization Taskbar Taskbar behaviors and check the box for Show notifications bell icon. If that option doesn’t appear, download ViVeTool, open Command Prompt as administrator, run vivetool /enable /id:49082522, then restart your PC.
What is the Notifications Bell Icon?
The bell appears on the taskbar at the bottom of your screen when new messages or reminders arrive. A solid bell means you have unread alerts. An empty bell means you are caught up, and it sits next to your system clock.
To check which version you are on, open Settings System About and look under Windows specifications. Either method below works from 22H2 onward.
How to Enable or Disable the Notifications Bell Icon (Easy Way)
The first method uses a free tool called ViVeTool, a small program that switches on hidden features in Windows. You download the tool, open Command Prompt as an administrator, and run a short command to show or hide the bell on your taskbar .
Before you start, keep these points in mind:
- You need an administrator account. Without it, the command will fail with an access error.
- Run Command Prompt as administrator. A normal window will not apply the change.
- Type the command exactly as shown in the steps. A small typo can make ViVeTool report an error or change nothing.
- Restart your PC after you run the command. The taskbar usually will not pick up the change until you do.
- To undo the change, run the matching disable command from the same steps, then restart again.
- Go to this page and download ViVeTool.
- Open the Command Prompt as an administrator:
- Click the Start button, type
cmd, right-click Command Prompt, and select Run as administrator. ⚠️ Admin privileges required
- Click the Start button, type
- In the Command Prompt, type this command and press Enter:
vivetool /enable /id:49082522 - Restart your computer to apply the change.
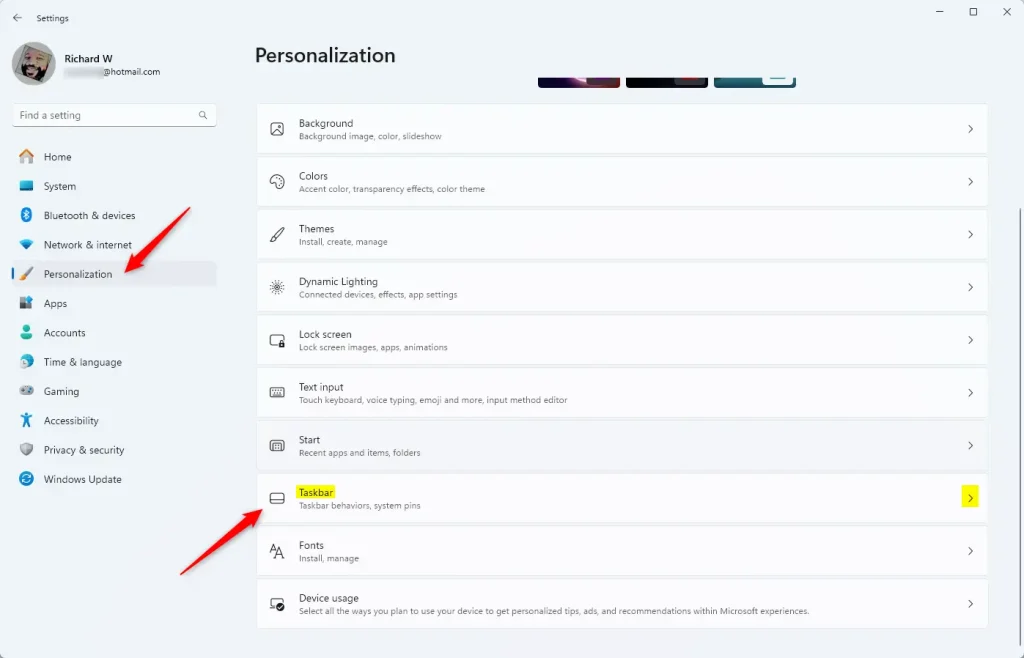
- Now, open Settings by pressing Windows + I.
- Click Personalization on the left, then choose Taskbar on the right.
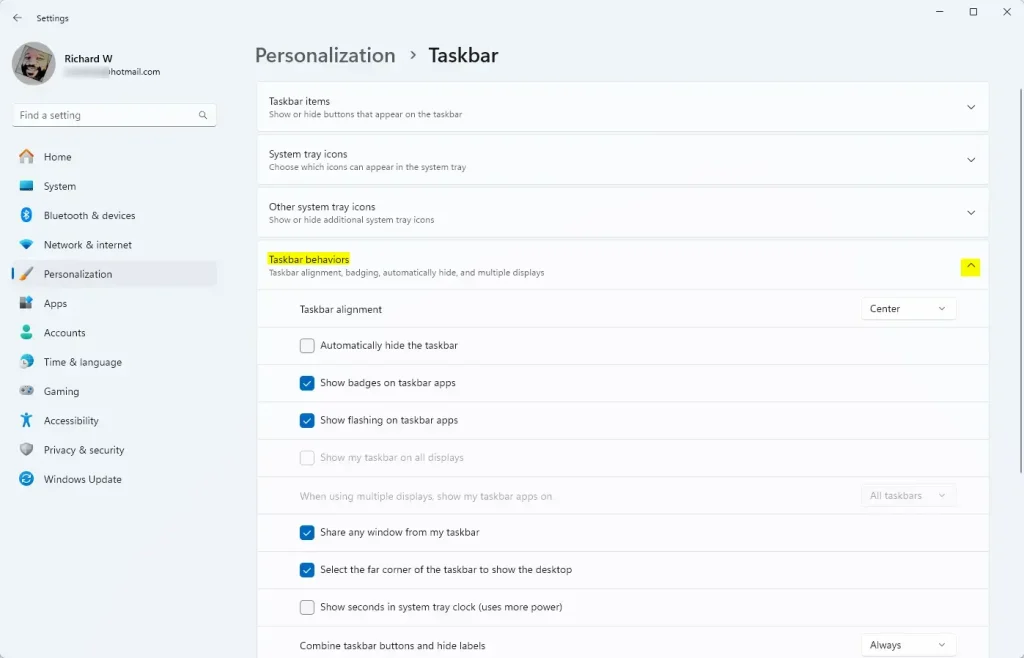
- Click Taskbar behaviors to open more options.
- Check or uncheck the box for Show notifications bell icon to turn it on or off.
- Close Settings when done.
If the bell does not appear after the restart, check that Command Prompt reported success and that you are on version 22H2 or newer. Then run the command again and restart one more time.
ViVeTool toggles hidden features that Microsoft may change or remove in later updates. If the bell disappears after a big update, repeat the steps.
How to Show or Hide Notifications Bell Using Windows Registry (Advanced Users)
The second method uses the Windows Registry, a database of system settings. It gives advanced users a direct way to show or hide the taskbar icon without extra software. You open Registry Editor, go to the correct key, and change a single value.
It is also a good idea to create a restore point first. In the Registry Editor you can use File Export to save a copy of the key before you edit it.
After you edit the value, restart your PC, or sign out and back in, so the taskbar reloads. To undo the change, set the value back to what it was, or import the backup you exported.
- Open the Registry Editor:
- Press Windows + R, type
regedit, and press Enter. ⚠️ Admin privileges required - If asked for permission, click Yes.
- Press Windows + R, type
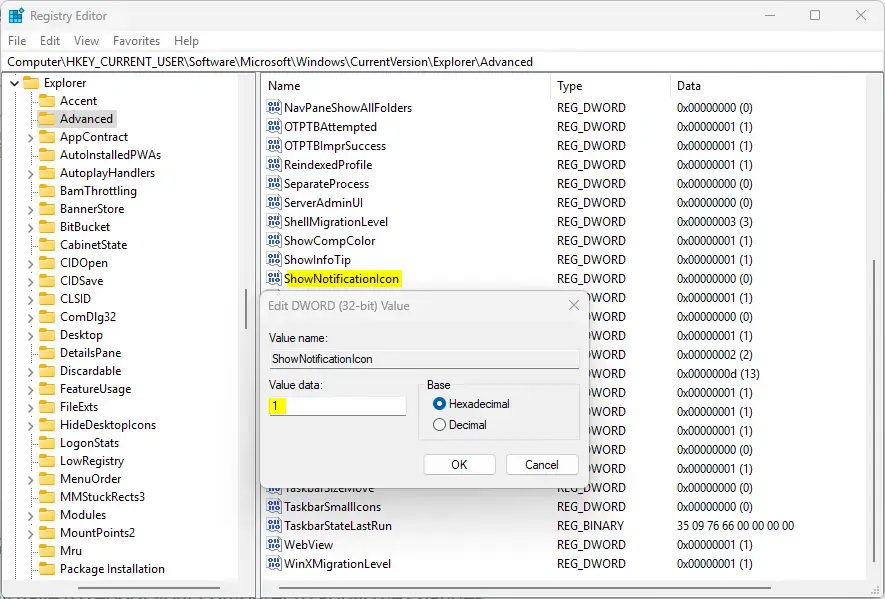
- Go to this folder (key):
Computer\HKEY_CURRENT_USER\Software\Microsoft\Windows\CurrentVersion\Explorer\Advanced - Look for a setting named
ShowNotificationIconin the right pane. - If it exists, double-click it and set its value to:
1to show the notifications bell0to hide the notifications bell
- If it doesn't exist:
- Right-click on a blank spot in the right pane.
- Choose New DWORD (32-bit) Value.
- Name it
ShowNotificationIcon. - Double-click it and set the value to 1 or 0 as above.
- Close the Registry Editor and restart your PC to see the changes.
If nothing changes after a restart, reopen Registry Editor and confirm that the key and value match the steps exactly. A value created in the wrong key is the most common reason this method fails.
Summary
Once the bell is set up, you control how taskbar alerts appear next to your clock. After you finish with ViVeTool or the registry and restart, the bell icon shows up and displays your latest alerts at a glance.
What happens after you make the change? Once enabled, the bell will show your notifications and a shorter clock on the taskbar.
Here is what to check after the change:
- You can turn the notifications bell icon on or off on your Windows 11 taskbar.
- The easiest way is by using the free ViVeTool app and then adjusting Taskbar settings.
- If you're comfortable with advanced tools, you can also enable or disable it using the Windows Registry Editor.
- That's all! Enjoy customizing your Windows 11 experience.
If you later decide you want the old look back, reverse the method you used and restart your PC.
Have a question about this guide?
Answered by AI from this guide. Good questions may be added to this page — please don't include personal details.
Did this guide fix your problem?

About the Author
Richard
Tech Writer, IT Professional
Richard is a writer at Geek Rewind who turns complex IT tasks into clear, step-by-step guides. He draws on years of hands-on experience in system administration and enterprise IT operations, focusing on Windows, Linux and WordPress: the problems people actually run into, and the fixes that work. His server and WordPress guides come from systems he runs himself. Richard builds and maintains the platform behind Geek Rewind, from its Ubuntu servers and Nginx configuration to its custom WordPress plugins. Many new tutorials start with readers' questions, and he's always glad to answer them in the comments.
No comments yet — be the first to share your thoughts!