How to Hide Notification Content on Windows 11 Lock Screen
You can hide notification content on your Windows 11 lock screen to enhance privacy.
Your Windows 11 lock screen shows alerts from apps and the system. You can prevent specific details from appearing there, though. This ensures private messages and sensitive information remain unseen if someone glances at your unlocked PC.
You’ll find this privacy setting starting with Windows 11 version 22H2. You can toggle this feature on or off through your Windows Settings.
Open Settings, go to System then Notifications. Select the app and toggle “Hide content when notifications are on lock screen” to On. This prevents sensitive details from appearing on your lock screen for that specific app.
Method 1Using Settings
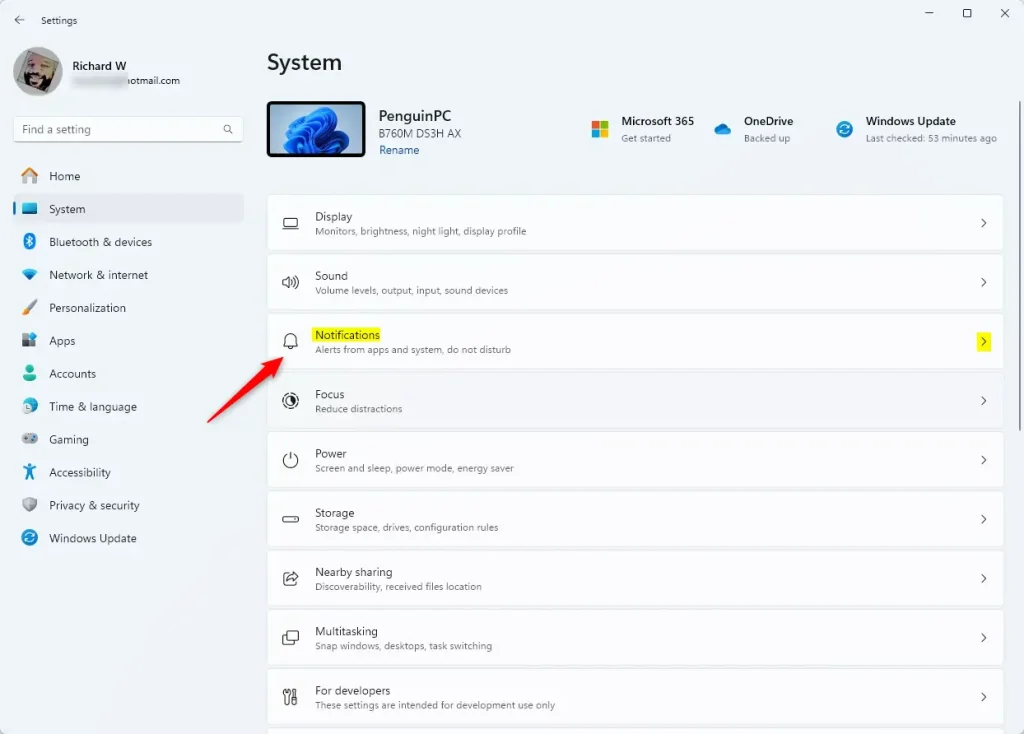
You can easily hide notification content on your Windows 11 lock screen using the Settings app by adjusting a simple option for each app you choose.- Open Settings by pressing ⊞ Win+I.
- Click System on the left side, then click Notifications on the right side.
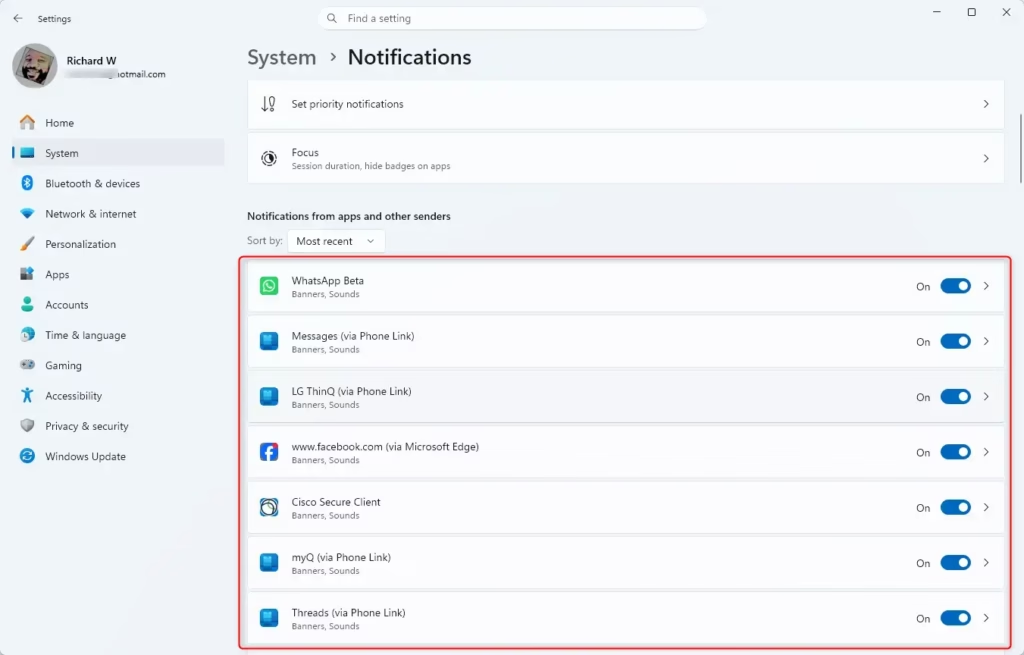
- Under “Notifications from apps and other senders,” click the app you want to change.
- Turn On (the default setting) or Off the option that says “Hide content when notifications are on lock screen.” Choose what works best for you.
- When you’re done, you can close Settings.
Method 2Using Registry Editor
If you’re comfortable with more technical steps, you can hide notification content on your Windows 11 lock screen using the Registry Editor, but you’ll need administrator access.
- Open Registry Editor by typing
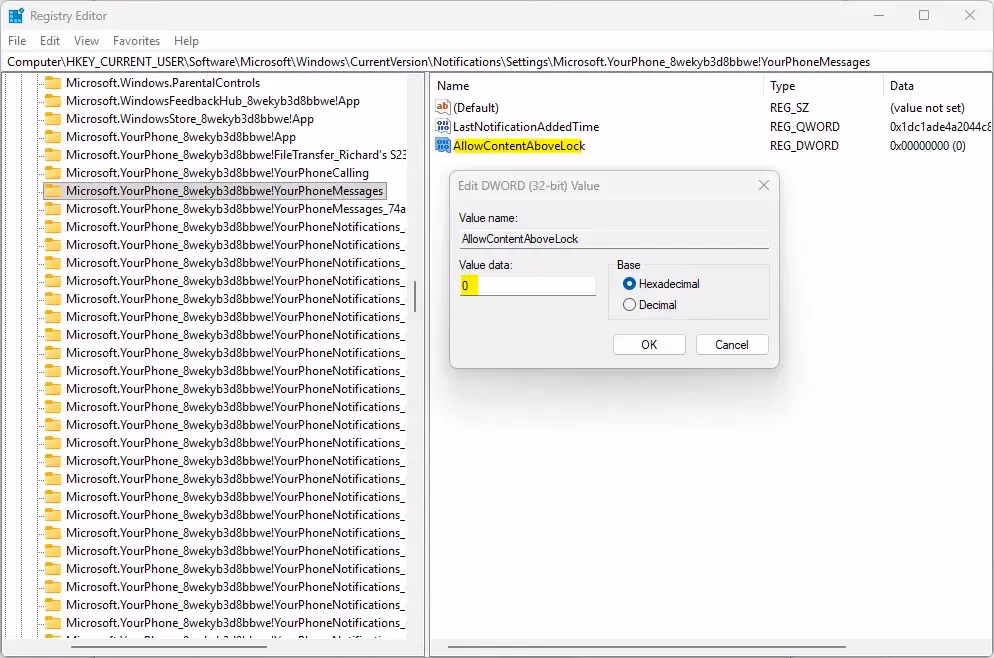
regedit.exein the search bar and pressing Enter. - In the left pane, navigate to this location:
HKEY_CURRENT_USER\Software\Microsoft\Windows\CurrentVersion\Notifications\Settings - Under the “Settings” folder in the left pane, click the app you want to change (for example: “Microsoft.YourPhone_8wekyb3d8bbwe!YourPhoneMessages”).
Turn On Hiding Notification Content (Default Setting)
- In the right pane, look for the value called AllowContentAboveLock.
- Right-click on AllowContentAboveLock and click Delete.
If you don’t see AllowContentAboveLock, your app is already set to hide content. Skip to the final step.
- Click Yes to confirm the deletion.
Turn Off Hiding Notification Content
- In the right pane, double-click the AllowContentAboveLock value to open it.💡TipTo show notification content on your Windows 11 lock screen again, you can easily reverse the changes made in the Registry Editor by adjusting the AllowContentAboveLock value back to its original setting.
- Type 1 in the “Value data” field.
- Click OK.
- When done, close Registry Editor.
Summary
Hiding notification content on your Windows 11 lock screen is a great way to keep your private alerts and messages from prying eyes when your computer is locked.
Windows 11 lock screen notifications allow users to choose if notification content appears. This choice impacts only the specific app selected by the user.
How to hide content of notifications on lock screen?
You can hide notification content on your Windows 11 lock screen by going into Settings, then Notifications, and choosing the app you want to adjust.
What does "hide content on lock screen" mean?
The ‘hide content on lock screen’ setting prevents sensitive information, such as message previews or app alerts, from being displayed while your computer is locked. By enabling this, Windows 11 will show that a notification exists without revealing the actual text or sender details to anyone viewing your screen.
How to hide notification content when phone is unlocked?
This section is about Windows lock screens, not phone settings.
How to hide message content when phone is locked on iPhone?
This section is about Windows lock screens, not iPhone settings.
Was this guide helpful?

About the Author
Richard
Tech Writer, IT Professional
Richard, a writer for Geek Rewind, is a tech enthusiast who loves breaking down complex IT topics into simple, easy-to-understand ideas. With years of hands-on experience in system administration and enterprise IT operations, he’s developed a knack for offering practical tips and solutions. Richard aims to make technology more accessible and actionable. He's deeply committed to the Geek Rewind community, always ready to answer questions and engage in discussions.


No comments yet — be the first to share your thoughts!