How to Enable or Disable Dynamic Lighting in Windows 11

Dynamic Lighting in Windows 11 lets you control the RGB lights on your keyboard, mouse and other gear from one place in the Settings app . Microsoft added it in late 2023 so you can manage lighting effects without installing a separate app from every device maker.
You can turn Dynamic Lighting on or off under the Personalization section of Settings. That makes it much easier to mix parts from different brands. It only works with devices that support the standard Windows uses for lighting. Older RGB gear may still need the maker’s own app, and it won’t show up in Settings.
Open Settings , click Personalization, select Dynamic Lighting, then toggle the Use Dynamic Lighting on my devices switch to On or Off. The change takes effect immediately without restarting.
How to Turn On or Off Dynamic Lighting
The steps below turn Dynamic Lighting on or off from Settings on a Windows 11 PC. The same steps work on Home and Pro. If you can’t find the Dynamic Lighting tile at the end, your Windows 11 build is probably too old. Run Windows Update , restart, and check again.
Step 1Open Windows Settings
- Click the Start menu (the Windows logo at the bottom of the screen) and choose Settings. The Settings window opens.
- Or press the Win+I together on your keyboard. This opens Settings straight away and is faster if you do it often.
Step 2Go to Personalization
- In the Settings window, click Personalization in the left-hand menu. The right side now shows the personalization options: background, colors, themes and so on.

If the left-hand menu is hidden because the window is narrow, click the three-line menu icon at the top left of Settings to show it again.
Step 3Find Dynamic Lighting
- On the right side, look for the tile labeled Dynamic Lighting and click it to open. You may need to scroll down a little to find it.
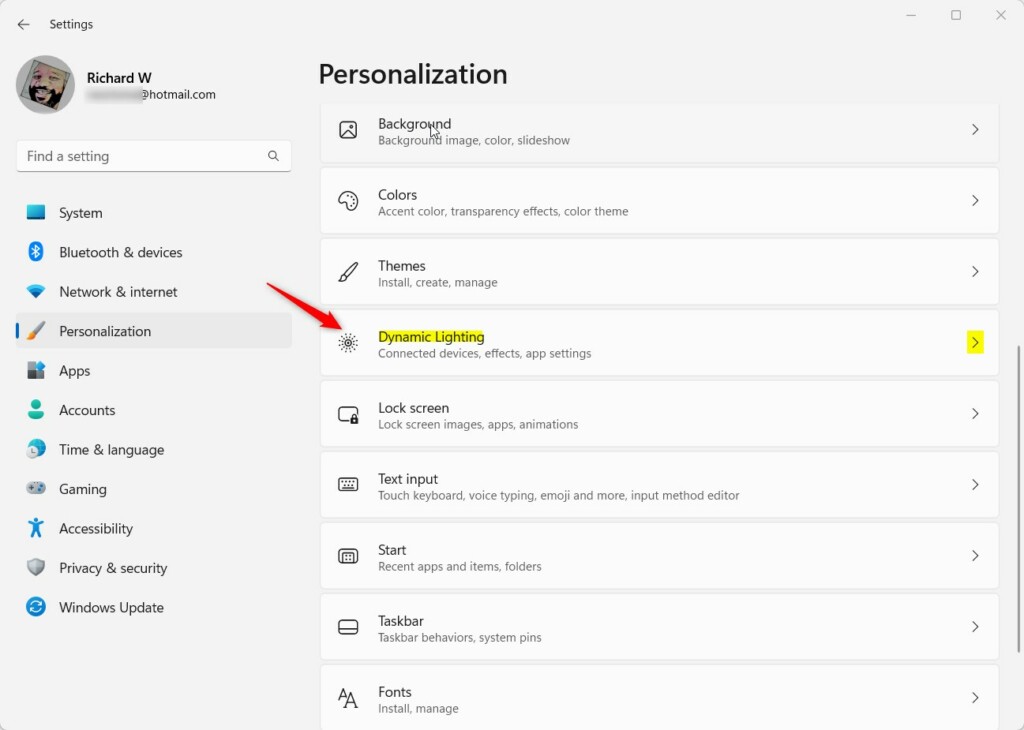
The Dynamic Lighting page lists any compatible lit devices that are connected. If the list is empty, the page and its switch still work. Windows just has nothing to control until a supported device is plugged in or paired.
Step 4Turn Dynamic Lighting On or Off
- Find the switch labeled Use Dynamic Lighting on my devices at the top of the page.
- Click the switch to set it to On to enable Dynamic Lighting, or to Off to disable it. The switch changes position right away. To undo the change, click it again.
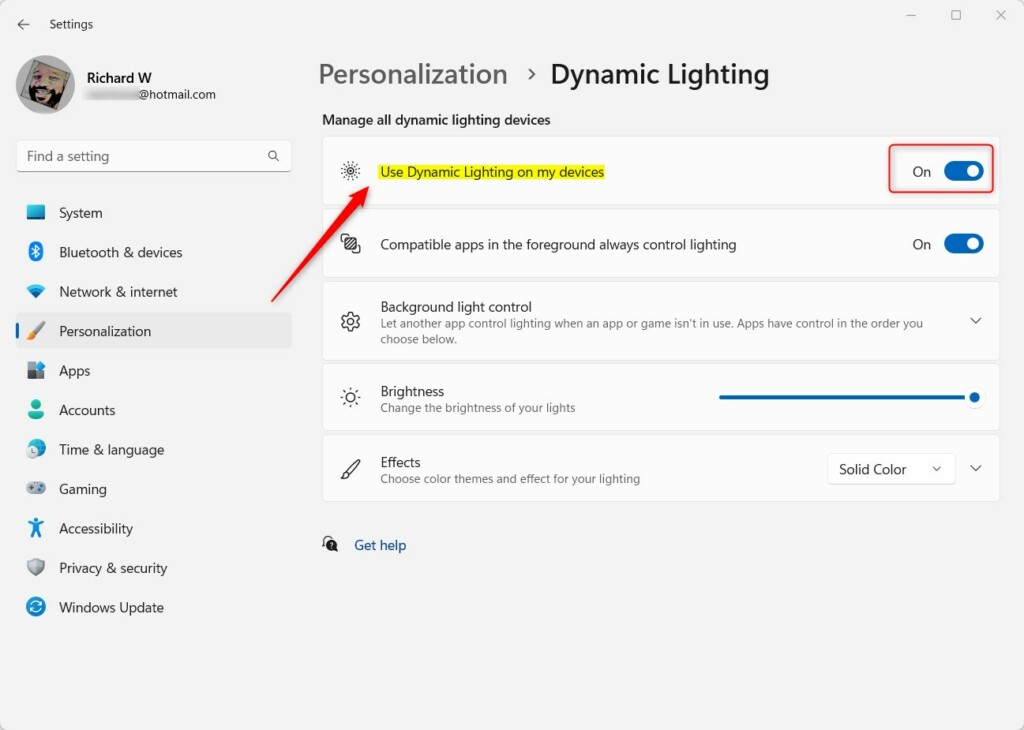
With the switch On, your devices follow the lighting settings on this page. With it Off, Windows stops controlling them. They then go back to whatever the device or its own app sets.
Step 5Close Settings
- When you're done, close the Settings window.
- Your changes save automatically. There is no Save or Apply button, and you don't need to restart.
Turn Dynamic Lighting On or Off Using the Registry Editor (Advanced)
You can also turn Dynamic Lighting on or off by editing the Windows Registry (a central database for system settings). Use this method when the Settings page is missing, or when you need to set it on several PCs or through a script. It's an advanced method, so use Settings if it works for you.
Before you start, consider creating a system restore point or exporting the key you're about to change. In Registry Editor, use File Export for that.
Change only the one value described below and leave everything else alone. Careful, small edits keep your hardware working normally.
Step 1Open the Registry Editor
- Press Windows key + R together. The Run dialog opens in the bottom left of the screen.
- Type
regeditin the Open box. - Press Enter. If a User Account Control prompt appears, click Yes. Registry Editor then opens.
- Note: Registry Editor may require admin privileges. If you're signed in with a standard account, Windows asks for an administrator's password. Without it, you won't be able to save the change.
Step 2Navigate to the Right Location
- Look for this path:
HKEY_CURRENT_USER\Software\Microsoft\Lighting. You can expand the folders in the left pane one at a time, or paste the path into the address bar at the top of Registry Editor and press Enter. - If you don't see the Lighting folder (called a key), you need to create it. Follow these steps:
- Right-click the Microsoft folder in the left pane.
- Choose New Key. A new folder appears with its name highlighted.
- Name it Lighting and press Enter. Click it once so it's selected.
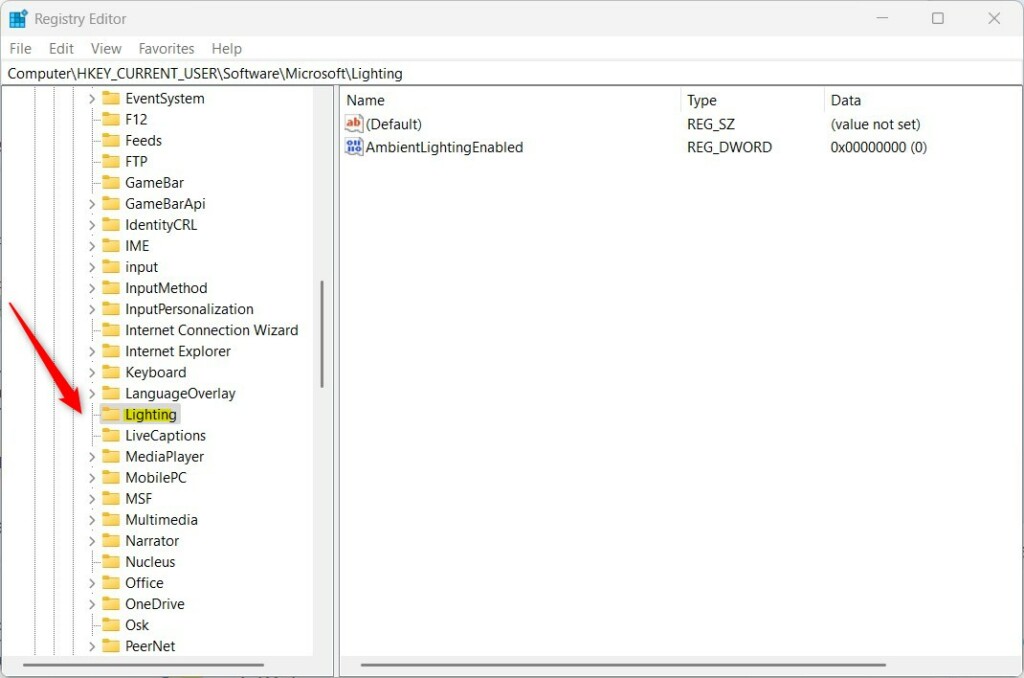
Check that the folder name is spelled exactly as shown in the path. A misspelled key is ignored by Windows, so the setting won't do anything.
Step 3Create a New Value
- With the Lighting folder selected, right-click an empty area on the right side.
- Select New DWORD (32-bit) Value. A new value appears in the list with its name highlighted. Use this type even on a 64-bit PC.
- Name this new value
AmbientLightingEnabledand press Enter.
Step 4Set the Value
- Double-click
AmbientLightingEnabled. The Edit DWORD (32-bit) Value window opens. - Set the Base to Decimal.
- Set the Value data to one of these:
1to turn Dynamic Lighting ON0to turn Dynamic Lighting OFF. Then click OK. The value shows the number you entered in the list. To undo the change later, come back here and enter the other number.
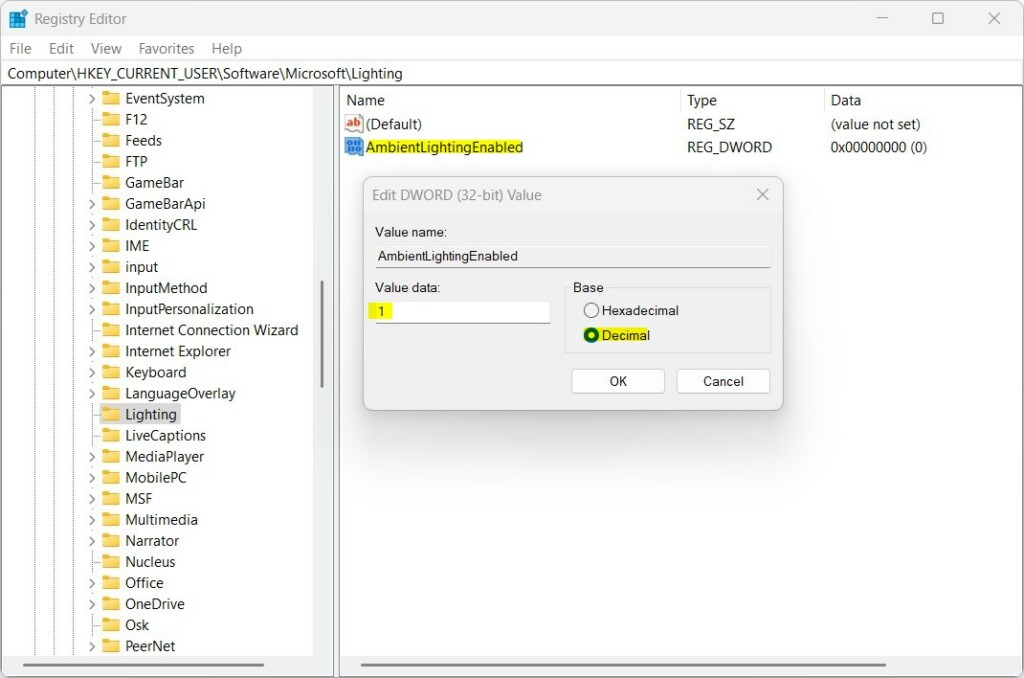
Switching it between Decimal and Hexadecimal after typing can change what the number means.
Step 5Close and Restart
- Close Registry Editor.
- Restart your computer to apply the changes. After you sign back in, open Settings Personalization Dynamic Lighting to check that the setting matches what you chose.
Summary
- Dynamic Lighting lets you control RGB lights on your compatible Windows 11 devices from one place.
- You can turn it on or off in Settings Personalization Dynamic Lighting. No restart is needed.
- Advanced users can also change this setting in the Windows Registry. A restart is needed afterward.
- This feature helps you personalize your PC lighting without extra apps, as long as your devices support it.
Dynamic Lighting in Windows 11 lets you manage the RGB lights on your computer parts and peripherals without installing extra software for each brand. You can turn it on or off in the Settings app, which is the easiest route, or through the Windows Registry if Settings isn't an option. Either way, you can switch it back whenever you like.
Was this guide helpful?

About the Author
Richard
Tech Writer, IT Professional
Richard is a writer at Geek Rewind who turns complex IT tasks into clear, step-by-step guides. He draws on years of hands-on experience in system administration and enterprise IT operations, focusing on Windows, Linux and WordPress: the problems people actually run into, and the fixes that work. His server and WordPress guides come from systems he runs himself. Richard builds and maintains the platform behind Geek Rewind, from its Ubuntu servers and Nginx configuration to its custom WordPress plugins. Many new tutorials start with readers' questions, and he's always glad to answer them in the comments.



No comments yet — be the first to share your thoughts!