How to Toggle Sidebar in OneDrive Photos App in Windows 11

The sidebar in the OneDrive Photos app holds shortcuts to your albums, memories, and folders in Windows 11. Hiding this panel gives your pictures more space on the screen, while showing it helps you jump quickly between different categories.
Version 2023 or newer of the app lets you press the menu button in the top corner or use your keyboard to toggle this sidebar on and off. Turning off the menu leaves more room to look at your pictures, and bringing it back takes one quick click whenever you need to find a specific folder.
Click the toggle sidebar button at the bottom of the navigation panel in the OneDrive photos app to switch between keeping the menu locked open and setting it to appear only when you hover your mouse over the edge of the screen.
Step 1Open the OneDrive Photos Experience
Open the OneDrive Photos app by clicking your Start menu , typing OneDrive in the search bar, and picking the app from the results list. You can also open the OneDrive Photos sidebar by clicking the cloud icon in your taskbar and choosing your pictures from the main hub window.
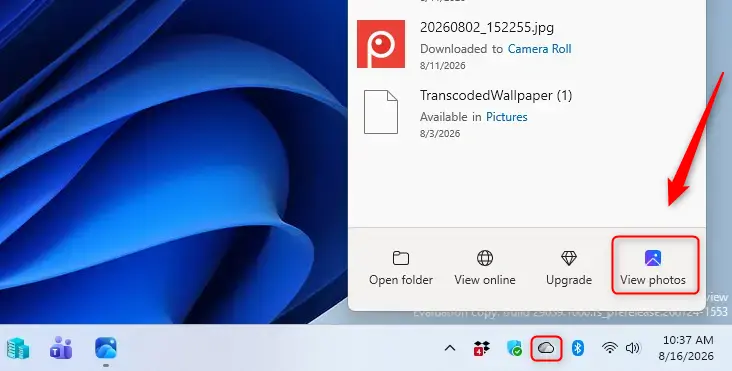
When the OneDrive hub opens, you can find the photo section by looking for a Photos shortcut or a picture icon on the left navigation pane. Opening this photo section launches the photo viewer window where your cloud memories and local computer folders appear together.
Step 2Locate the Toggle Sidebar Button
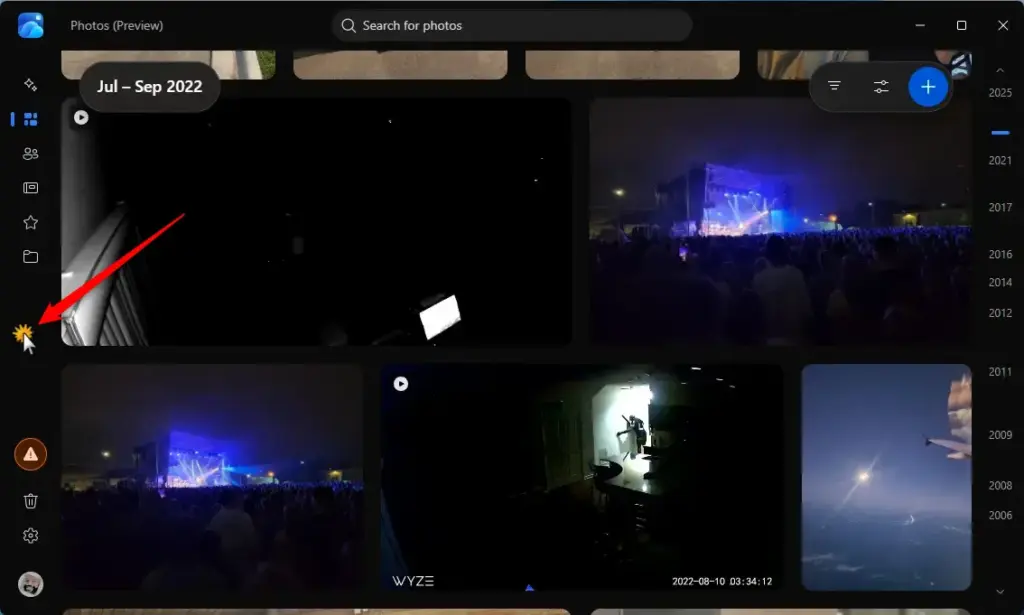
Locate the OneDrive Photos sidebar control switch at the very bottom of the left vertical menu panel, right below your links for Gallery, albums, and memories. This small button with horizontal lines lets you switch how the side menu behaves while you browse your pictures.
Hover your mouse over the OneDrive Photos sidebar menu area if the menu area is hidden or minimized. The OneDrive Photos panel will slide out to show text labels next to each icon. Move your mouse to the bottom corner of this expanded OneDrive Photos panel and hover over the toggle button. A tooltip may pop up to show you are on the right switch.
Step 3Keep Your Sidebar Always Open
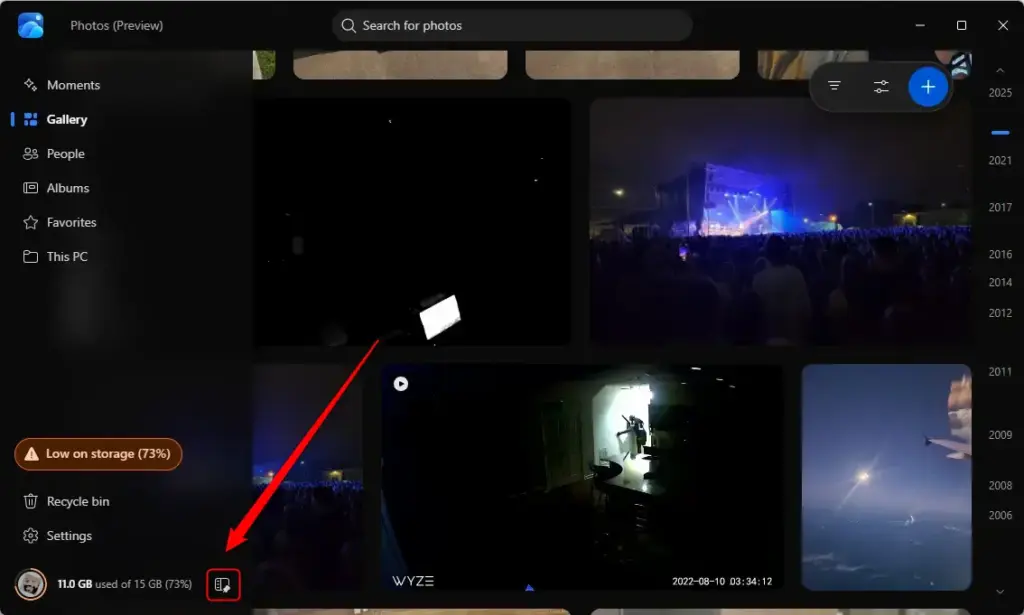
Keep your OneDrive Photos sidebar locked in place by clicking the toggle button at the bottom of the expanded menu. This anchors the panel to the left side of your window so your navigation links stay visible at all times while you look at your pictures.
To lock the panel in place, click the toggle sidebar button at the bottom of the expanded menu. This anchors the navigation pane to the left side of your photo window. Your photo gallery grid will resize to fit the remaining screen space so your pictures stay visible.
With this setting turned on, you can browse your Moments, check your Favorites, or open your Recycle Bin without hunting for hidden menus. It saves you an extra click every time you change categories.
Step 4Switch Your Sidebar to Open on Hover
Switch your OneDrive Photos sidebar to open on hover by clicking the toggle button at the base of the open menu to tuck it away. The app releases the locked panel so it slides shut and gives your pictures more room on the screen until you move your mouse to the left edge.
To turn on the hover behavior, click the same toggle button at the base of the sidebar while the menu is open. The app will release the locked panel, causing it to slide shut and leave small icons on the left margin.
Test your new setup by moving your mouse to the narrow left edge. When your pointer touches the side of the window, the menu will slide open. When you move your mouse away to view your pictures, the panel hides itself again.
Summary
Managing the OneDrive Photos sidebar gives you the freedom to choose between a locked menu for quick navigation and a hidden menu that opens on hover for maximum picture viewing space. Using the toggle button at the bottom of the left panel gives you full control over how your photo screen looks and works every day.
Was this guide helpful?

About the Author
Richard
Tech Writer, IT Professional
Richard is a writer at Geek Rewind who turns complex IT tasks into clear, step-by-step guides. He draws on years of hands-on experience in system administration and enterprise IT operations, focusing on Windows, Linux and WordPress: the problems people actually run into, and the fixes that work. His server and WordPress guides come from systems he runs himself. Richard builds and maintains the platform behind Geek Rewind, from its Ubuntu servers and Nginx configuration to its custom WordPress plugins. Many new tutorials start with readers' questions, and he's always glad to answer them in the comments.

No comments yet — be the first to share your thoughts!