How to Reset File Associations in Windows 11
Resetting file associations in Windows 11 fixes problems where the wrong app opens your files, like when a .docx document opens in a media player instead of Word.
File associations tell Windows which program should open a certain type of file, such as .jpg pictures opening in the Photos app. Windows 11 lets you reset these connections if they get mixed up or if a new program incorrectly takes over a file type.
This helps ensure your files open with the correct software every time. You can usually find this option within the main Settings app.
Open Settings, click Apps, then Default apps. Scroll down and click Reset to restore all default apps. This will revert custom choices, so you’ll need to re-select your preferred applications.
What happens when you reset file associations?
Performing a reset clears all your custom choices. Windows will revert any app you previously set as a default for photos, videos, or web links to its factory default. You’ll need to re-select your preferred apps the next time you open those file types.
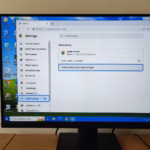
How to reset default apps via Settings
This is the safest way to fix file extension mapping issues.
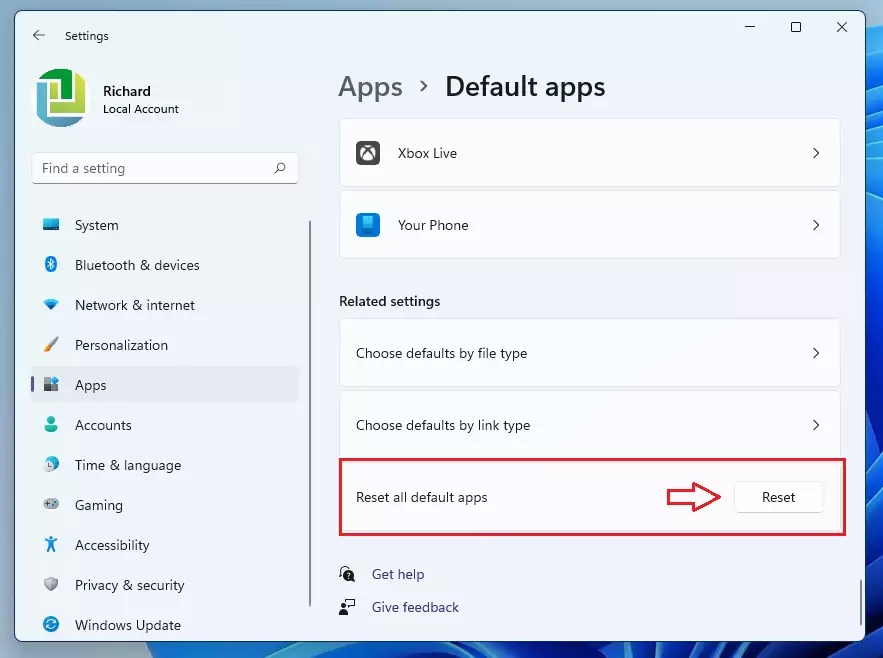
1. Press Windows key + I to open Settings.
2. Click Apps, then select Default apps.
3. Scroll to the very bottom to find the Reset all default apps section.
4. Click the Reset button.
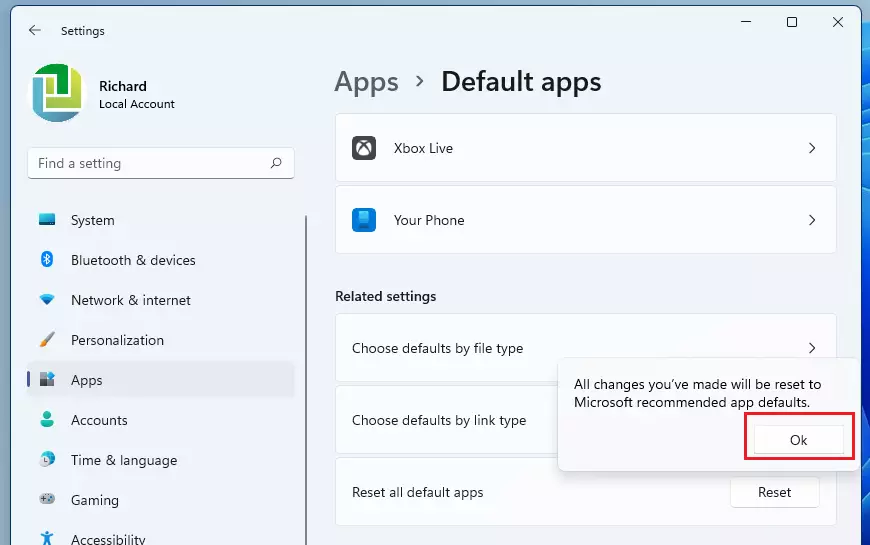
5. Click OK to confirm.
Fixing corrupted associations with the Open With dialog
Fixing corrupted associations with the Open With dialog. If a file isn’t opening correctly, you can often reset its association using the ‘Open With’ option.
If you’re facing a specific file issue, the ‘Open With’ dialog offers another solution.
Advanced: Resetting via Registry Editor (Admin Required)
If other ways to reset file associations in Windows 11 haven’t worked, you can try the Registry Editor. This advanced method requires administrator permission. Please be very careful when following the steps to reset file associations using the registry.
- Press Windows key + R, type regedit, and press Enter.
- Navigate to:
HKEY_CURRENT_USER\Software\Microsoft\Windows\CurrentVersion\Explorer\FileExts - Find the folder for the file extension (e.g., .png), right-click the UserChoice folder, and select Delete.
4. Restart your computer.
Advanced: Using DISM to repair system defaults (Admin Required)
When file associations are still incorrect, the DISM tool can help repair system defaults in Windows 11. This advanced method uses a command to restore your system’s default app settings, which can fix corrupted file associations.
- Open Command Prompt as Administrator.
- Type the following command and press Enter:
dism /online /import-defaultappassociations:C:\Windows\System32\appdefaults.xml
This command tells Windows to re-apply the core system defaults using the installation files.
Summary
Why do my file associations keep resetting after a Windows update?
Windows updates sometimes reset file associations to default apps. This helps keep your system secure and stable. If a program isn’t set up correctly to handle specific files, Windows might revert the setting to a default app, such as your browser.
Windows updates often reset file associations to Microsoft-recommended apps to ensure security and stability. If an app is not properly registered as a valid handler, Windows may revert the setting to a default browser or media player to prevent potential malware or compatibility issues during the update process.
Can I export and import file associations in 🪟 Windows 11?
Yes, you can save your current file association settings to a file and then use that file to set them on another computer.
Yes, you can save your current file association settings to a file and then use that file to set them on another computer.
Was this guide helpful?

About the Author
Richard
Tech Writer, IT Professional
Richard, a writer for Geek Rewind, is a tech enthusiast who loves breaking down complex IT topics into simple, easy-to-understand ideas. With years of hands-on experience in system administration and enterprise IT operations, he’s developed a knack for offering practical tips and solutions. Richard aims to make technology more accessible and actionable. He's deeply committed to the Geek Rewind community, always ready to answer questions and engage in discussions.

[…] UserChoice Protection Driver is a Windows feature that helps prevent unauthorized changes to file type associations. When a user sets a default program for opening a specific file type, Windows adds an entry for […]
Resetting file type associations? Why on earth some wants all those unwanted Microsoft apps back on its PC? The opposite is true, I guess.
I prefer other apps (Firefox, Thunderbird and so on), so I deleted Edge from W10 a long time
ago, and I am glad with that decision. The EU was not able to stop those Seattle alligators, better do that on our own (with a litte help from henrypp’ s simplewall).