How to Remove All Accounts from Microsoft Authenticator


Microsoft Authenticator is a phone app that adds a second check to your sign-ins with a tap or a one-time code. It has no single delete-all button. The quickest way to remove every account is to wipe the app’s data (Android) or delete and reinstall the app (iPhone). Do this when you sell your phone, move to a new device, or clear out old work and school logins.
Before you start, remove the sign-in method at each service where you use the app, or make sure you have another way in (a backup code, a different phone number or another authenticator). Wiping the app does not tell Microsoft, Google or your employer to stop expecting a code from it. If the app is your only second factor, you can lock yourself out. Work and school accounts may also need your IT admin to reset your sign-in method.
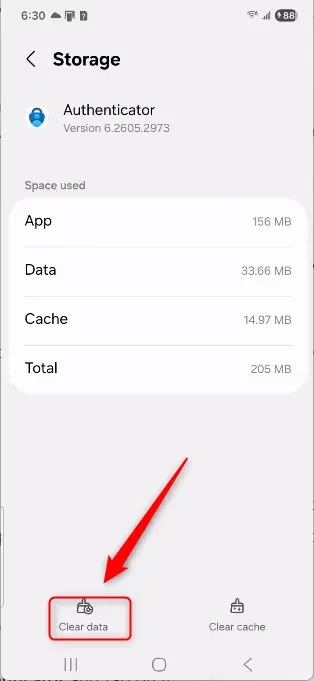
Open Settings Apps on Android and tap Microsoft Authenticator Storage Clear data, or on iPhone go to Settings General > iPhone Storage Authenticator Delete App, then reinstall it. All accounts are removed permanently.
What Happens When You Remove All Accounts?
After the wipe, the app is completely empty and ready for a fresh setup. If you only want to drop one or two accounts, you can instead open the app, tap the account and remove it from its settings. The steps below are for removing everything at once.
Removing All Accounts: The Full Reset
Whether the app can bring accounts back afterwards depends on whether you turned on its cloud backup. If you did, signing in to the app’s recovery option on a phone can restore the accounts. If you want a truly clean start, turn off the backup in the app’s settings before you wipe it.
Clearing App Data on Android
Clearing app data on Android is the fastest way to remove every account and all saved sign-in information from the app. It deletes every stored profile at once, and you do it from the phone’s settings without opening the app. Menu names vary a little between Samsung, Pixel and other makers, so use the closest match on your phone.
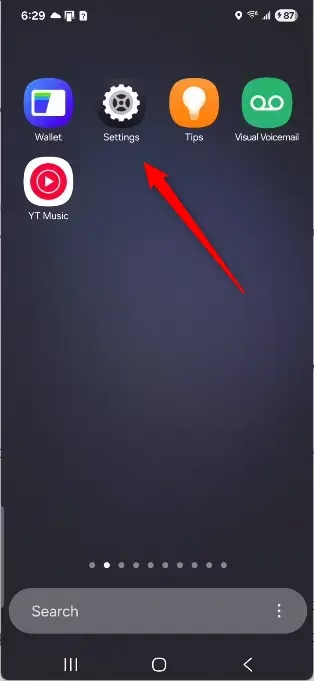
- Unlock your Android phone and open the Settings app. It usually looks like a gear icon.
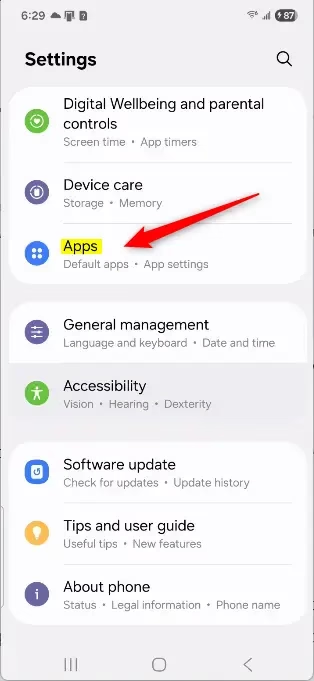
- Scroll down and tap Apps. On some phones it is called Applications or App Management. You should see a list of your installed apps.
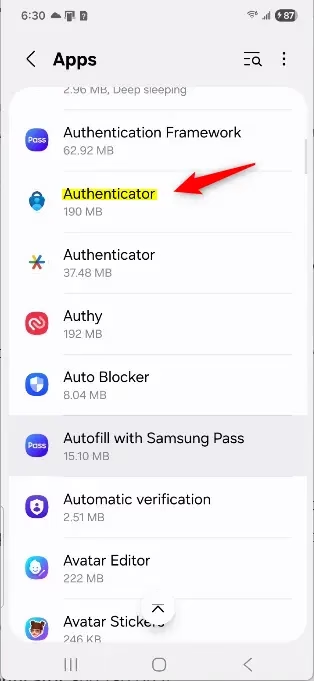
- Scroll to Authenticator and tap it. If you can’t find it, tap See all apps or use the search icon. You should now see the app’s info screen.
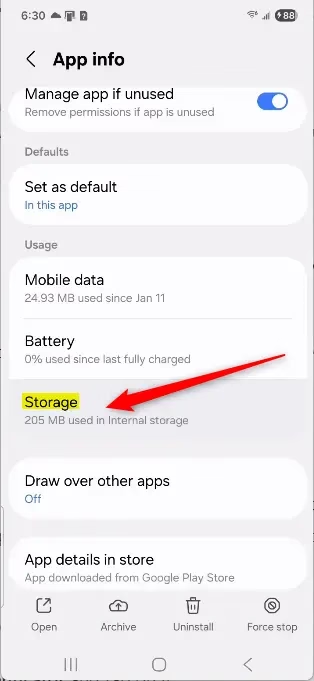
- Tap Storage or Storage & cache. You should see the storage options for the app.
- Tap Clear data. On some phones this is under Manage storage and may be called Clear all data. Don’t tap Clear cache, because that does not remove your accounts.
- A message will ask if you’re sure. Warning: This action is permanent! Tap OK or Confirm to continue. The accounts are deleted straight away.
If Clear data is greyed out, the app may be locked by a work profile or device policy. In that case, ask your IT admin, or uninstall the app and reinstall it from the Play Store.
Open the app again. The main screen should show zero accounts, as though it were freshly installed. You may be asked to go through the first-run screens or to restore from a backup. Choose to skip the restore if you want it to stay empty.
Offloading the App on iPhone
On iPhone, Apple does not let you clear one app's data separately. You have to delete the app, then reinstall it. This removes the app and its stored local data in one step.
Offloading removes the app itself but keeps its documents and data, so when you reinstall it, your accounts come back. To wipe the accounts, use Delete App instead.
- Unlock your iPhone and open the Settings app.
- Tap General, then tap iPhone Storage. The list of apps may take a few seconds to load.
- Scroll down to Authenticator and tap it. You should see the app's size and two options at the bottom.
- Tap Delete App, then tap Delete App again to confirm. The icon disappears from your Home Screen.
- Open the App Store, search for Microsoft Authenticator and tap the download button to reinstall it. Tip: If you see a small cloud icon on the Home Screen, that means the app was offloaded and not deleted. Tapping it brings the old data back.
- Important warning: Just like on Android, this removes all accounts from the app and there is no going back. Once you reinstall and open the app, it will be empty. Your phone can't approve sign-ins until you add accounts again.
Reinstalling after deleting gives you the same clean state as clearing data on Android. As on Android, an iCloud backup in the app can offer to restore your accounts, so skip that option if you want it empty.
Summary
Once the reset is done, the app holds no accounts and is back in its initial state. Check that you can still sign in to your important accounts using another method. If you are keeping the phone, you can add your accounts back from each service's security settings.
Have a question about this guide?
Answered by AI from this guide. Good questions may be added to this page — please don't include personal details.
Did this guide fix your problem?

About the Author
Richard
Tech Writer, IT Professional
Richard is a writer at Geek Rewind who turns complex IT tasks into clear, step-by-step guides. He draws on years of hands-on experience in system administration and enterprise IT operations, focusing on Windows, Linux and WordPress: the problems people actually run into, and the fixes that work. His server and WordPress guides come from systems he runs himself. Richard builds and maintains the platform behind Geek Rewind, from its Ubuntu servers and Nginx configuration to its custom WordPress plugins. Many new tutorials start with readers' questions, and he's always glad to answer them in the comments.
No comments yet — be the first to share your thoughts!