How to Mount Windows 11 Shares on Ubuntu Linux


Mounting Windows 11 shares on Ubuntu Linux links your Windows folders directly to your Ubuntu desktop so you can open and edit files across both operating systems. This connection uses SMB (Server Message Block, a network protocol for sharing files) built into Windows 11 to let Ubuntu access your PC over a local network.
To prepare your system, run the command sudo apt update && sudo apt install cifs-utils in your Ubuntu terminal to grab the necessary tools for handling Windows network folders.
Install `cifs-utils` on Ubuntu, create a mount point folder, and use the `mount` command with your Windows IP, share name, and credentials. For permanent mounting, add an entry to your `/etc/fstab` file.
Enable Network Discovery in 🪟 Windows 11
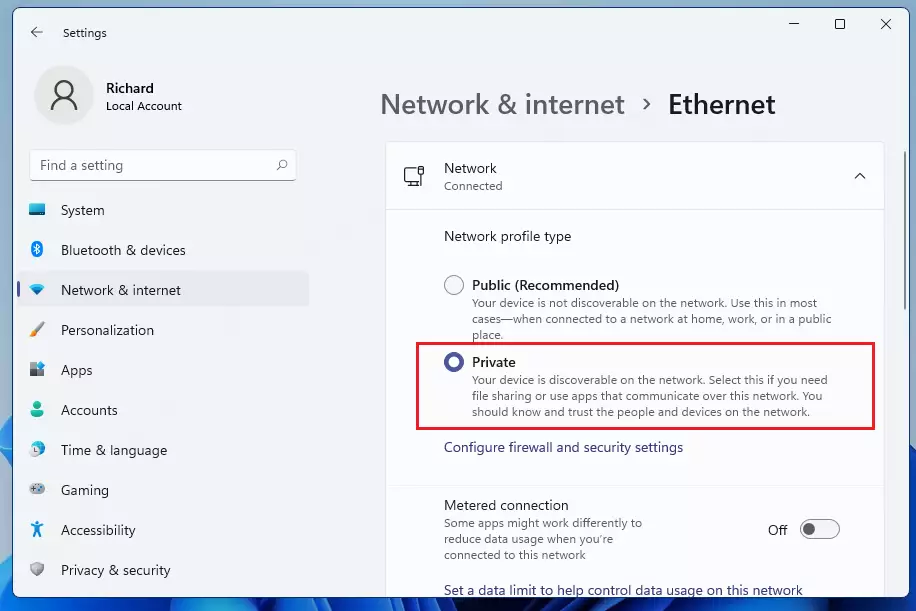
Enable network discovery in Windows 11 so your Ubuntu computer can see your PC on the local network. Open Settings using the Win plus I, click Network & internet, select Ethernet or Wi-Fi , and change your network profile type to Private. Private profile types allow other devices on your home network to detect your Windows PC and access shared folders.
To get to System Settings, use the Windows key + I shortcut or click Start ==> Settings.

In Windows Settings , click Network & Internet, then select Ethernet.
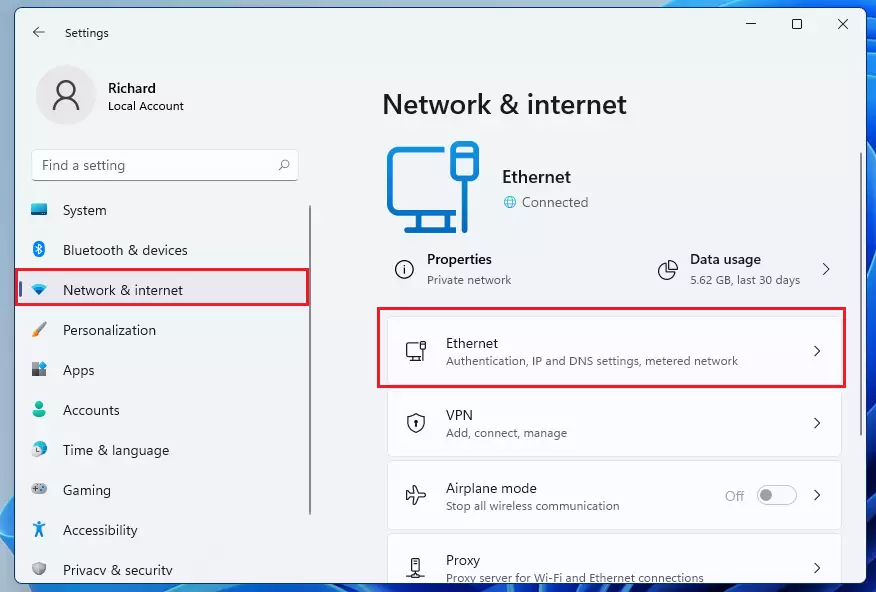
For the Network profile type, choose `Private`. This setting lets other computers on your local network discover your Ubuntu Linux machine. This configuration remains crucial for accessing shared files, as it signals your computer operates on a trusted network.
Latest Update
Configure persistent Windows shares on Ubuntu by adding a mounting rule to the bottom of your /etc/fstab file. Open the file with sudo nano /etc/fstab and include your Windows PC IP address, share name, and credentials file location. The _netdev option remains important to ensure Ubuntu does not try to mount the share before the network starts.
Turn on Public Folder Sharing in 🪟 Windows 11
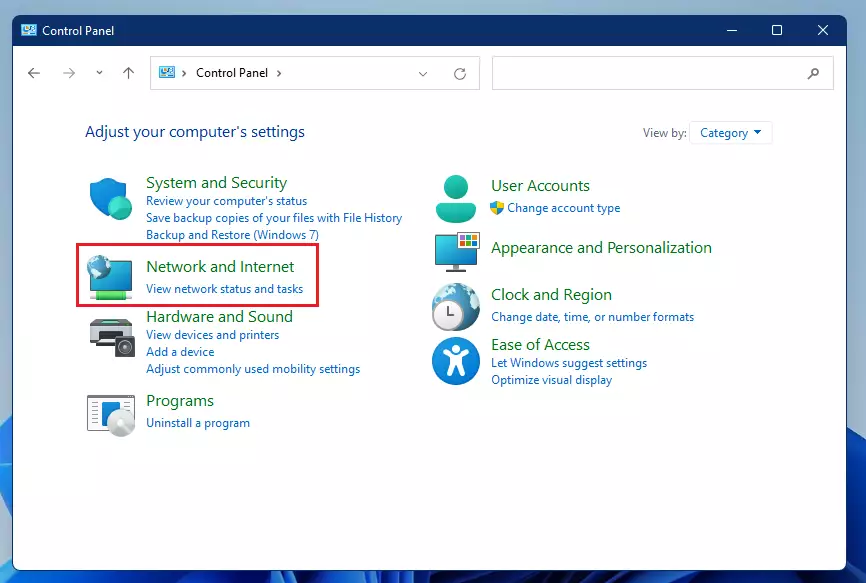
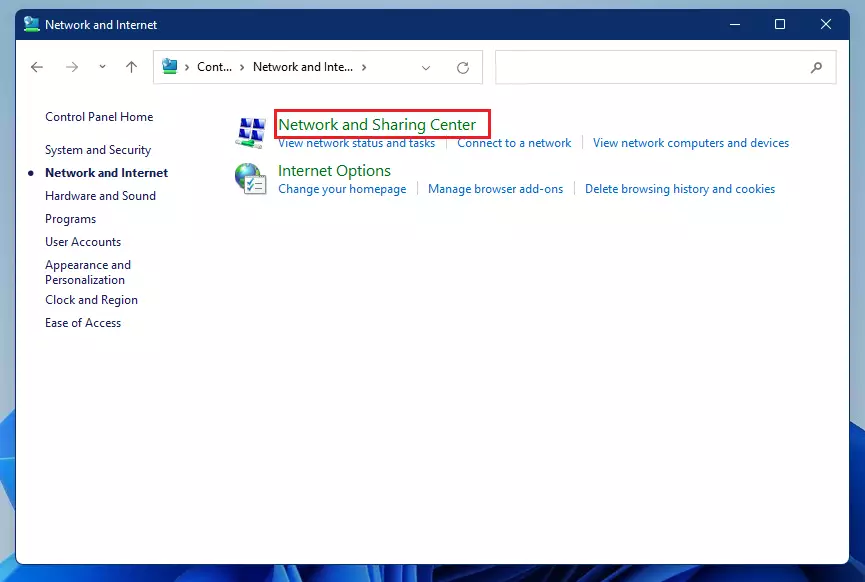
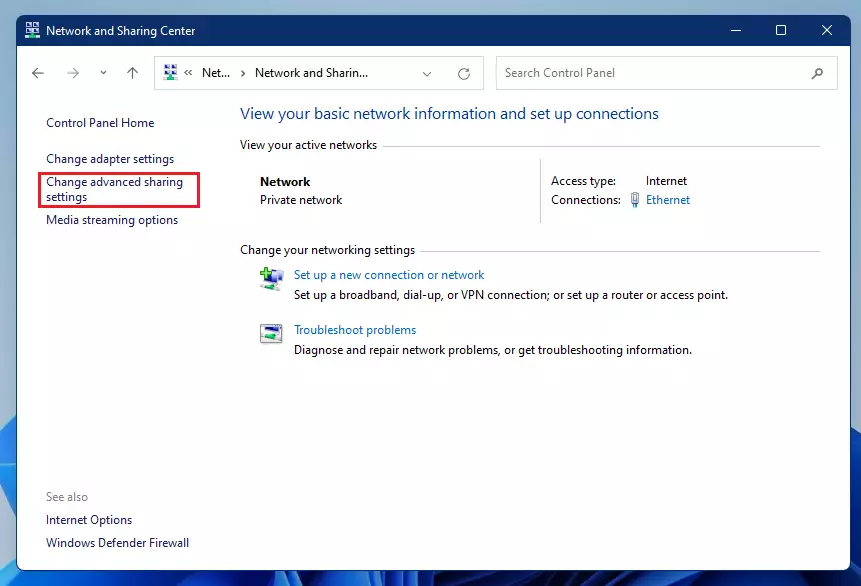
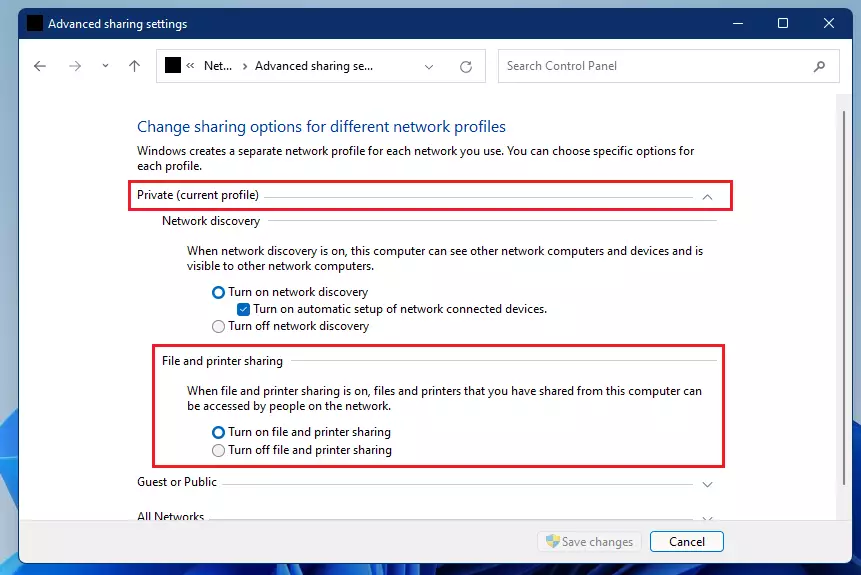
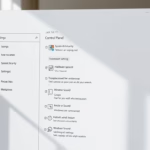
Turn on file and printer sharing in Windows 11 to let Ubuntu access files on your PC. Open the Control Panel, go to Network and Sharing Center, and click Change advanced sharing settings. Under the Private network settings, select Turn on file and printer sharing so your computer can broadcast shared folders across the network.
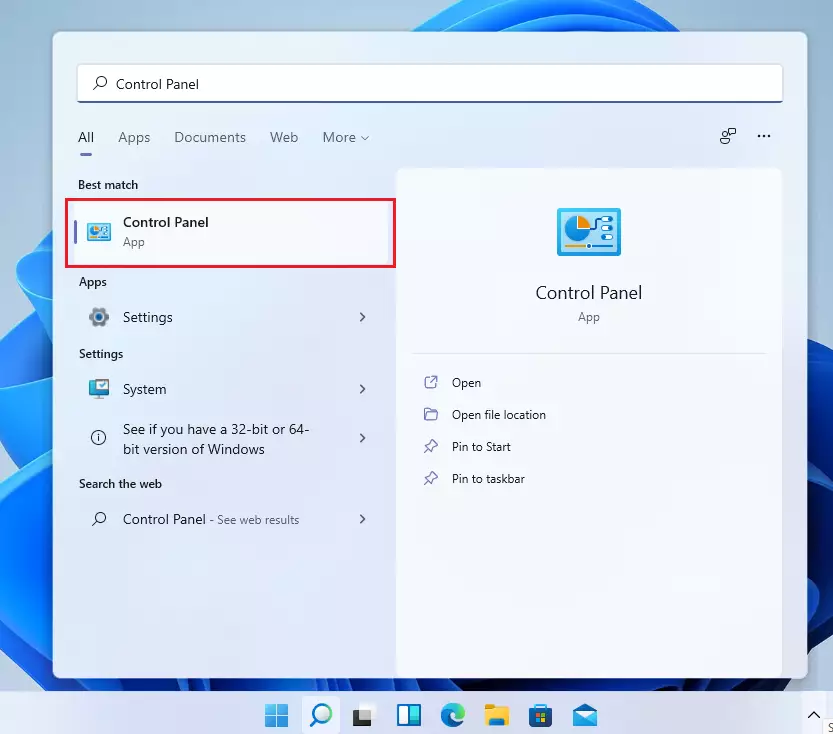
Select Network and Internet.
Select Network and Sharing Center.
Select Change advanced sharing settings.
Under Private, select Turn on file and printer sharing.
You can also run these commands in an administrator Command Prompt:
netsh advfirewall firewall set rule group="File and Printer Sharing" new enable=Yes
netsh advfirewall firewall set rule group="Network Discovery" new enable=Yes
How to mount Windows shares on Ubuntu Linux
Mount Windows shares on Ubuntu Linux by installing the cifs-utils package and creating a local folder to act as your mount point. Run sudo apt update followed by sudo apt install cifs-utils in your terminal to get the required tools. Next, create a folder using mkdir to connect your remote Windows folders directly to your Ubuntu file system.
Before mounting, ensure your Windows PC is set up to share folders. Gathering the IP address of your Windows PC and the name of the shared folder is also necessary.
Mounting Methods
- Manual Mount: Use the
mountcommand for temporary access. It's quick for one-time use but won't survive a reboot. - Automatic Mount (
fstab): Edit the/etc/fstabfile for persistent mounting. The share will be available every time you start Ubuntu.
Choose between manual and automatic mounting methods depending on how long you need access to your Windows share on Ubuntu. Manual mounting using the mount command provides quick, temporary access that disappears when you reboot. Automatic mounting through the fstab file makes the Windows share available permanently every time your Ubuntu computer starts up.sudo mkdir /mnt/Windows_Share
Mount the share using the mount command:
sudo mount -t cifs -o username=<Windows_UserName> //WindowsPC_IP/<ShareName> /mnt/Windows_ShareLet's break down what those terms mean:
- -t cifs: Tells Ubuntu to use the CIFS/SMB protocol.
- username: Your Windows login name.
- //192.168.1.5/ShareName: The network path to your Windows folder.
- /mnt/Windows_Share: The folder on Ubuntu where files will appear.
Advanced Mount Options and Security
Secure credentials for mounting Windows shares on Ubuntu by storing your username and password in a hidden text file instead of typing them into the terminal. Create a file named .smbcredentials in your home directory, add your login details, and lock down the file permissions using chmod so other system users cannot read your Windows password.
.smbcredentials file are set correctly. If the file is too open, your password could be exposed. Use chmod 600 /home/user/.smbcredentials to ensure only you can read it.nano /home/user/.smbcredentials
Add these lines to the file:
username=generic_user
password=your_password
domain=WORKGROUP
Protect the file so only you can read it:
sudo chown root: /etc/credentials
sudo chmod 600 /etc/credentials
Use this command to mount using the file:
sudo mount -t cifs -o credentials=/etc/credentials //WindowsPC_IP/<ShareName> /mnt/Windows_ShareHow to auto-mount with /etc/fstab
Auto-mount Windows shares in Ubuntu by editing the /etc/fstab file so your shared folders reconnect automatically after every reboot. Open the fstab file using nano and add a specific configuration line containing your Windows PC IP address, folder name, and credentials file path, along with the _netdev option to wait for the network to load.
Latest Update
To have your Windows share automatically mount every time Ubuntu starts, add a line to your /etc/fstab file. Open the file with sudo nano /etc/fstab and add the specific line, including your Windows PC's IP address, the share name, and the location of your credentials file. The _netdev option remains important.
sudo nano /etc/fstab
Add this line to the bottom of the file:
//WindowsPC_IP/ShareName /mnt/Widows_Share cifs credentials=/etc/credentials,file_mode=0755,dir_mode=0755 0 0
The _netdev option ensures the system waits for the network to be active before trying to mount the share.
Summary Table
| Method | Persistence | Best For |
|---|---|---|
| Manual Mount | Temporary | Quick, one-time file access |
| /etc/fstab | Permanent | Automatic access at startup |
Summary
Mounting Windows shares on Ubuntu allows for robust file sharing. Enabling Network Discovery on Windows and using the cifs-utils package on Ubuntu connects systems securely. Use the '/etc/fstab' file for permanent access, and always use a credentials file to keep your passwords safe.
```Was this guide helpful?

About the Author
Richard
Tech Writer, IT Professional
Richard is a writer at Geek Rewind who turns complex IT tasks into clear, step-by-step guides. He draws on years of hands-on experience in system administration and enterprise IT operations, focusing on Windows, Linux and WordPress: the problems people actually run into, and the fixes that work. His server and WordPress guides come from systems he runs himself. Richard builds and maintains the platform behind Geek Rewind, from its Ubuntu servers and Nginx configuration to its custom WordPress plugins. Many new tutorials start with readers' questions, and he's always glad to answer them in the comments.

No comments yet — be the first to share your thoughts!