How to Manage Who Can Call You in Microsoft Teams

Call management in Microsoft Teams controls who can reach you by call and lets you set quiet hours for your time off. It cuts down on work interruptions by sending calls to voicemail or to specific colleagues, based on rules you create.
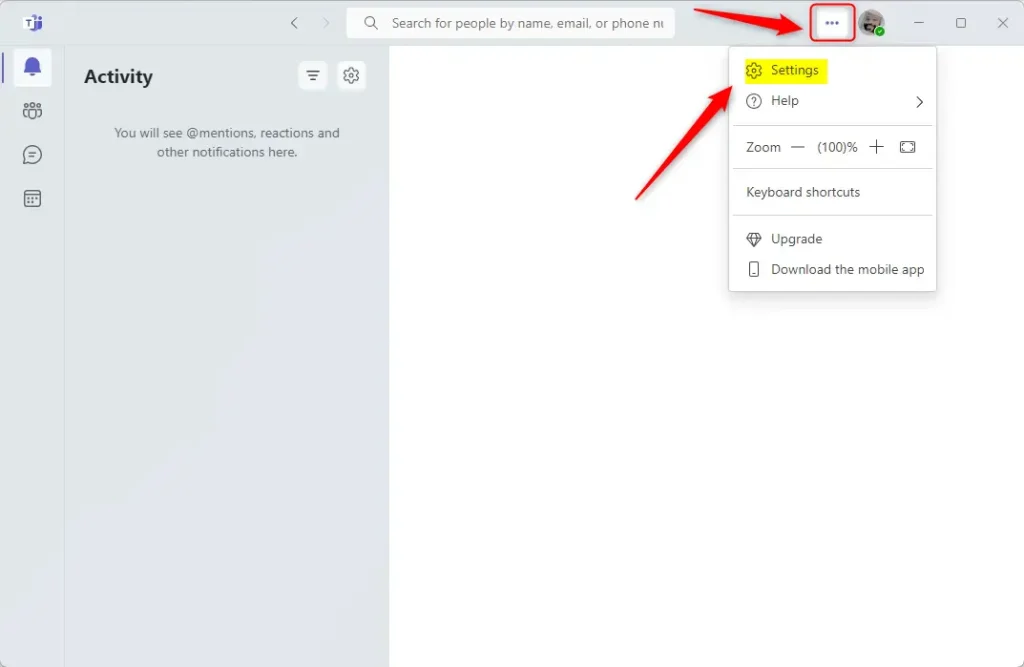
To start, open Microsoft Teams, select your profile picture at the top right, and choose Settings. From there you can forward calls to another person or group, send unanswered calls to voicemail after a set number of seconds, and pick the hours when Teams rings your phone. Which options you see depends on your account type. This tutorial focuses on the Privacy setting that controls who can start a call with you. Work or school accounts usually manage forwarding and voicemail under Settings Calls, and your organization’s admin may lock some of those options.
To manage who can call you in Microsoft Teams, go to your profile picture, select Settings, then Privacy, and finally “Manage how people can call you.” You can then choose between “Everyone” or “My contacts.
Managing Who Can Call You in Teams Free
Restricting incoming calls means only approved contacts can ring you. You do it in a few steps, starting with the profile menu.
Step 1Go to Your Settings
Every call preference lives behind your profile picture. That menu holds your personal preferences, audio options and routing rules, so it is the starting point for everything below.
- Open Microsoft Teams and sign in if you are not already.
- Find your profile picture. On desktop, it is in the top right corner of the Teams window. On mobile, it is usually in a corner of the app.
- Click or tap the picture. A menu opens with your account options.
- On Mobile: Look for your profile picture, usually in a corner of the app. Tap it to open a menu.
- On Desktop: Find your profile picture in the top right corner of the Teams window. Click it to see your options.
Step 2Find Privacy Settings
Next, open the settings that control who can interact with you.
- In the menu that dropped down from your profile picture, select Settings. The Settings window or screen opens.
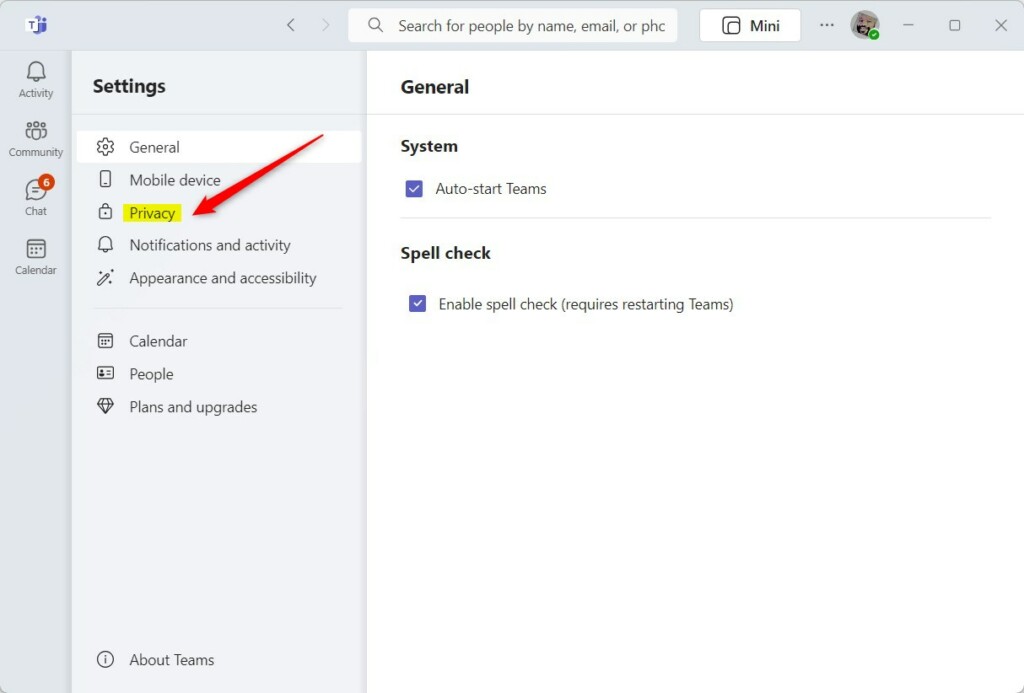
- Select the Privacy section. This is where you control interactions and profile visibility.
If you cannot find a Privacy section, you are probably signed in with a work or school account. Those accounts follow rules set by your organization, so check Settings Calls instead, or ask your admin.
Step 3Locate Call Management
The Privacy page holds the controls for your status and profile visibility. The one you want is the call setting.
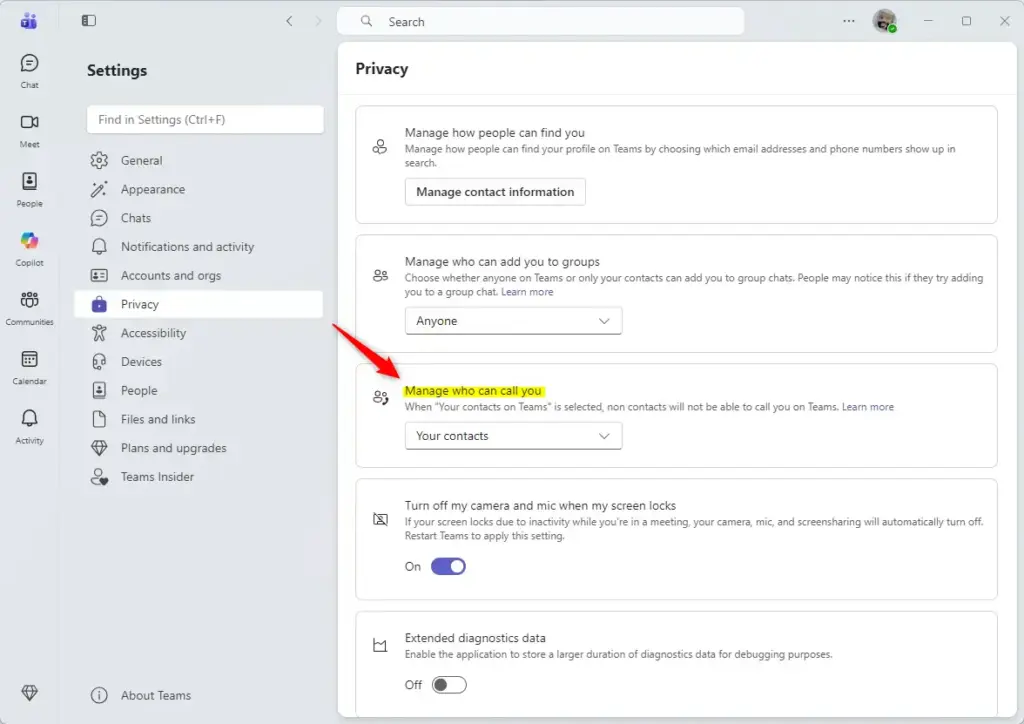
- Scroll through the Privacy page until you see Manage how people can call you.
- Look at the options listed there. This is where you decide which contacts can start a call with you.
Step 4Choose Your Call Preference
Now decide who can ring your device. Choosing Everyone lets any user with your contact details reach you directly. Choosing My contacts blocks unknown callers and lets only trusted people start voice or video calls with you.
- Everyone: Anyone who has your contact info in Teams Free can call you. Even if you have never talked to them, they can start a voice or video call. This can help if you use Teams Free for a group and want everyone to reach you easily.
- My contacts: This is the default setting, and many people keep it. Only people who have sent you a chat request, and whom you accepted, can call you. It gives you more control, because only people you have already talked to can ring you.
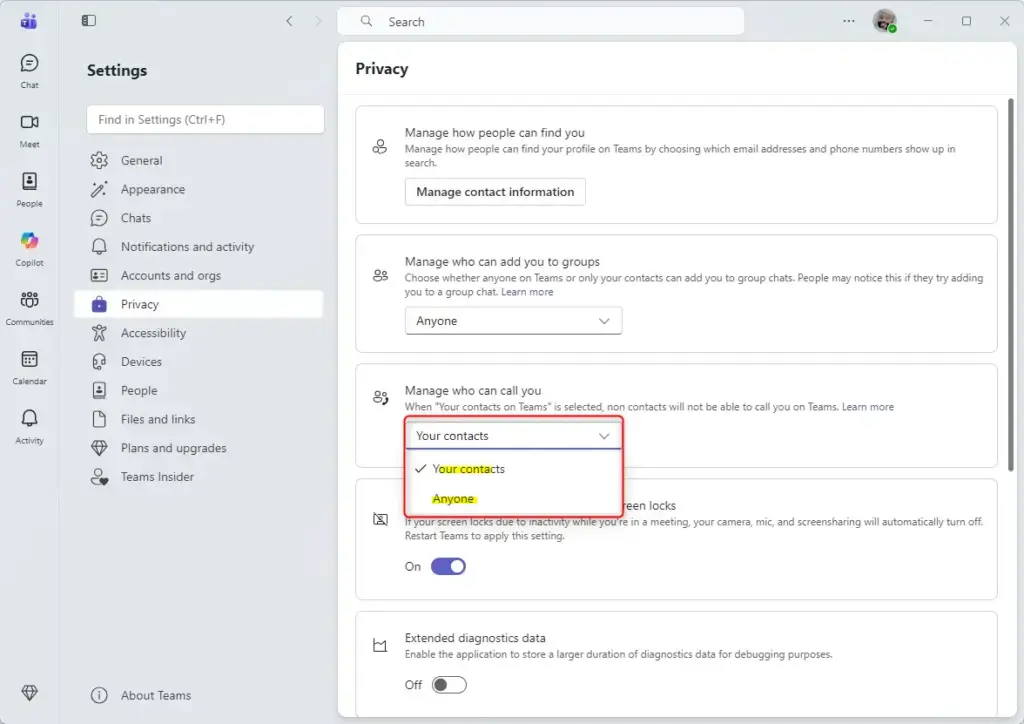
- Choose either Everyone or My contacts. For cutting down unwanted rings, My contacts works best.
- Close Settings. You should not need to restart Teams, but if the change does not seem to apply, sign out and back in.
To undo the change, return to Settings Privacy and pick the other option. If you switch to Everyone and start getting calls you do not want, switch back to My contacts.
Reference:
Summary
In short, the Privacy settings decide who can call you through the Everyone and My contacts options. Check them whenever you start getting calls from people you do not know.
Have a question about this guide?
Answered by AI from this guide. Good questions may be added to this page — please don't include personal details.
Did this guide fix your problem?

About the Author
Richard
Tech Writer, IT Professional
Richard is a writer at Geek Rewind who turns complex IT tasks into clear, step-by-step guides. He draws on years of hands-on experience in system administration and enterprise IT operations, focusing on Windows, Linux and WordPress: the problems people actually run into, and the fixes that work. His server and WordPress guides come from systems he runs himself. Richard builds and maintains the platform behind Geek Rewind, from its Ubuntu servers and Nginx configuration to its custom WordPress plugins. Many new tutorials start with readers' questions, and he's always glad to answer them in the comments.
No comments yet — be the first to share your thoughts!