How to Install Tomcat 11 on Ubuntu 24.04

Apache Tomcat 11 is a free, open-source web server that runs Java websites and programs on your server. Installing it on Ubuntu 24.04 takes about 10 minutes from start to finish.
The setup requires a working Java installation. Tomcat 11 needs Java 17 or later. You download the Tomcat archive, extract it, and give it its own user account. You then set up a systemd service so the web server starts automatically at boot. The steps below assume you run commands as a user with sudo rights.
Download the Tomcat 11 binary archive with curl, extract it, and move it to /usr/libexec/tomcat11 on Ubuntu 24.04. Create a tomcat system user, set a systemd service file at /usr/lib/systemd/system/tomcat11.service, then run sudo systemctl enable –now tomcat11. Tomcat 11 requires Java 17 or later, so install Java first.
Install Java Runtime Environment
If you don’t have Java yet, read the post below and install it first. Check that the version you install is Java 17 or newer, because Tomcat 11 will not start on older releases.
Install Java Runtime Environment on Ubuntu
Once Java is installed on Ubuntu, come back here and continue with the Tomcat installation.
Download Tomcat packages
To download Tomcat 11 for your Ubuntu 24.04 system, grab the latest core binary archive from the official Apache Tomcat website. The core archive is the plain tar.gz package. It contains everything the server needs, so you don’t miss any components when you install Tomcat 11 on Ubuntu.
Tomcat releases new minor versions often, so check the latest version number and download source on the download site before you continue. If the version in the command below is out of date, change it to match the current release.
Since we're installing Tomcat version 11, download the version 11 binary archive with the command below.
curl -O https://dlcdn.apache.org/tomcat/tomcat-11/v11.0.4/bin/apache-tomcat-11.0.4.tar.gz
When the download finishes, extract the archive with the command below. This creates a new folder with the Tomcat files in the directory where you ran the command.
tar zxvf apache-tomcat-11.0.4.tar.gz
Then move the extracted folder to /usr/libexec/tomcat11. This will be the working directory of the Tomcat user we create in the next section. You can delete the downloaded archive afterwards if you want to save disk space.
sudo mv apache-tomcat-11.0.4 /usr/libexec/tomcat11
Create Tomcat user
Next, create a dedicated system account for Tomcat, with the Tomcat folder as its home directory. Running the server under its own account, instead of your login or root, limits the damage if a web application is ever compromised. It is also the safe way to install Tomcat 11 on Ubuntu.
Run the first command below to create the Tomcat user, with the extracted Tomcat folder as its home directory.
Then run the second command, which makes the Tomcat user the owner of the directory. Without this step, Tomcat can't write its logs, temp files or deployed applications, and the service will fail to start.
sudo useradd -M -d /usr/libexec/tomcat11 tomcat
sudo chown -R tomcat:tomcat /usr/libexec/tomcat11
Create system service
Now create a systemd service file for Tomcat 11. This lets you start, stop and restart the server with the normal service tools. It also makes Tomcat start by itself every time the machine boots.
Run the command below to create and open the Tomcat service file in an editor.
sudo nano /usr/lib/systemd/system/tomcat11.service
Copy the content below and paste it into the file. Check that the Java path and the Tomcat folder in the file match your system. A wrong path here is the most common reason the service fails to start.
[Unit]
Description=Apache Tomcat 11
After=network.target

[Service]
Type=oneshot
ExecStart=/usr/libexec/tomcat11/bin/startup.sh
ExecStop=/usr/libexec/tomcat11/bin/shutdown.sh
RemainAfterExit=yes
User=tomcat
Group=tomcat

[Install]
WantedBy=multi-user.target
Save the file and exit the editor.
Next, enable the service with the commands below. Enabling it makes Tomcat start at boot. Check that the service status shows it as running. If it shows an error, re-check the service file you just saved.
sudo systemctl enable --now tomcat11
sudo systemctl restart tomcat11
Access Tomcat web portal
To reach the Tomcat web portal, open a web browser and type your server's IP address followed by port 8080. Tomcat listens on 8080 by default. If the page shows up, your Tomcat 11 installation on Ubuntu worked. This is also the starting point for managing deployed applications.
You can use either the server's IP address or its hostname, followed by port 8080. If the page doesn't load from another computer, check that the service is running. Also check that no firewall on the server is blocking port 8080.
http://srv1.example.com:8080
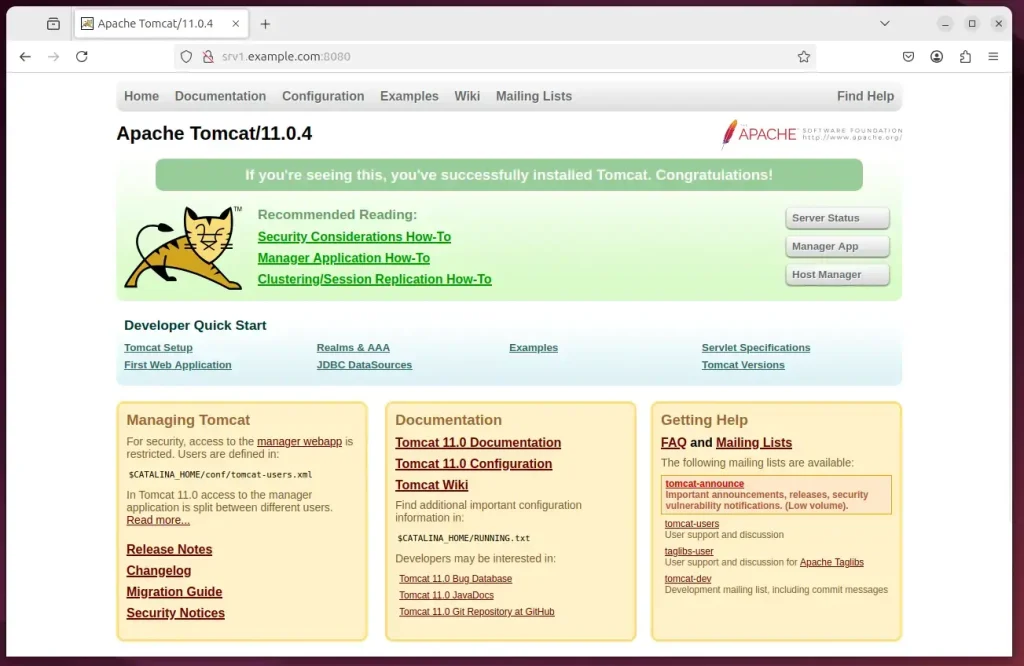
If you see the Tomcat start page, Tomcat is installed and ready.
The start page works without a login. To open the server manager, though, you need an account and password, and none exists yet.
You create one by editing the user configuration file below.
sudo nano /usr/libexec/tomcat11/conf/tomcat-users.xml
Copy the code below and paste it into the file, just before the </tomcat-users>. Change the username and password to your own values. Use a strong password, because this account can deploy applications to your server.
<role rolename="manager-gui"/>
<role rolename="admin-gui"/>
<user username="admin" password="type_new_password_here" roles="manager-gui,admin-gui"/>
</tomcat-users>
Save the file and exit.
By default, Tomcat only lets the manager apps be opened from the server itself. To reach them remotely, you must allow your remote IP address. Do this by editing the context.xml file of each app. There are two files, one for the Server Manager app and one for the Host Manager app.
Server Manager app:
sudo nano /usr/libexec/tomcat11/webapps/manager/META-INF/context.xml
Host Manager app:
sudo nano /usr/libexec/tomcat11/webapps/host-manager/META-INF/context.xml
Allow only the addresses you need. Opening the manager apps to everyone is a security risk.
<Context antiResourceLocking="false" privileged="true" >
  <!--<Valve className="org.apache.catalina.valves.RemoteAddrValve"
         allow="127.d+.d+.d+|::1|0:0:0:0:0:0:0:1|new_public_ip_address_here" />-->
</Context>
Save and close the files. If the manager pages don't pick up your changes, restart the Tomcat service and try again. Then you're done!
That should do it!
Conclusion:
In summary, installing Apache Tomcat 11 on Ubuntu 24.04 is a straightforward process that involves several key steps:
- Java Requirement: Ensure a Java runtime (version 17 or later) is installed before setting up Tomcat.
- Downloading Tomcat: Obtain the latest Tomcat 11 binary package from the official Apache website.
- User Creation: Create a dedicated system user for Tomcat to enhance security and manageability.
- System Service Setup: Configure Tomcat as a system service for easy management and automated start on boot.
- Accessing the Portal: Use the server's IP address to access the Tomcat web portal at port 8080.
- Security Configuration: Set up user roles and permissions for the Tomcat server, and limit remote access to the manager apps, to manage access effectively.
You can now deploy your Java web applications on Tomcat 11. The server is running under its own account, starts automatically at boot, and has a manager login ready for when you need it.
Have a question about this guide?
Answered by AI from this guide. Good questions may be added to this page — please don't include personal details.
Did this guide fix your problem?

About the Author
Richard
Tech Writer, IT Professional
Richard is a writer at Geek Rewind who turns complex IT tasks into clear, step-by-step guides. He draws on years of hands-on experience in system administration and enterprise IT operations, focusing on Windows, Linux and WordPress: the problems people actually run into, and the fixes that work. His server and WordPress guides come from systems he runs himself. Richard builds and maintains the platform behind Geek Rewind, from its Ubuntu servers and Nginx configuration to its custom WordPress plugins. Many new tutorials start with readers' questions, and he's always glad to answer them in the comments.
No comments yet — be the first to share your thoughts!