How to Install MySQL 8.0 on Ubuntu 24.04


MySQL 8.0 is a popular database system that stores and organizes data for websites and apps. You can install it on Ubuntu 24.04 in 5 steps from the terminal. You need a user account with sudo rights and a working internet connection.
The standard Ubuntu software catalog lets you set up the database server with a few short commands. This tutorial covers two install methods, then starting and stopping the service, hardening the install, and removing it.
To install MySQL 8.0 on Ubuntu 24.04, open a terminal and run sudo apt update, then sudo apt install mysql-server. The server starts automatically when the install finishes. For a newer release, add the official MySQL Community Server repository first and install mysql-community-server instead.
Install MySQL 8.0 via Ubuntu APT repositories
Installing MySQL 8.0 from the Ubuntu APT repositories is the quickest way to get a database running on Ubuntu 24.04. You update your package list, then run the package manager command to download and set up the default server version Ubuntu provides. Ubuntu tests this package against the rest of the system and updates it through normal system updates. For most servers and test machines, this is the method to use.
- Open a terminal and update the Ubuntu package list by running the command below.
sudo apt update
sudo apt upgrade
You should see APT contact the Ubuntu servers and finish with a summary of how many packages can be upgraded. Enter your password if sudo asks for it.
- Run the command below to install MySQL. Type Y and press Enter if APT asks you to confirm the download.
sudo apt install mysql-server
The command above installs MySQL 8.0 (the current version as I’m writing this) on Ubuntu 24.04. The installer does not ask for a root password with this method. The service starts automatically when the install finishes, and the MySQL root account is tied to the system root account. You can fix that in the security step later in this tutorial.
Install MySQL 8.0 with MySQL Community Server
Installing MySQL with MySQL Community Server lets you get newer releases straight from the official MySQL developers instead of the Ubuntu package archive. You add the official repository to your system, update your package lists, and install the server packages from there.
Use this method only if you need a version or feature that the Ubuntu archive does not offer. Updates then come from the MySQL repository, not from Ubuntu. The version you get depends on which release the repository is set to when you add it, so check the version after the install.
- Install the prerequisites by running the command below. These are the tools needed to download the repository key and add the repository.
sudo apt install dirmngr ca-certificates software-properties-common apt-transport-https curl lsb-release
When the command finishes without errors, you can move on. If the packages are already installed, APT just says so.
- Run the command below to import the MySQL repository GPG key. Ubuntu uses this key to check that the packages really come from MySQL and were not changed on the way.
curl -fsSL http://repo.mysql.com/RPM-GPG-KEY-mysql-2023 | sudo gpg --dearmor | sudo tee /usr/share/keyrings/mysql.gpg > /dev/null
- Run the command below to add the MySQL 8.0 repository to Ubuntu 24.04.
echo "deb [arch=$(dpkg --print-architecture) signed-by=/usr/share/keyrings/mysql.gpg] http://repo.mysql.com/apt/ubuntu $(lsb_release -cs) mysql-8.0" | sudo tee -a /etc/apt/sources.list.d/mysql.list
Now that you have added the MySQL GPG key and the repository, update the package list and install the server.
- Run the command below to update Ubuntu and install the MySQL server. The update makes APT read the new repository, so the server packages come from MySQL rather than Ubuntu.
sudo apt update
sudo apt install mysql-community-server
- When the installer prompts you, type a root password and confirm it. Use a long password you can store in a password manager. Or leave it blank to enable passwordless login using UNIX socket based authentication. With a blank password, you can only get into MySQL as root from the system’s root account, for example through sudo.
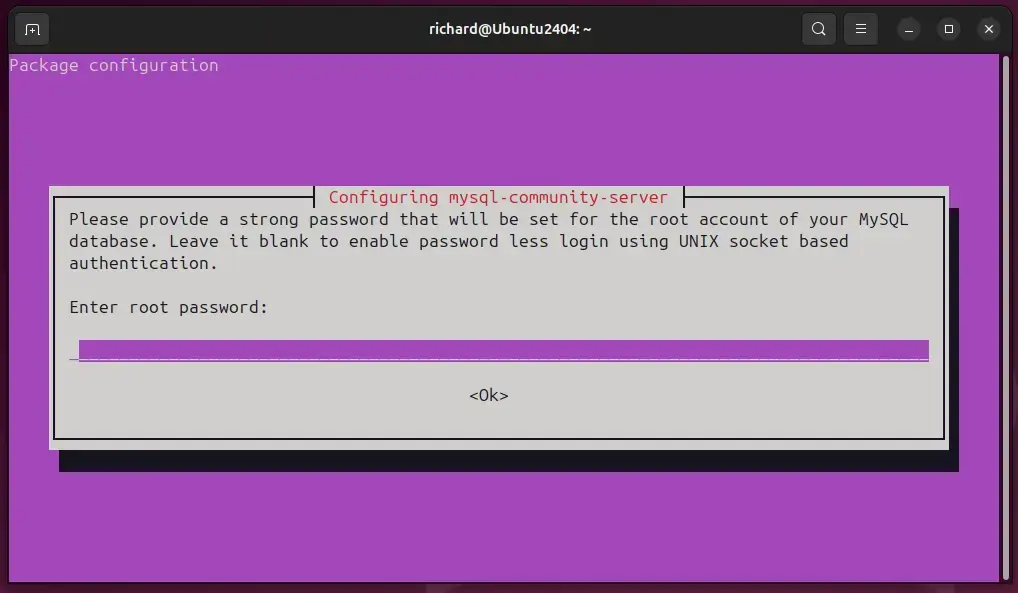
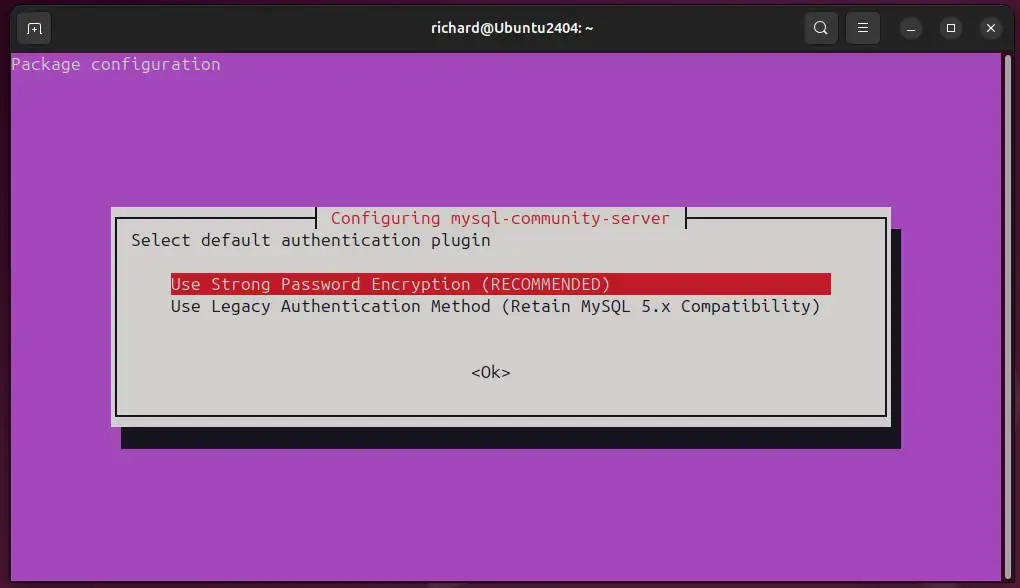
- If the installer shows a password encryption screen, select the strong password encryption option marked Recommended. Use the arrow keys or Tab to move, then press Enter.
Once installed, you can use the commands below to start, stop, enable, restart, or disable the MySQL service. The service is managed through systemd. Here is what each action does:
- Start runs the service now. Stop shuts it down. Both only last until the next reboot.
- Enable makes the service start automatically at boot. Disable turns that off. It does not stop a service that is already running.
- Restart stops and starts the service in one go. Use it after you change the MySQL configuration, because changes do not apply until the service restarts.
sudo systemctl start mysql
sudo systemctl stop mysql
sudo systemctl enable mysql
sudo systemctl restart mysql
sudo systemctl disable mysql
Run MySQL security script
After installing MySQL on Ubuntu, run its security script to tighten the install and do some housekeeping. The script lets you set up password checking, set or change the root password, remove anonymous users, block remote root login, and delete the test database. Run it with sudo so it can connect to the server.
- Run the command below to start the security script.
sudo mysql_secure_installation
- Follow the prompts until you’re done. Each question takes Y or N. Answering Y is the safe choice for removing anonymous users, disallowing remote root login, removing the test database, and reloading the privilege tables.
If the script offers to change the root password and you chose passwordless login earlier, you can answer N to keep it. The script reports All done! when it finishes.
Uninstall MySQL 8.0
This leaves your system clean if you plan to start a fresh database setup.
Back up anything you want to keep before you run the commands below, and copy the backup off the server.
sudo systemctl stop mysql --now
sudo apt autoremove mysql-community-server
sudo apt autoremove mysql-server
sudo rm /etc/apt/sources.list.d/mysql.list
That should do it! MySQL is now installed, secured and, if you need it, removable.
Conclusion:
- MySQL 8.0 is a robust and popular open-source relational database management system suitable for various web applications and software.
- Installing MySQL 8.0 on Ubuntu 24.04 can be accomplished through the default APT repositories or by adding MySQL's official repositories for the latest stable release.
- After installation, managing MySQL 8.0 involves starting, stopping, enabling, restarting, or disabling the MySQL service using systemctl commands.
- Running MySQL's security script after installation is recommended to enhance security and perform necessary housekeeping.
- If the need arises to uninstall MySQL 8.0, specific commands can be used to stop, remove, and clean up the installation.
Have a question about this guide?
Answered by AI from this guide. Good questions may be added to this page — please don't include personal details.
Did this guide fix your problem?

About the Author
Richard
Tech Writer, IT Professional
Richard is a writer at Geek Rewind who turns complex IT tasks into clear, step-by-step guides. He draws on years of hands-on experience in system administration and enterprise IT operations, focusing on Windows, Linux and WordPress: the problems people actually run into, and the fixes that work. His server and WordPress guides come from systems he runs himself. Richard builds and maintains the platform behind Geek Rewind, from its Ubuntu servers and Nginx configuration to its custom WordPress plugins. Many new tutorials start with readers' questions, and he's always glad to answer them in the comments.
No comments yet — be the first to share your thoughts!