How to Install RSAT on Windows 11

RSAT (Remote Server Administration Tools, a package of server management utilities) lets you manage network servers and remote roles directly from your Windows 11 desktop. You can run tools such as Active Directory, DNS, DHCP and Group Policy management from your own PC instead of logging on to the server.
RSAT requires Windows 11 Pro, Enterprise, or Education edition. Windows 11 Home lacks built-in support for remote server management features, so the RSAT packages will not install there. If you are not sure which edition you have, check it under Settings System About before you start. You also need an administrator account and an internet connection, because Windows downloads the RSAT packages from Windows Update .
Open Settings , go to Apps Optional Features, click Add an optional feature, search for RSAT, tick the tools you need, then click Install. Windows downloads and installs the packages in the background without requiring a restart.
Step 1Open Windows Settings
Start by opening the Settings app. Either of the two methods below works. Use whichever is quicker for you.
- Press the Windows key + I on your keyboard. The Settings window opens straight away. or
- Click the Start button, then click Settings. If you don’t see it in the pinned apps, click All apps and look for Settings in the list.
The Settings window should look like this, with a list of categories down the left side:

Step 2Go to Apps > Optional Features
Next, go to the page that lists optional Windows features. RSAT is delivered as one of these features, not as a separate download.
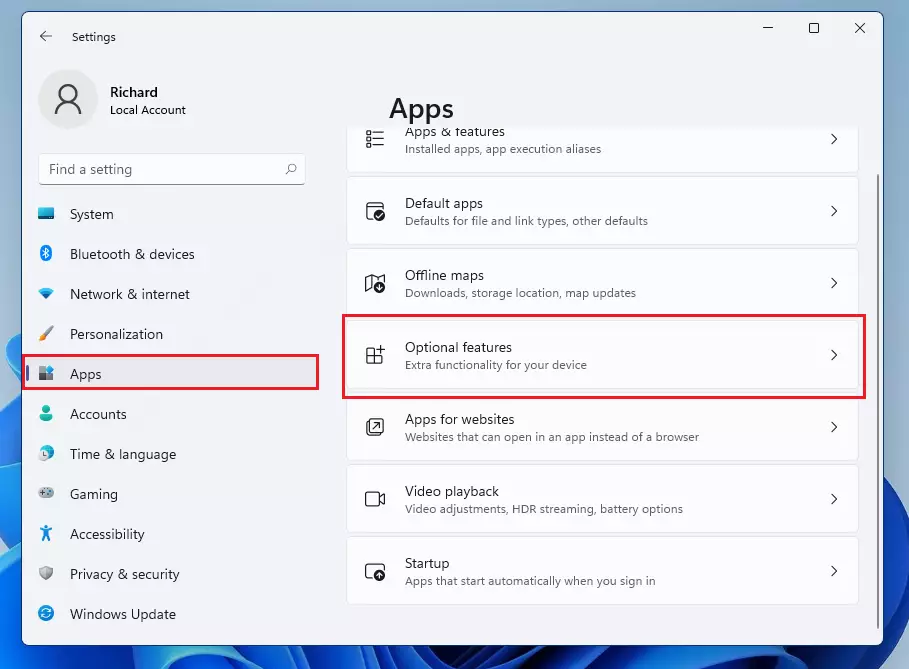
- Click Apps in the left-hand menu of the Settings window. The page on the right changes to show app-related settings.
- Then click Optional Features on the right side. You will see a list of the features already installed, plus a button to add more. On some newer Windows 11 builds (24H2 and later), this page has moved to System Optional features. If you can’t find it under Apps, look there.
Step 3Add RSAT Feature
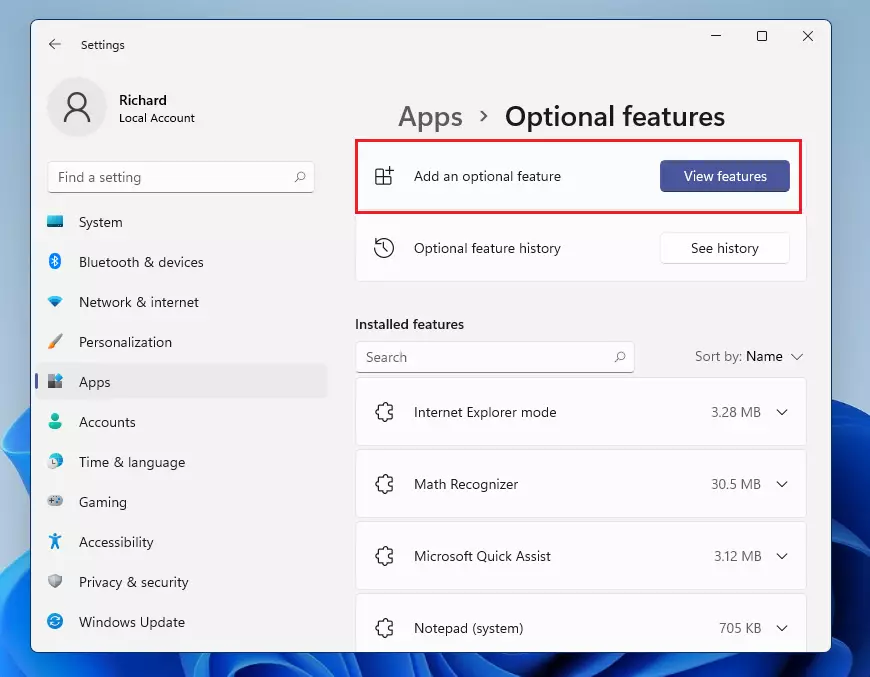
- Click Add an optional feature. On some builds the button is labelled View features instead. It does the same thing.
- Wait for the Add an optional feature window to open. It lists every feature Windows can add.
Computers managed by a company policy that points to an internal update server (WSUS) sometimes can’t download optional features. In that case, ask your IT team to allow it.
Step 4Search for RSAT
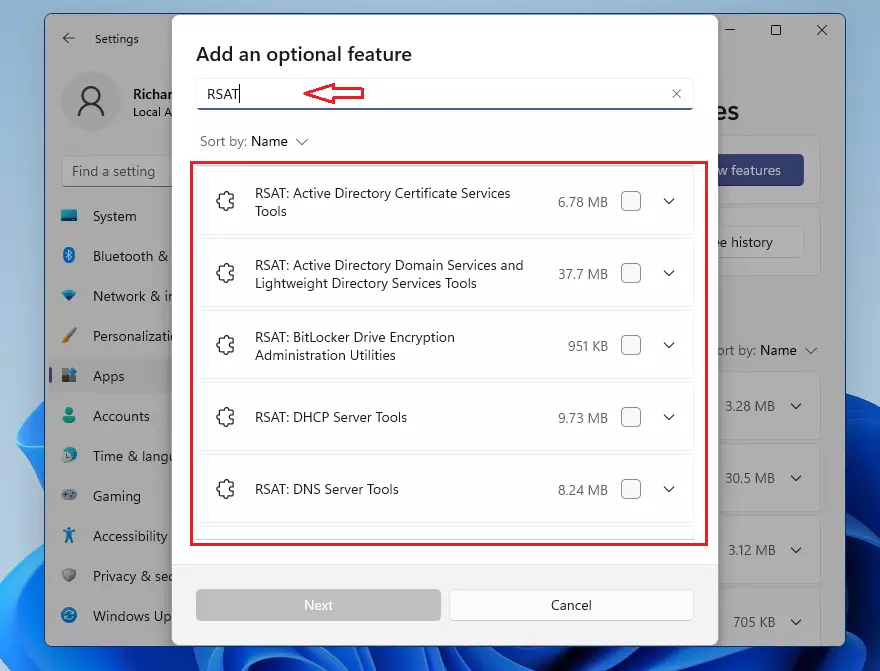
- Click the search box at the top of the window.
- Type RSAT. The list narrows to the available administration packages.
If the search returns nothing on a Pro, Enterprise or Education PC, wait a moment and try again. The list can take a few seconds to load.
Step 5Choose and Install RSAT Tools
- Tick the box next to each management tool you need. Select only the specific tools you will use. Installing everything takes longer and fills your Start menu with tools you may never open.
- Click Next. Windows shows a summary of what you selected.
- Click Install. Windows starts downloading and adding the packages to your system.
You can close the Settings window while this runs, and the installation continues in the background.
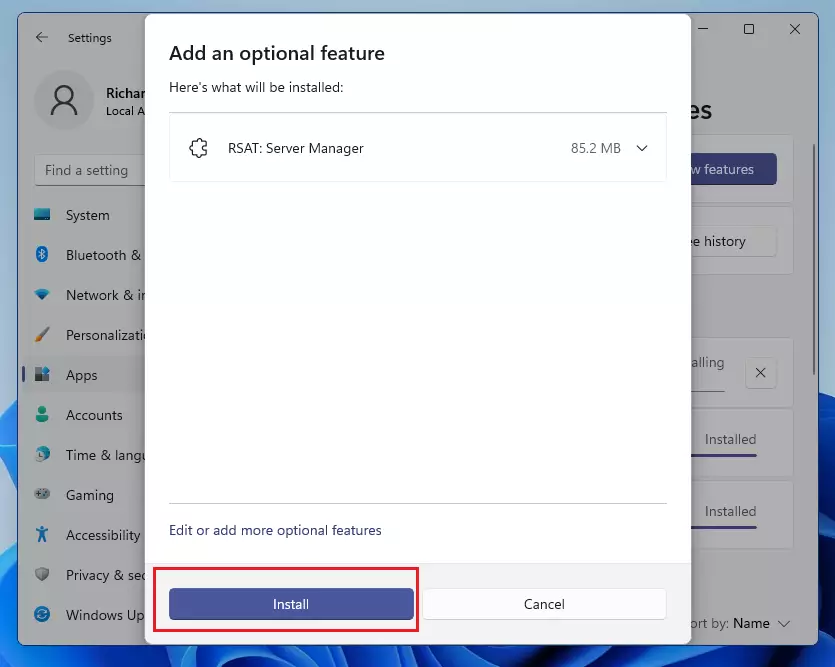
Allow a few moments for the installation to finish. The time depends on how many packages you picked and how fast your connection is. When it is done, each package moves to the installed list on the Optional features page, and remote server management becomes available immediately afterward. A restart is normally not required.
To find the new tools, open the Start menu and look in the Windows Tools folder, or search for the tool by name. If you later want to remove a package, return to the Optional features page, click the package in the installed list, and click Uninstall.
Summary
- RSAT helps you manage Windows servers from your own PC, so you don't need to sign in to the server itself.
- Windows 11 makes it easy to add RSAT using the Settings app, as long as you run Pro, Enterprise or Education.
- Just search for RSAT in Optional Features and install what you need. Pick only the tools you will actually use.
- After installation, RSAT tools will be ready to use for remote server management. You can remove them at any time from the same Optional Features page.
Have a question about this guide?
Answered by AI from this guide. Good questions may be added to this page — please don't include personal details.
Did this guide fix your problem?

About the Author
Richard
Tech Writer, IT Professional
Richard is a writer at Geek Rewind who turns complex IT tasks into clear, step-by-step guides. He draws on years of hands-on experience in system administration and enterprise IT operations, focusing on Windows, Linux and WordPress: the problems people actually run into, and the fixes that work. His server and WordPress guides come from systems he runs himself. Richard builds and maintains the platform behind Geek Rewind, from its Ubuntu servers and Nginx configuration to its custom WordPress plugins. Many new tutorials start with readers' questions, and he's always glad to answer them in the comments.
No comments yet — be the first to share your thoughts!