How to Install CakePHP on Ubuntu 24.04

CakePHP is a free web framework that organizes your database work, design, and code separately. It uses an MVC (Model-View-Controller, a pattern that separates data, user interface, and application logic) design to keep your projects organized on Ubuntu 24.04.
Before you start, make sure you have PHP, a web server like Apache, and Composer ready on your system.
Install CakePHP by first updating apt and installing composer and PHP extensions. Then, create a project directory and use composer create-project cakephp/app MyApp. Finally, run the built-in server with ./bin/cake server.
Install PHP requirements
To install CakePHP Ubuntu 24.04, you must first set up PHP and its associated tools using the terminal. The apt package manager installs PHP, Composer, and essential extensions like curl, sqlite, and xml so your framework has everything it needs to run properly.
Run the command below to install some essential PHP packages.
sudo apt update
sudo  apt install composer php8.3-curl php8.3-sqlite3 php8.3-xml php8.3-mysql
Once PHP is installed, open its configuration file. PHP 8.3 is the current version available in Ubuntu 24.04 as of this writing.
sudo nano /etc/php/8.3/cli/php.ini
When the file opens, change the highlighted line.
# line 1614: adjust the value
; Default Value: 1
; Development Value: 1
; Production Value: -1
; https://php.net/zend.assertions

zend.assertions = 1

;
;
Save and exit.
Create CakePHP project
To create a CakePHP project on Ubuntu 24.04, you need to make a new directory and use Composer to download the application files. Composer builds the framework inside your folder, which prepares your new web app for local development and testing.
mkdir project
Change into the project folder and create the CakePHP app.
cd project
composer create-project cakephp/app MyApp
Successful execution produces output similar to the example below.
Permissions set on /home/richard/project/MyApp/tmp/cache
Permissions set on /home/richard/project/MyApp/tmp/cache/models
Permissions set on /home/richard/project/MyApp/tmp/cache/persistent
Permissions set on /home/richard/project/MyApp/tmp/cache/views
Permissions set on /home/richard/project/MyApp/tmp/sessions
Permissions set on /home/richard/project/MyApp/tmp/tests
Permissions set on /home/richard/project/MyApp/tmp
Permissions set on /home/richard/project/MyApp/logs
Updated Security.salt value in config/app_local.php
Change to the MyApp folder and run CakePHP.
cd MyApp
./bin/cake server -H 0.0.0.0 -p 8765
Open a browser and navigate to the server's hostname or IP address followed by port # 8765.
Welcome to CakePHP v5.1.6 Console
-------------------------------------------------------------------------------
App : src
Path: /home/richard/project/MyApp/src/
DocumentRoot: /home/richard/project/MyApp/webroot
Ini Path:
-------------------------------------------------------------------------------
built-in server is running in http://0.0.0.0:8765/
You can exit with `CTRL-C`
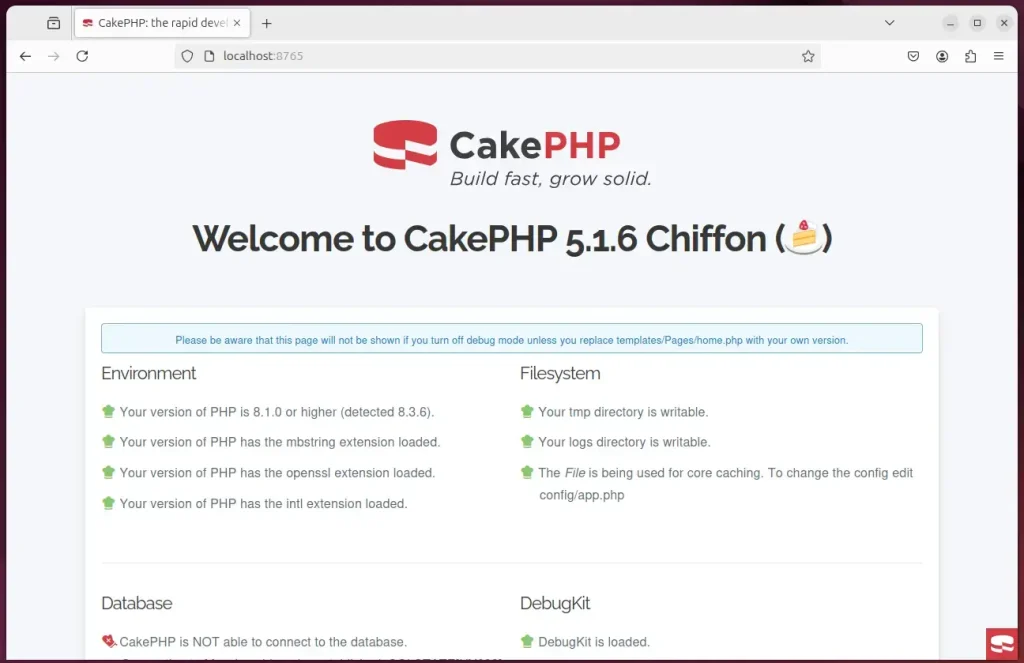
The development server is now up and running.
Getting CakePHP running on Ubuntu 24.04 comes down to a few core tasks:
- Install PHP and required packages: Ensure PHP and necessary PHP extensions are installed using the appropriate commands.
- Configure PHP settings: Modify the PHP configuration file to enable assertions for better error handling.
- Create a project directory: Set up a dedicated folder for your CakePHP project.
- Use Composer to create a CakePHP application: Easily generate a new CakePHP application within the project directory.
- Run the application: Start the CakePHP server and verify it by accessing the designated port in your web browser.
Following these steps efficiently sets up the CakePHP web application on Ubuntu 24.04, allowing concentration to shift entirely to development.
Was this guide helpful?

About the Author
Richard
Tech Writer, IT Professional
Richard is a writer at Geek Rewind who turns complex IT tasks into clear, step-by-step guides. He draws on years of hands-on experience in system administration and enterprise IT operations, focusing on Windows, Linux and WordPress: the problems people actually run into, and the fixes that work. His server and WordPress guides come from systems he runs himself. Richard builds and maintains the platform behind Geek Rewind, from its Ubuntu servers and Nginx configuration to its custom WordPress plugins. Many new tutorials start with readers' questions, and he's always glad to answer them in the comments.


No comments yet — be the first to share your thoughts!