How to Get Help from Someone You Trust Using Quick Assist in Windows 11

Quick Assist is a built-in Windows 11 tool that lets a trusted person connect to your PC from another location and help you fix technical problems. It shares your screen over the internet, so your helper can see your desktop and guide you through troubleshooting steps.
You stay in control for the whole session. No one can view or control your computer until you give permission, and you can end the connection at any time by clicking Leave. Quick Assist is included with Windows 11 Home and Pro, so you don’t need to install anything. You do need a working internet connection, and so does your helper.
Press Win+Ctrl+Q to open Quick Assist. Enter the 6-digit security code your helper provides into the Code from assistant box, then click Submit. When the permission prompt appears, click Allow to let your helper see your screen and control your PC remotely.
Getting Help from Someone You Trust Using Quick Assist
Computer problems happen, and a tech-savvy friend or relative who lives far away can often fix them in minutes. Quick Assist closes that distance. This guide covers the receiving side: how to accept help from someone who connects to your PC remotely.
Quick Assist is meant for people you know. Microsoft does not call people out of the blue and ask them to open Quick Assist, so if a stranger contacts you that way, do not go any further.
Step 1Open Quick Assist
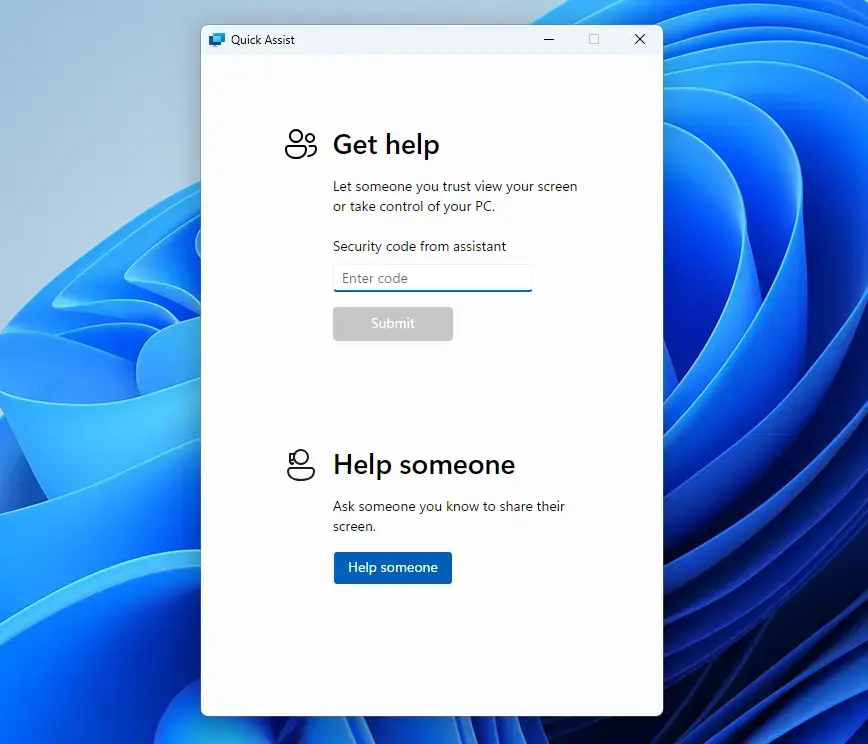
The fastest way to open Quick Assist on your Windows 11 PC is to press the Win+Ctrl+Q at the same time. You can also find it from the Start menu by typing the app name into the search bar. Either way you get the same app. You only need it open when your helper is ready to start the session.
- Using the Start Menu : Click the Start button (the Windows icon, usually in the bottom-left corner). Type
quick assistinto the search bar. Click the Quick Assist app when it appears in the results. The Quick Assist window should open with options to help someone or to get help. - Using a Keyboard Shortcut: Press the
Ctrlkey, theWindows key, and theQkey all at the same time. Quick Assist should open right away. If nothing happens, click on the desktop first and try again, or use the Start menu method instead. Some keyboards need the keys pressed in order, with Windows and Ctrl held down before you tap Q.
Step 2Enter the Security Code
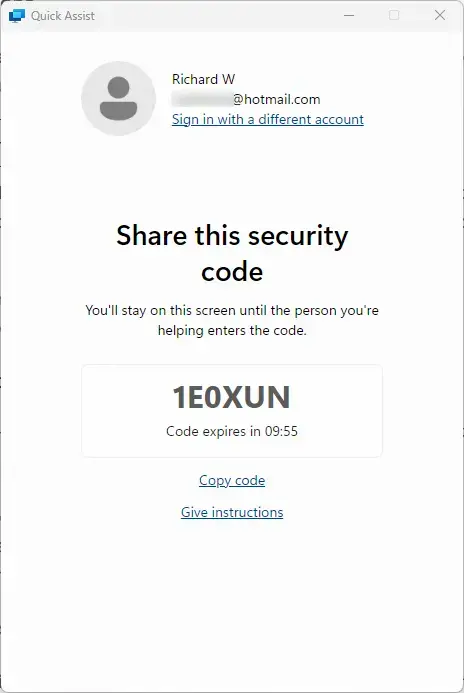
To connect, you type in a 6-digit code that your helper gives you. Your helper generates this temporary code on their own device and tells it to you by phone, text or chat. The code only works for a short time, about 10 minutes, so ask for a fresh one if it stops working. No connection can happen without this code, which keeps unwanted people out of your PC.
- Wait for your helper to tell you they have their 6-digit code ready.
- Find the Code from assistant box in the Quick Assist window.
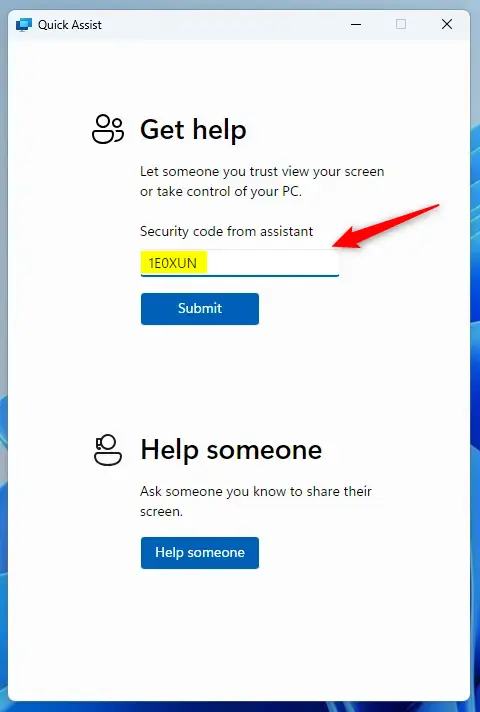
- Type the 6-digit code into that box. Check each digit carefully. A single wrong number means the connection will fail.
Step 3Submit the Code and Wait for Connection
- Click Submit to let your helper connect.
- Wait for the window to change. You should see a status message while Quick Assist contacts your helper's PC.
If you get an error instead, the code has probably expired or was typed wrongly. Ask your helper to generate a new code and try again.
Setting up the network link with the remote machine takes a few moments. A status message appears during the connection attempt. Be patient and don't click around while it works. If it hangs for more than a minute or two, close Quick Assist, reopen it, and ask your helper for a new code. Check that your internet connection is working as well.
Step 4Allow the Connection and Screen Sharing
Your helper cannot see anything on your PC until you approve screen sharing. When the connection is made, a permission prompt appears on your screen.
- Read the prompt. It tells you who is asking to connect.
- Click Allow if you know the person and expected the request.
Once you click Allow, your helper can see your desktop and diagnose the problem. If you don't recognize the request, close the prompt instead.
Without your permission, your helper cannot see it. Before you click, close anything private, such as banking pages, personal documents or open emails, because your helper will be able to see whatever is on screen.

Step 5Grant Control (If Asked)
Your helper may ask for full control of your PC rather than just viewing your screen. This is a separate permission that you have to approve.
- Wait for the prompt that appears on your screen when your helper asks for control.
- Click Allow if you want them to take over. Your helper can then move the mouse and type to fix problems for you.
Only choose this option if you trust the person and are okay with them making system changes. If you only want them to look and talk you through the steps, don't allow control. You can still follow their instructions yourself.
Allowing full control lets the helper fix your computer directly. A message asks whether you want to give them this access. Select Allow if you are comfortable with the helper making changes to solve your problem. Keep watching the screen while they work, and speak up if they do something you did not expect. Windows may also ask for administrator approval during the session, for example when a change needs elevated rights. In that case, the helper may need you to approve the prompt or enter an admin password on your side.
Step 6Work Together to Fix the Problem
With the connection active, you and your helper can now work on the problem together. Talk through what you are seeing by phone or chat, because Quick Assist is mainly for sharing the screen. Explain exactly what is going wrong and what you have already tried.
Ask questions while your helper works. Watching them fix the problem is a good way to learn what to do next time. If you understand the steps, you may be able to handle the same issue yourself later. Guided repairs also tend to fix the underlying cause rather than just the symptom.
Step 7End the Session When Done
Ending the session is up to you. When troubleshooting is finished, disconnect your helper straight away.
- Find the Quick Assist toolbar or window on your screen while the session is active.
- Click the Leave button.
- Check that the Quick Assist connection has closed.
Selecting Leave breaks the remote connection and removes the viewing permission. It gives you back full local control of your PC, and the helper can no longer see or control your screen. If you want more help later, you will need a new code and a new permission prompt.
Selecting Leave ends the connection immediately. Your helper can no longer see or control your computer, and you are in full control again. There is nothing to undo or restart. The session simply stops, and no one can reconnect unless you start another one.
Before you click Leave: Make sure you are happy with the help you received and that the problem is actually solved. Try the fix yourself while your helper is still connected. If the problem comes back, your helper can try again right away without needing a new code. It is also worth checking that nothing unexpected was installed or changed.
Remote troubleshooting is a practical alternative to professional tech support when someone you trust can help. Use Quick Assist only with people you know, approve each permission yourself, and leave the session when you are done. That protects your personal data while getting your PC working normally again.
Reference:
Summary
Quick Assist is a built-in Windows 11 tool that lets a trusted friend or family member see your screen or control your PC to help fix issues. Your helper needs a 6-digit code to connect, you approve screen sharing and any control request yourself, and you can end the session at any time with Leave.
Have a question about this guide?
Answered by AI from this guide. Good questions may be added to this page — please don't include personal details.
Did this guide fix your problem?

About the Author
Richard
Tech Writer, IT Professional
Richard is a writer at Geek Rewind who turns complex IT tasks into clear, step-by-step guides. He draws on years of hands-on experience in system administration and enterprise IT operations, focusing on Windows, Linux and WordPress: the problems people actually run into, and the fixes that work. His server and WordPress guides come from systems he runs himself. Richard builds and maintains the platform behind Geek Rewind, from its Ubuntu servers and Nginx configuration to its custom WordPress plugins. Many new tutorials start with readers' questions, and he's always glad to answer them in the comments.
… liked this!