How to Enable Preload Pages in Edge for Faster Browsing


Preload pages in Microsoft Edge speeds up web browsing by loading links in the background before you click them, cutting wait times to near zero. This feature uses your browsing habits to guess which page you want next, starting the download quietly so the site opens instantly when you click.
You can turn this setting on or off in Microsoft Edge depending on whether you want to save waiting time or reduce background data use.
Enable preloading in Microsoft Edge by going to Settings Performance and toggling “Preload pages for faster browsing and searching” on. Alternatively, you can enable it via the Windows Registry by creating a DWORD value named NetworkPredictionOptions and setting its value to 0 in Computer\🗝️HKEY_LOCAL_MACHINE\
Turn Preload Pages On or Off in Edge (For Your Account)
To enable preload pages Edge for your personal account, open the browser settings and turn on the network prediction feature. This quick change helps web pages load much faster by guessing what you want to click next. You can turn this setting on or off at any time directly from the menu without needing any special permissions.
- Open Microsoft Edge. Click the Edge icon on your taskbar or find it in your Start menu .
- Go to Settings . Look for three small dots stacked vertically (
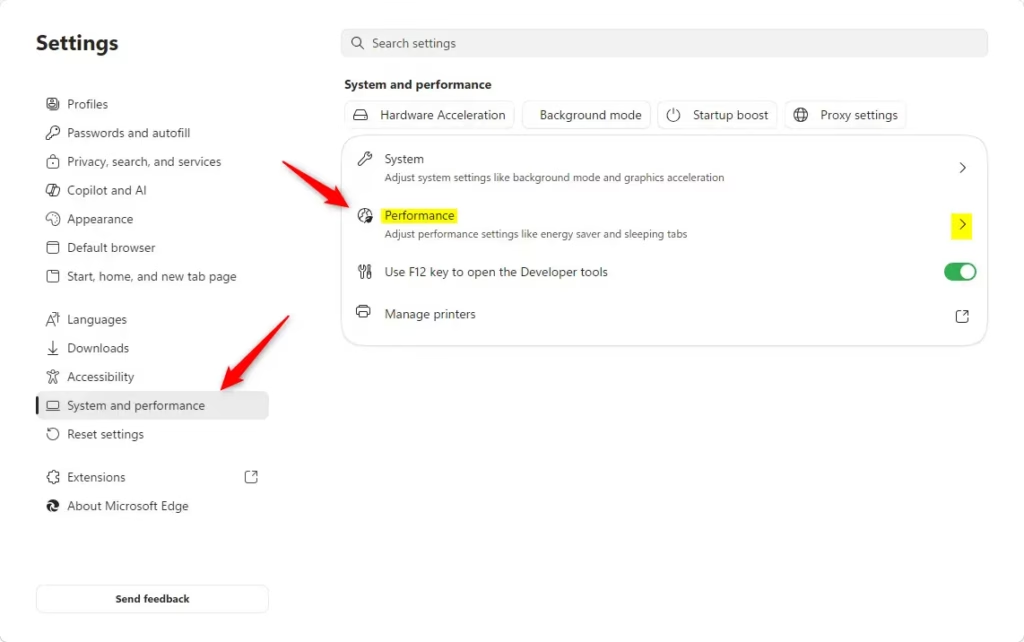
...) in the top-right corner of the Edge window. Click them, then choose “Settings” from the list that appears. - Find Performance settings. In the Settings tab, look at the menu on the left side. Click on “System and performance.” Then, on the right side, click on “Performance.”
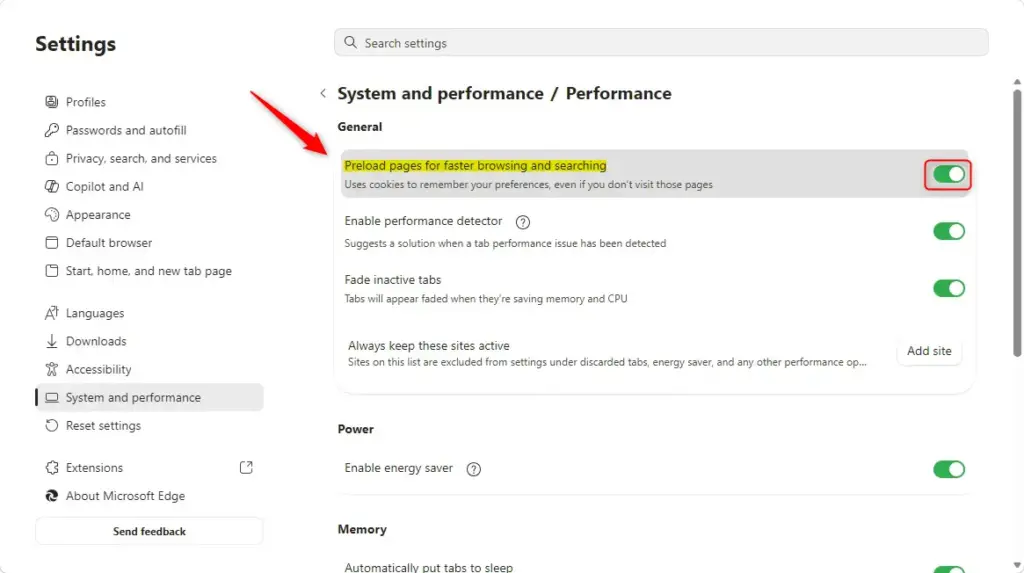
- Locate the Preload pages setting. Under a section called “General settings,” you should see an option named “Preload pages for faster browsing and searching.”
- Choose your setting.
- To turn the feature ON (which is usually best for speed), make sure the switch next to “Preload pages for faster browsing and searching” is moved to the ON position. This is typically the default setting.
- To turn the feature OFF, move the switch to the OFF position.
- Close the Settings tab. Your changes are saved. You can now close the Settings tab.

Enable or Disable Preload Pages for All Users (Using the Registry Editor)
To enable preload pages Edge for all users on your computer, you need to use the Registry Editor. This system-wide method works well when the normal menu option is locked or when you want to apply the faster browsing setting to every account on the PC at the same time. You will need administrator access to make this change.
Back up the registry before making changes, as incorrect edits can cause system instability. Follow these steps to update the registry.
What the Registry Change Does
The NetworkPredictionOptions value in the Windows Registry tells Microsoft Edge whether to preload pages by controlling how the browser handles network predictions. Located at 🗝️HKEY_LOCAL_MACHINE\
The location is: HKEY_LOCAL_MACHINE\SOFTWARE\Policies\Microsoft\Edge
We will change a value called NetworkPredictionOptions.
This value can be a DWORD (a type of data) and uses different numbers to control how it works:
0(Hexadecimal) means "Always Enable Preload pages."2(Hexadecimal) means "Disable Preload pages."
If the `EnablePreloadPage` DWORD value in the Windows Registry does not exist or is set differently (e.g., deleted), Microsoft Edge will use its default settings. You can control these browser defaults through the browser's options menu, as explained in the first section of this article.
Steps: Using the Registry Editor
To enable preload pages Edge using the Registry Editor, first close all open browser windows completely. Press the Windows key plus R, type regedit, and press Enter to open the registry tool. Navigate to the correct folder path and change the key value to turn the browsing speed feature on for everyone on your machine.
- Close Microsoft Edge. Make sure all Edge windows are closed before you start. This helps make sure the changes work correctly.
Open the Registry Editor.
- Press the Windows key + R on your keyboard. This opens a small "Run" box.
- Type
regeditinto the box and press Enter, or click "OK."
- Allow changes. If a box appears asking if you want to let the app make changes to your device, click "Yes."
- Go to the right location. In the Registry Editor window, look at the list of folders on the left. You need to click through the folders (keys) to find the specific place for Edge's settings. Click each folder to open it:
HKEY_LOCAL_MACHINE\SOFTWARE\Policies\Microsoft\Edge - Select the "Edge" key. Click on the
Edgefolder you found or created in the left side of the window. This will show its settings on the right side. Create or change the
NetworkPredictionOptionsvalue. Now look at the right side of the window. You need to find or create a value namedNetworkPredictionOptions.- If
NetworkPredictionOptionsalready exists: Double-click on it to change its current setting. - If
NetworkPredictionOptionsdoes NOT exist: Right-click on an empty space in the right-hand area. Choose "New," then choose "DWORD (32-bit) Value." Name this new value exactlyNetworkPredictionOptions.
- If
Set the value data. A small window will pop up asking for the "Value data." Enter the number for the setting you want:
- To ALWAYS ENABLE Preload Pages: Type
0(zero) into the "Value data" box. Make sure "Base" is set to "Hexadecimal." Click "OK."
Warning: This setting will block you from changing preload pages in Edge's settings. You won't be able to change it from within the browser anymore. - To DISABLE Preload Pages: Type
1into the "Value data" box. Make sure "Base" is set to "Hexadecimal." Click "OK."
Warning: This setting will also block you from changing preload pages in Edge's settings, making that option grayed out in the browser. - To set it back to DEFAULT (so you can control it from Edge settings): You have two choices. You can either delete the
NetworkPredictionOptionsvalue (right-click on it in the right pane and select "Delete") or you can set its Value data to1. Setting it to 1 enables network prediction but allows the browser settings to control it. Deleting it is often the easiest way if you want to use the browser's own settings.
- To ALWAYS ENABLE Preload Pages: Type
- Close the Registry Editor. You can now close the Registry Editor window.
- Restart Microsoft Edge. If Edge was open, close it completely and then open it again. The changes you made in the registry will now be active.
Summary
The preload pages feature in Microsoft Edge helps web pages load much faster by anticipating your clicks. You can easily enable preload pages Edge from your personal settings menu, or use the Windows Registry Editor to force the setting on for all users across the entire computer when administrator control is needed.
Was this guide helpful?

About the Author
Richard
Tech Writer, IT Professional
Richard is a writer at Geek Rewind who turns complex IT tasks into clear, step-by-step guides. He draws on years of hands-on experience in system administration and enterprise IT operations, focusing on Windows, Linux and WordPress: the problems people actually run into, and the fixes that work. His server and WordPress guides come from systems he runs himself. Richard builds and maintains the platform behind Geek Rewind, from its Ubuntu servers and Nginx configuration to its custom WordPress plugins. Many new tutorials start with readers' questions, and he's always glad to answer them in the comments.



No comments yet — be the first to share your thoughts!