

This article explains how to turn the Snipping Tool on or off in Windows 11. The Snipping Tool is a built-in app that lets you take screenshots and record videos of your screen.
The Snipping Tool is a simple way to capture part or all of your computer screen.
Some workplaces and schools don’t allow screen captures or recordings. If you need to turn this feature on or off, follow the steps below.
Why Would You Need to Do This?
Turning screen capture and recording on or off can be important in certain situations. In offices, companies might want to block screenshots to protect secret information. In schools, teachers might want to allow recording so students can make learning videos.
What Happens When You Enable or Disable This?
When you enable screen capturing, you can take screenshots and record videos using the Snipping Tool. When you disable it, users cannot use these features.
How to Enable or Disable the Snipping Tool
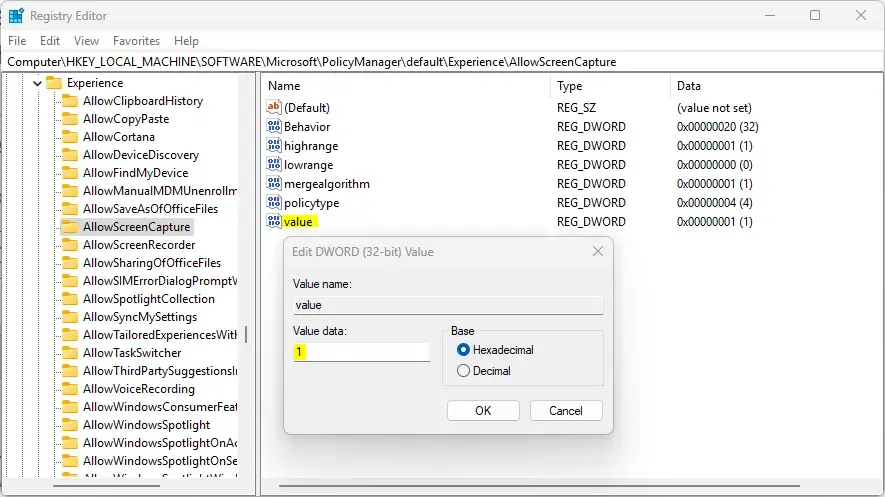
- Open the Windows Registry on your computer.
- Navigate to this path:
Computer\HKEY_LOCAL_MACHINE\SOFTWARE\Microsoft\PolicyManager\default\Experience\AllowScreenCapture - In the right pane, double-click the value item (REG_DWORD) to open it.
- Enter 1 to turn on screen capturing and recording with the Snipping Tool.
- Enter 0 to turn off screen capturing and recording with the Snipping Tool.
- If you don’t see the “value” item, right-click on an empty area and select the option to create a new DWORD (32-bit) registry item.
- Name it “value” and enter your desired number (1 to enable, 0 to disable).
⚠️ ADMIN REQUIRED: The steps above require administrator privileges. You must be logged in as an admin to edit the Registry.
⚠️ WARNING: Editing the Registry can be dangerous. If done incorrectly, it can seriously damage your computer. Always back up your PC before making Registry changes.
- Save your changes and restart your computer for the changes to take effect.
That’s it! You’ve successfully enabled or disabled the Snipping Tool.
Summary
- The Snipping Tool is a built-in Windows app for taking screenshots and recording videos.
- You can enable or disable this feature by editing the Windows Registry.
- Navigate to
HKEY_LOCAL_MACHINE\SOFTWARE\Microsoft\PolicyManager\default\Experience\AllowScreenCapture - Set the value to 1 to enable or 0 to disable.
- Admin privileges are required to make these changes.
- Always back up your computer before editing the Registry.
- Restart your computer after making changes.
Frequently Asked Questions
How do I enable the Snipping Tool in Windows 11?
What steps do I need to take to disable the Snipping Tool?
Is it safe to edit the Windows Registry for the Snipping Tool?
Why would I want to disable screen capturing in Windows 11?
Can I create a new value in the Registry for the Snipping Tool?
Leave a Reply