Enable or Disable Online Speech Recognition in Windows 11
You enable or disable online speech recognition in Windows 11 by adjusting a specific setting within the system’s Speech settings. Online speech recognition leverages Microsoft’s cloud services to process your voice data, significantly enhancing dictation accuracy and voice command understanding compared to local processing.
This cloud-based feature learns your individual speech patterns, improving its accuracy over time. By default, Windows 11 may send your voice data to Microsoft servers for analysis when online speech recognition is enabled, leading to more precise results.
Disabling this feature means your PC will only use the on-device speech recognition engine, which is generally less accurate. However, essential accessibility tools like the Narrator app will continue to function.
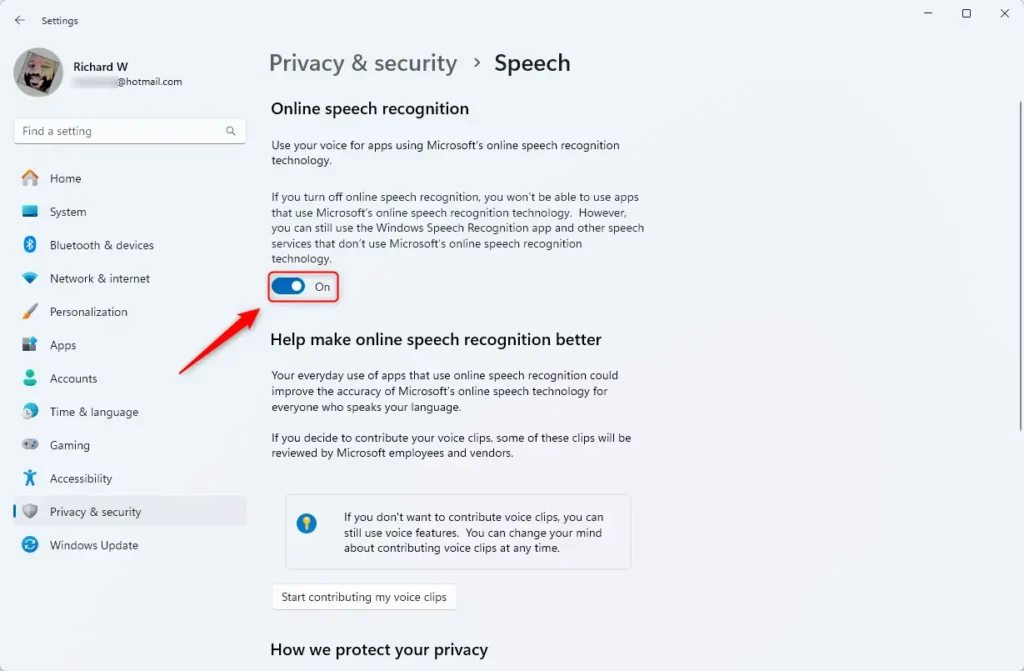
Open Settings, go to Privacy & security, then click Speech. Toggle the switch to On to enable online speech recognition or Off to disable it. This setting uses Microsoft’s cloud services for better dictation accuracy.
Prerequisites: Setting Up Your Microphone
Before you begin, ensure your microphone is working correctly. Go to Settings > System > Sound and run the Microphone setup wizard to ensure your voice is captured clearly. This makes sure both cloud-based and local speech recognition work as well as they can.
Voice Access vs. Windows Speech Recognition (WSR)
Microsoft has introduced Voice Access in newer Windows 11 22H2 updates. This is a modern, more powerful accessibility feature that replaces the older Windows Speech Recognition (WSR). While WSR was for basic dictation, Voice Access lets you control your entire desktop, open apps, and browse the web using only your voice.
How to turn Online Speech Recognition on or off in Settings
1. Open the Windows Settings app.
2. Select Privacy & security on the left menu.
3. Click the Speech tile on the right.
4. Toggle the switch to On to enable it, or Off to disable it.
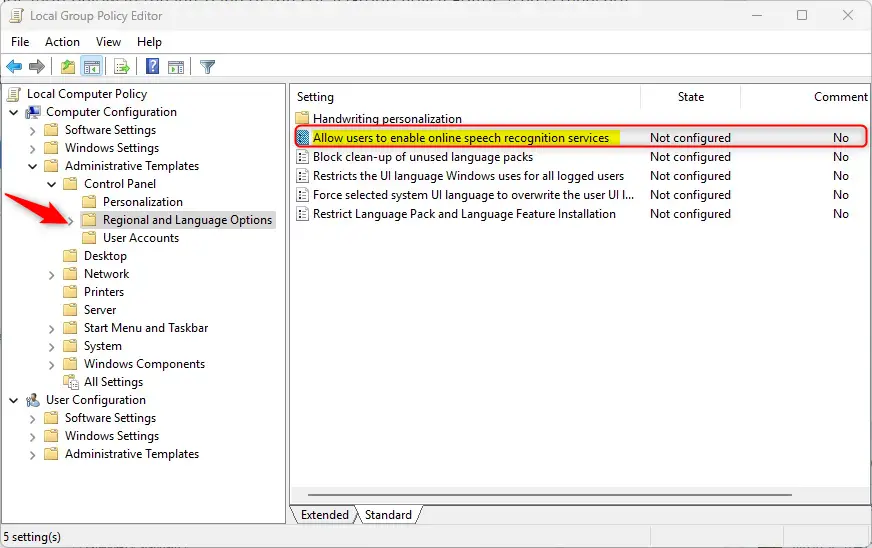
How to manage settings using Group Policy (Admin Required)
Note: This method requires admin privileges.
- Search for “Edit group policy” in the Start menu and open it.
- Go to this path: Computer Configuration > Administrative Templates > Control Panel > Regional and Language Options.
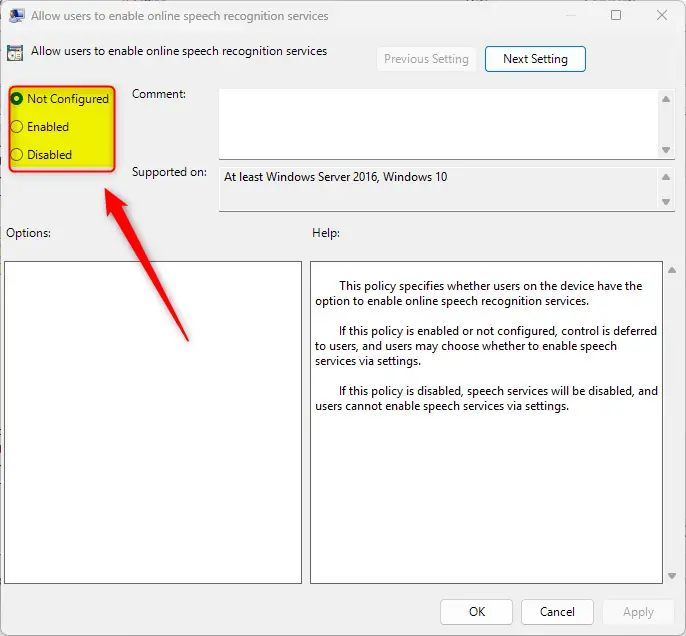
- Double-click Allow users to enable online speech recognition services.
4. Choose Enabled, Disabled, or Not Configured. Click OK to save.
How to use the Registry Editor (Admin Required)
Note: This method requires admin privileges.
- Open the Windows Registry editor.
- Go to this path:
Computer\HKEY_LOCAL_MACHINE\SOFTWARE\Policies\Microsoft\InputPersonalization - Double-click the
AllowInputPersonalizationitem. Set the value to0to disable it .
4. If the item doesn’t exist, right-click, create a new DWORD (32-bit) value, name it AllowInputPersonalization, and set its value to 0.
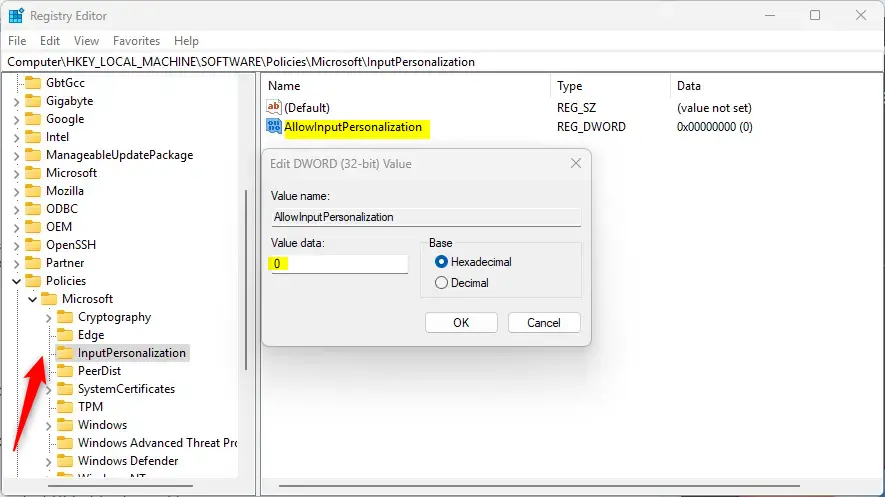
5. Restart your computer for the changes to take effect.
Summary
You can control online speech recognition to balance between better accuracy and your personal privacy. By understanding the difference between cloud-based processing and local recognition, you can choose the best setup for your needs. Whether you use the Settings app for a quick change or Group Policy/Registry Editor for deeper control, you can manage these Windows 11 accessibility features.
Does 🪟 Windows 11 still support legacy Windows Speech Recognition?
Yes, Windows 11 still includes legacy Windows Speech Recognition for backward compatibility. However, Microsoft recommends using the newer Voice Access feature for better performance and more comprehensive control over your operating system. Voice Access is built for modern workflows and provides a more intuitive experience for users with mobility impairments.
Is my voice data sent to Microsoft when using online speech recognition?
Yes, when online speech recognition is enabled, your voice data is sent to Microsoft cloud-based services to improve transcription accuracy. If you are concerned about voice data privacy, you can disable this feature in settings to rely solely on local, device-based speech recognition, which keeps your data on your computer.
Was this guide helpful?

About the Author
Richard
Tech Writer, IT Professional
Richard, a writer for Geek Rewind, is a tech enthusiast who loves breaking down complex IT topics into simple, easy-to-understand ideas. With years of hands-on experience in system administration and enterprise IT operations, he’s developed a knack for offering practical tips and solutions. Richard aims to make technology more accessible and actionable. He's deeply committed to the Geek Rewind community, always ready to answer questions and engage in discussions.


No comments yet — be the first to share your thoughts!