How to Turn On or Off OneDrive in Windows 11
OneDrive is a cloud storage service that comes built into Windows 11. It helps you save your files online so you can open them from any device like your phone, tablet, or another computer.
When you use OneDrive, any changes you make to files on your computer will automatically update in the cloud, and vice versa. Even if you’re not connected to the internet, you can still open your files on your computer, and OneDrive will sync everything once you go online again.
By default, your OneDrive folder is here on your PC: 📁C:\Users\yourusername\OneDrive.
Below, you’ll find simple step-by-step ways to turn OneDrive on or off on your Windows 11 PC.
You can disable OneDrive using the Local Group Policy Editor by navigating to Computer Configuration Administrative Templates Windows Components OneDrive, and enabling “Prevent the usage of OneDrive for file storage.” Alternatively, use the Registry Editor to set DisableFileSyncNGSC to 1. Restart your PC after making changes.
How to Turn On or Off OneDrive Using the Local Group Policy Editor
This method is good if you want to control OneDrive for all users on your computer.
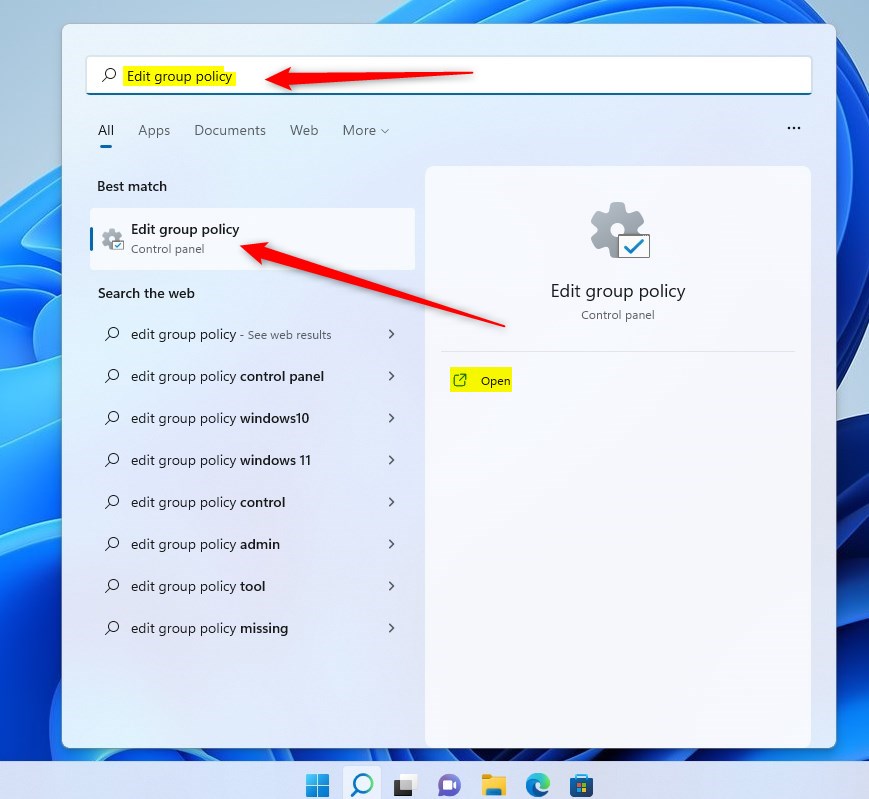
- Click the Start button and type Edit group policy. Click on the Edit group policy app from the search results.
- In the window that opens, look at the left side and follow this path by clicking each folder:
Computer Configuration > Administrative Templates > Windows Components > OneDrive
- On the right side, find and double-click the setting named Prevent the usage of OneDrive for file storage.
- A new window will open with three options:
- Not Configured (default) – OneDrive works normally.
- Enabled – OneDrive is turned off and cannot be used.
- Disabled – OneDrive is turned on and works normally.
- Choose the option you want, click OK, then close the Local Group Policy Editor.
- Restart your computer to make the change take effect.
How to Turn On or Off OneDrive Using the Windows Registry
If you don’t have access to the Group Policy Editor, you can use the Registry Editor instead. Be careful with this tool because changing the wrong settings can cause problems.
- Press Win + R on your keyboard, type regedit, and press Enter to open the Registry Editor.
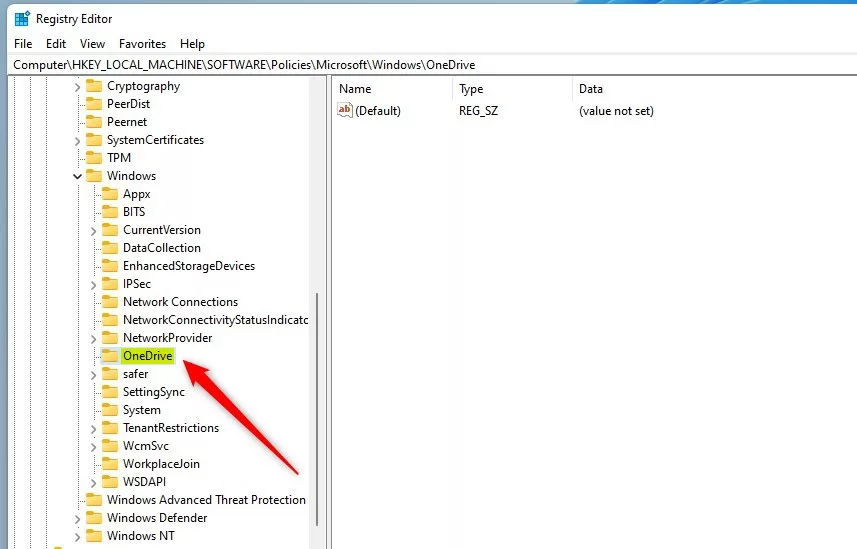
- Navigate to this folder path by expanding the folders on the left:
HKEY_LOCAL_MACHINE\SOFTWARE\Policies\Microsoft\Windows\OneDrive
- If you don't see the OneDrive folder, right-click on Windows, choose New > Key, and name it OneDrive.
- Click on the OneDrive folder. On the right side, right-click and choose New > DWORD (32-bit) Value.
- Name the new value: DisableFileSyncNGSC.
- Double-click on DisableFileSyncNGSC and set the value to:
- 1 to turn OneDrive off
- 0 to turn OneDrive on
- Click OK, close the Registry Editor, and restart your computer.
What Happens When OneDrive Is Disabled?
- You won’t be able to open OneDrive from its app or the file picker window.
- Apps from the Microsoft Store won’t be able to use OneDrive.
- OneDrive will not show up in the File Explorer sidebar.
- Your files won’t sync with the cloud anymore.
- Photos and videos won’t automatically upload from your camera roll.
How to Uninstall OneDrive from 🪟 Windows 11
Follow the detailed guide here: How to uninstall and remove OneDrive from Windows 11
More Help and Official Information
For official Microsoft help, check out their page here: Microsoft OneDrive Support
Summary
- OneDrive helps you save and access files online on Windows 11.
- You can turn OneDrive on or off using the Local Group Policy Editor or Windows Registry.
- Turning OneDrive off stops syncing and removes it from File Explorer.
- If you want, you can completely uninstall OneDrive from your PC.
- Always restart your computer after making changes for them to work.
Was this guide helpful?

About the Author
Richard
Tech Writer, IT Professional
Richard, a writer for Geek Rewind, is a tech enthusiast who loves breaking down complex IT topics into simple, easy-to-understand ideas. With years of hands-on experience in system administration and enterprise IT operations, he’s developed a knack for offering practical tips and solutions. Richard aims to make technology more accessible and actionable. He's deeply committed to the Geek Rewind community, always ready to answer questions and engage in discussions.


No comments yet — be the first to share your thoughts!