How to Enable or Disable OneDrive Screenshot Saving in Windows 11
You control whether Windows 11 automatically saves your screenshots to OneDrive.
This feature automatically captures your screen when you press the Print Screen (PrtScn) key and uploads it directly to your OneDrive cloud storage, typically into the ‘Pictures\Screenshots’ folder.
While convenient for instant cloud backup and cross-device access, it can quickly eat into your OneDrive storage, especially if you take many screenshots and are using the free 5GB tier.
By understanding this setting, you decide if your screenshots are backed up to the cloud or saved locally on your PC.
To enable or disable automatic screenshot saving to OneDrive, click the OneDrive icon, select Settings, go to Sync and Backup, and toggle “Save screenshots I capture to OneDrive.” This setting controls whether screenshots taken with the Print Screen key are automatically uploaded to your OneDrive.
OneDrive Folder Backup vs. Screenshot Auto-save
Steps to Enable or Disable OneDrive Screenshot Saving
You can easily turn OneDrive screenshot saving on or off directly from your Windows 11 taskbar. This setting controls whether your screenshots are automatically saved to OneDrive, and changing it only takes a few clicks.
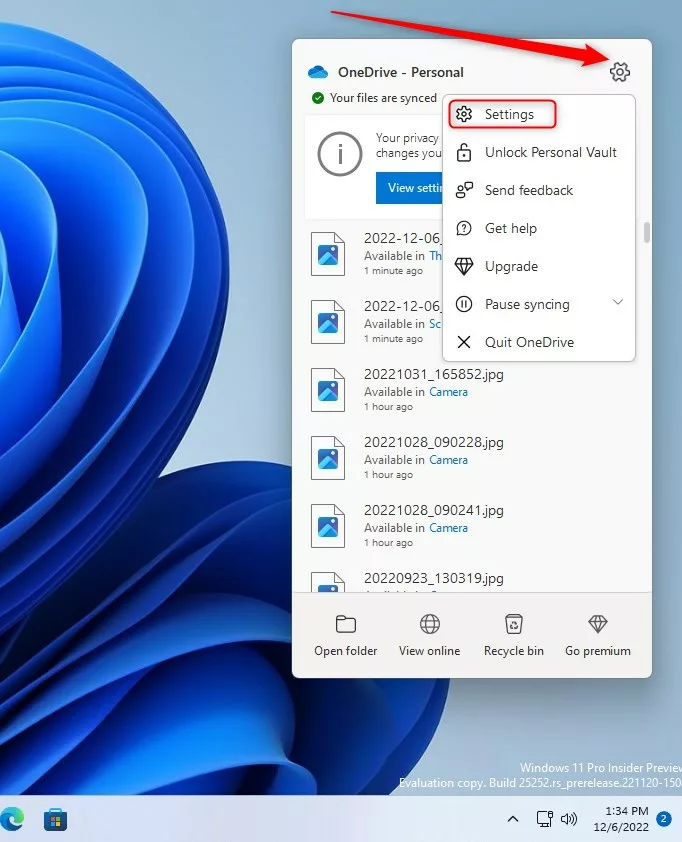
1. Click the OneDrive cloud icon in your taskbar. If you do not see it, click the arrow icon to show hidden icons.
2. Click the Help & Settings gear icon and select Settings.
3. Go to the Sync and Backup tab on the left.
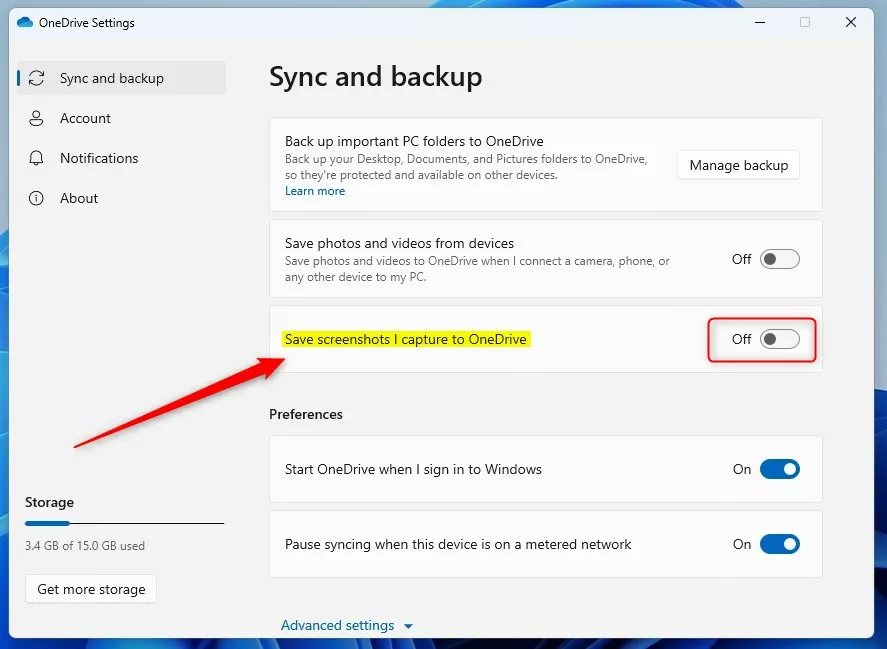
The Save screenshots I capture to OneDrive toggle controls whether your screenshots automatically upload to OneDrive storage. Switch the Save screenshots I capture to OneDrive toggle On to automatically save your screenshots to OneDrive, or switch it Off to prevent this automatic saving.
Troubleshooting OneDrive Sync Issues
If your screenshots are still saving to OneDrive after you’ve turned the feature off, there are a few things you can try. Restarting OneDrive or checking for updates can often resolve this issue. For more complex problems, a registry check might be needed.
- Restart OneDrive: Right-click the icon, select Quit OneDrive, then open it again from the Start menu.
- Check for Updates: Ensure your OneDrive sync client is up to date.
- Registry Check: For advanced users, check the registry. Warning: Modifying the registry incorrectly can cause system issues. Press ⊞ Win+R, type
regedit, and navigate toHKEY_CURRENT_USER\Software\Microsoft\OneDrive. Ensure theAutoSaveCameraPhotosvalue is set to 0.
Summary
Managing your OneDrive screenshot saving settings lets you control where your captured images are stored, deciding if they stay on your computer or sync to the cloud, which is different from full folder backups.
Why does OneDrive keep saving my screenshots even after I turn off the setting?
OneDrive might keep saving your screenshots after you turn off the setting if the sync client is stuck or the change didn’t update properly in the cloud, so restarting the app or signing out and back in can help.
Does disabling OneDrive screenshot saving delete my existing files?
No, disabling this feature will not delete your existing files. It only stops new screenshots from being automatically uploaded to your cloud storage. Your previously saved images will remain in your OneDrive folder until you manually move or delete them from your local computer.
Was this guide helpful?

About the Author
Richard
Tech Writer, IT Professional
Richard, a writer for Geek Rewind, is a tech enthusiast who loves breaking down complex IT topics into simple, easy-to-understand ideas. With years of hands-on experience in system administration and enterprise IT operations, he’s developed a knack for offering practical tips and solutions. Richard aims to make technology more accessible and actionable. He's deeply committed to the Geek Rewind community, always ready to answer questions and engage in discussions.

No comments yet — be the first to share your thoughts!