This article explains how to enable or disable “Captions” in Microsoft Teams.
Microsoft Teams is a collaboration platform developed by Microsoft that integrates chat, video meetings, file storage, and application integration.
The free version is installed on Windows with its icon on the Taskbar.
There are many settings one can enable in the Microsoft Teams app. You can sync contacts with Teams, connect to Google Calendar, link your mobile device, turn message preview on or off, manage filters, and more.
The new Microsoft Teams allows you to enable or disable captions for calls and meetings. It also offers the option to filter out profanity when live captions are enabled.
Enable or Disable Captions in Teams
As mentioned, users can enable or disable live captions in the Microsoft Teams app using the Settings page.
Here’s how to do it.
First, launch the Microsoft Teams app by clicking the Start menu and selecting it on the All Apps list.

You can also launch the app from the Taskbar or Taskbar overflow.

In the full Teams window, click the Settings and more ( …) button next to your profile picture and select Settings from the menu.

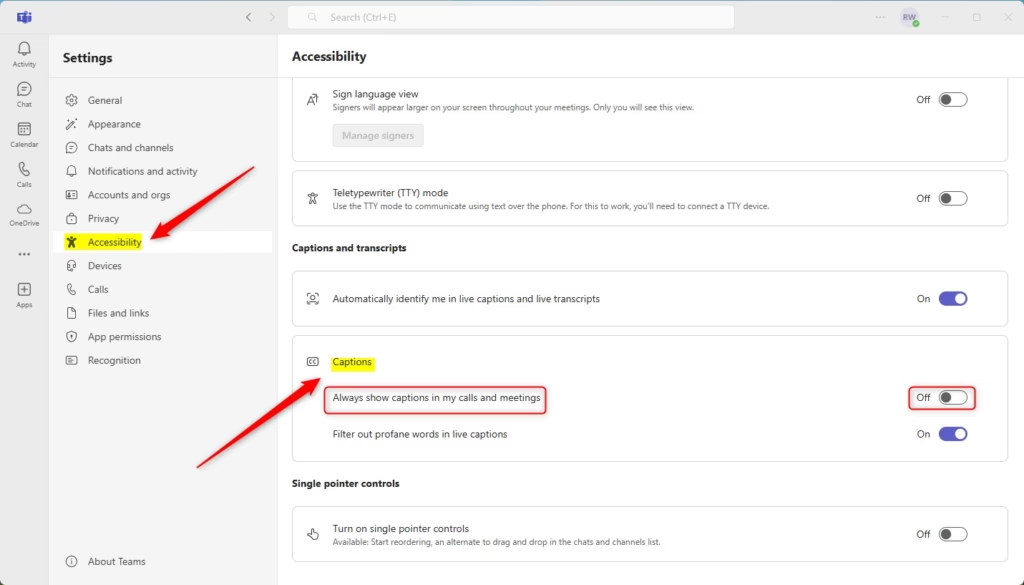
Next, click the “Accessibility” tab on the left side of the Settings page. On the right, under “Captions,” toggle the button for “Always show captions in my calls and meetings” to enable or disable it.
That should do it!
Conclusion:
- Enabling or disabling captions in Microsoft Teams enhances accessibility during meetings.
- Users can easily manage caption settings through the Accessibility tab in the app’s settings.
- The option to filter out profanity ensures a more professional communication environment.
- Customizing caption settings helps tailor the Teams experience to individual needs.
- Regularly check for updates in Teams to access new features and improvements related to captions.


Leave a Reply