How to Turn Auto Color Management on or off in Windows 11

- 14 steps
- Includes a restart or sign-out
To turn on color management in Windows 11, open Settings System Display, select your monitor, click Color profile, and switch Automatically manage color for apps to On. Switch it to Off to turn it back off. Auto Color Management (ACM) matches colors across standard and high dynamic range (HDR) screens, so photos and videos look natural without extra setup.
To turn on Auto Color Management in Windows 11, open Settings System Display, select your monitor, click Color profile, and switch Automatically manage color for apps to On. Switch it off to turn it back off. You need Windows 11 version 22H2 or newer, and no restart is required.
ACM is built into Windows 11 version 22H2 and newer. It aims to make your monitor’s colors look right in every app, and you can change it in your display settings whenever you want. Leaving it on helps your screen show accurate colors for everyday web browsing and creative work.
Who benefits most:
- Creative professionalsGraphic designers, photographers, and video editors need colors to be exact. ACM keeps colors consistent from app to app.
- EnthusiastsIf you enjoy digital art or photography, or just like bright, true-to-life colors, you will likely notice the difference.
- General usersYou don’t have to be a pro. Colors can look richer, and you may see fewer odd color patterns in dark areas.
ACM handles color profiles for the entire system, so colors look correct on compatible screens. It helps both modern and older programs render colors more faithfully. It also reduces color banding, which is the harsh, visible steps you sometimes see in smooth gradients, and it brings out subtle detail.
In short, this feature aims to:
- Keep colors the same across different programs.
- Make colors more accurate, for a more real-life look.
- Show more detail in pictures, especially where colors change slightly.
- Reduce visual problems like color stripes.
Enabling Automatic Color Management in 🪟 Windows 11
Turning on Auto Color Management takes a few clicks in the display settings. The setting is per display, so you work on one monitor at a time.
You need Windows 11 version 22H2 or newer. To see your version, go to Settings System About and look under Windows specifications. If you are on an older version, run Windows Update first. The option also depends on your graphics hardware and driver. A very old GPU or an outdated graphics driver can leave the toggle missing or greyed out, so update the driver if you don’t see it.
- Open Settings . Click the Start button on the taskbar , then click the Settings icon (it looks like a gear). You can also press Win+I. The Settings window opens.
- Go to Display settings. Click System in the left menu, then click Display on the right. You should now see your monitor layout and brightness options.
- Choose your screen. If you have more than one monitor, select the one you want to adjust at the top of the page. Pick the right one before you change anything. If you aren’t sure which is which, click Identify. A number appears on each screen to match the layout.
- Open the color settings. Scroll down in the Display settings and click Color profile. The color profile options for that monitor open.
- Turn on Automatic Color Management. Find Automatically manage color for apps and switch the toggle to On. The screen may flicker or go dark for a second while Windows applies the change. That is normal.
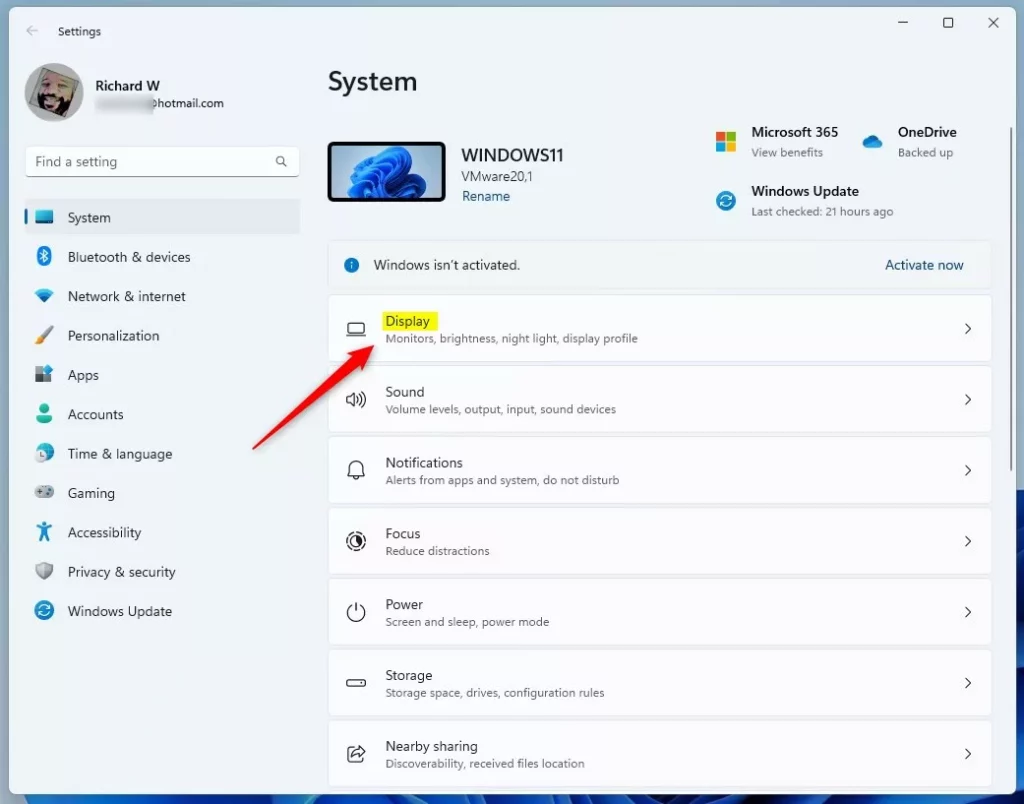
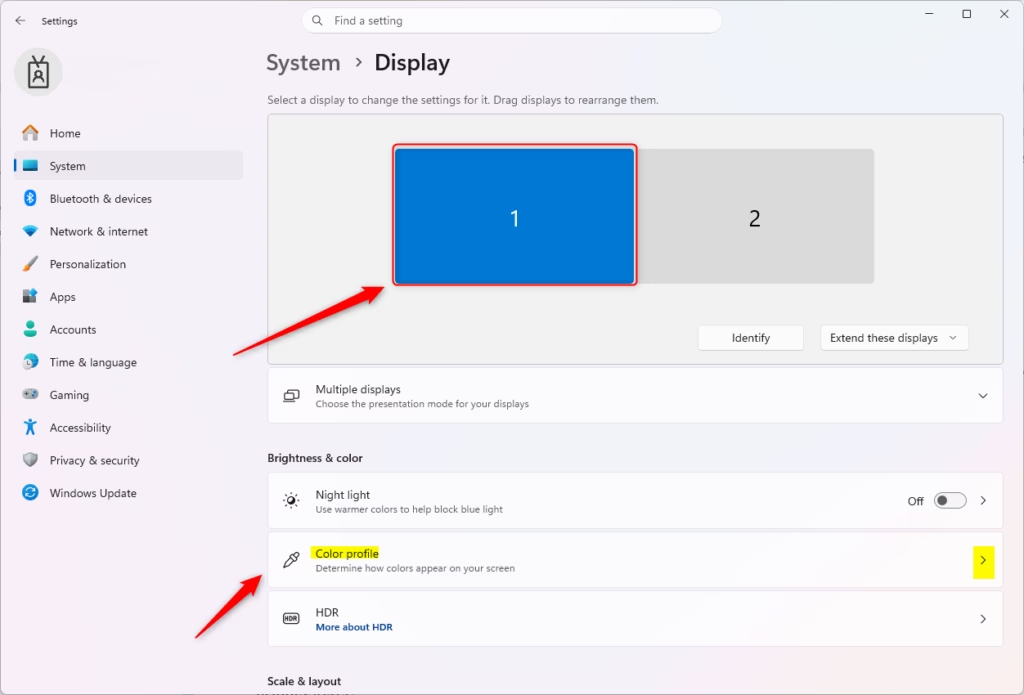
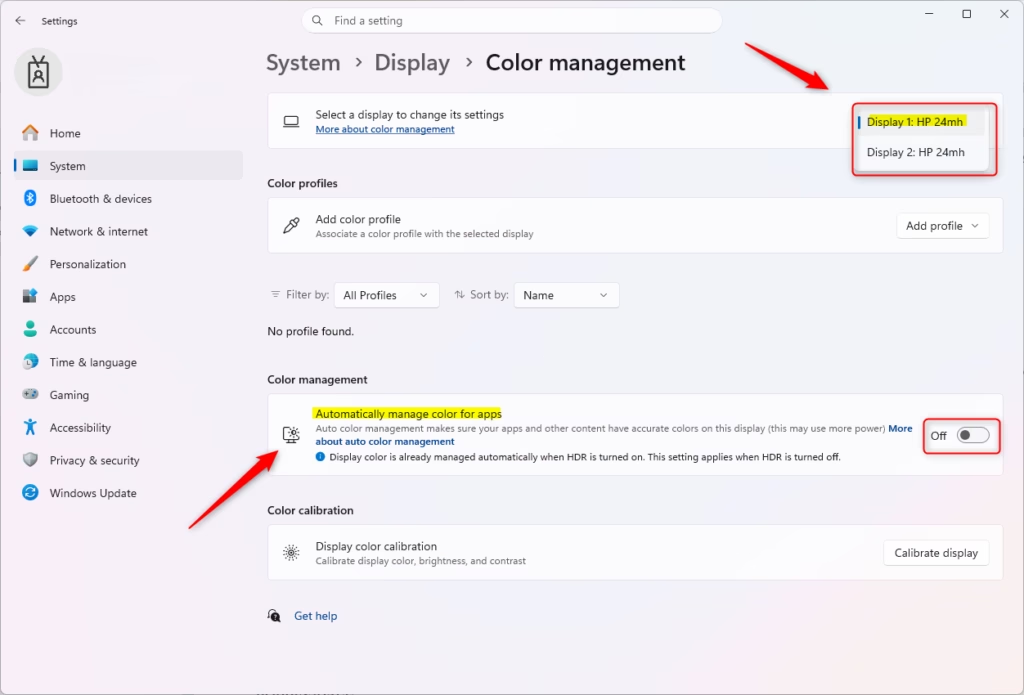
Once the toggle is on, Windows manages colors for that display automatically. Apps without their own color correction still benefit, because the system applies the display profile for them. You don’t need to restart your PC.
To check the result, open a photo or video you know well and compare it with how it looked before. Colors should look more natural, and gradients should look smoother. If nothing seems to have changed, the difference may simply be small on your monitor. Toggle the setting off and on again to compare side by side.
A Quick Tip for Multiple Screens
With several monitors, you have to enable this setting for each display separately. Follow these steps:
- Open Settings System Display.
- Select the screen you want from the drop-down menu or the monitor layout at the top of the page.
- Click Color profile.
- Switch Automatically manage color for apps to On for that screen.
- Repeat for each remaining monitor.
If it is missing for just one monitor, that is usually the reason, not a fault in Windows.
Summary
Auto Color Management makes colors look accurate and consistent across your apps. It helps creative professionals and everyday users get precise color without ugly gradient banding. With it on, pictures and videos look more natural on your screen.
To turn it off, follow these steps:
- Go to Settings System Display.
- Select the monitor you want to change.
- Click Color profile.
- Switch Automatically manage color for apps to Off.
Colors return to how Windows handled them before. Turning it off is useful if you rely on a custom calibration profile and want to compare, or if you notice a color problem in a specific app. You can switch it back on at any time, and no restart is needed either way.
Frequently asked questions
How to turn on color?
Open Settings System Display, select your monitor, and click Color profile. Turn on Automatically manage color for apps. Windows then adjusts colors across apps so they look consistent. To turn it off, switch the same setting to Off. This works on Windows 11 version 22H2 and newer.
Is 🪟 Windows 11 auto color management security risk?
No, Auto Color Management is not a security risk. It only changes how your screen shows colors. It does not open your files, read your data, or connect to the internet. You can turn it off at any time in Settings System Display.
Can Windows setting color depth be automated testing?
Windows has no built-in automated test for color depth. To automate it, you need a third-party tool or a script that changes the setting and checks the result. Color depth is set in Advanced display, which you can also change by hand.
How to set up auto color mode in 🪟 Windows 11?
Open Settings System Display, select your monitor, and click Color profile. Switch Automatically manage color for apps to On. Then open a photo or web page to check that the colors look right. Your PC needs Windows 11 version 22H2 or newer for this option.
Should I enable the Windows setting automatically color manage apps if I have a calibrated icc?
Usually no. An ICC profile (a file that describes how your monitor shows color) already sets colors the way you calibrated them. Auto Color Management can override that. Turn it off, then compare a photo in two apps. Turn it on only if the colors look wrong.
How to default auto color?
Windows has no separate default setting for Auto Color Management. To set it back, go to Settings System Display, select your monitor, click Color profile, and switch Automatically manage color for apps to the state you want. Changes apply right away.
Still have a question?
Answered by AI from this guide. Good questions may be added to this page — please don't include personal details.
Did this guide fix your problem?

About the Author
Richard
Tech Writer, IT Professional
Richard is a writer at Geek Rewind who turns complex IT tasks into clear, step-by-step guides. He draws on years of hands-on experience in system administration and enterprise IT operations, focusing on Windows, Linux and WordPress: the problems people actually run into, and the fixes that work. His server and WordPress guides come from systems he runs himself. Richard builds and maintains the platform behind Geek Rewind, from its Ubuntu servers and Nginx configuration to its custom WordPress plugins. Many new tutorials start with readers' questions, and he's always glad to answer them in the comments.
No comments yet — be the first to share your thoughts!