Change Display Orientation in Ubuntu Linux Easily

- 13 steps
- Needs administrator rights
Screen rotation in Ubuntu Linux lets you switch your display between standard Landscape, Portrait Right, Portrait Left, and Landscape (flipped) modes. You don’t need to install extra software, because the option is built into the Settings app. It works with Intel, NVIDIA, and AMD graphics, as long as the driver in use supports rotation.
Rotating the display fixes an upside-down screen. It also gives you Portrait mode, which shows more lines at once when you read long documents, code, or web pages. You can do all of it in a few clicks from the standard Ubuntu settings menu. If the option is missing on your machine, the last section covers a terminal fallback.
To change display orientation in Ubuntu, open Settings from the System menu in the top-right corner, click Displays, then choose Landscape, Portrait Right, Portrait Left, or Landscape (flipped) from the Orientation drop-down menu. Ubuntu reverts the change if you don’t confirm it, and no extra software or terminal is needed.
How to rotate the display in Ubuntu Linux
To change the display orientation in Ubuntu, open the Settings app, click Displays, and pick a new rotation from the Orientation drop-down menu. You can switch between landscape, portrait, and upside-down views in a few seconds. You don’t need sudo rights, a terminal, or extra packages, because the change applies to your own desktop session.
The steps below cover the whole job: open Settings, go to Displays, choose an orientation, and confirm it. The screenshots show the standard Ubuntu desktop, so your layout may look slightly different if you use another flavor or an older release.
Before you start, know that the change is safe to try. Ubuntu reverts it on its own if you don’t confirm it, so you can’t lock yourself out with a wrong choice.
Ubuntu Linux keeps most configuration in one central place. System adjustments, user management, and updates all happen inside the Settings panel. You can reach it in two ways, and both end up in the same place.
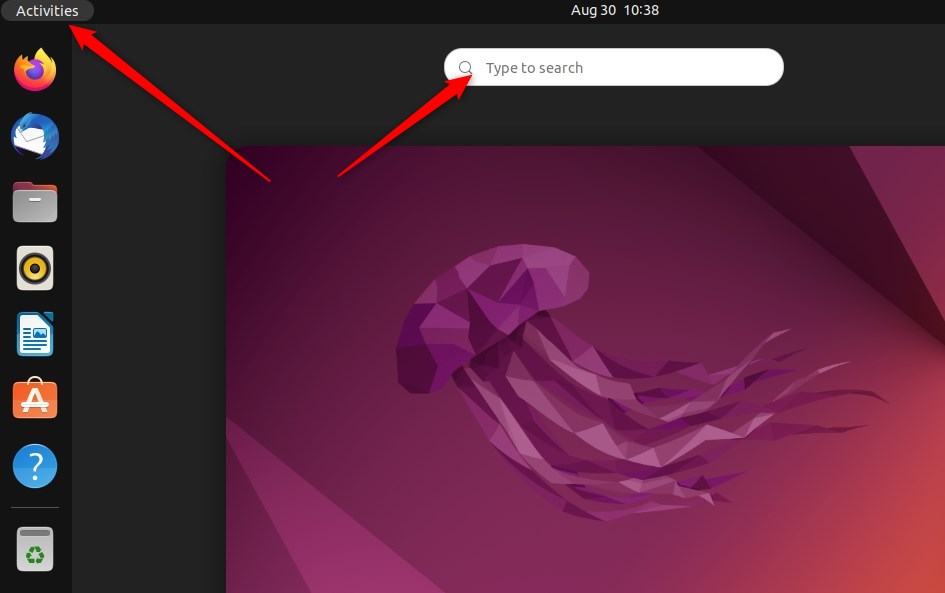
The first way is to use the top bar:
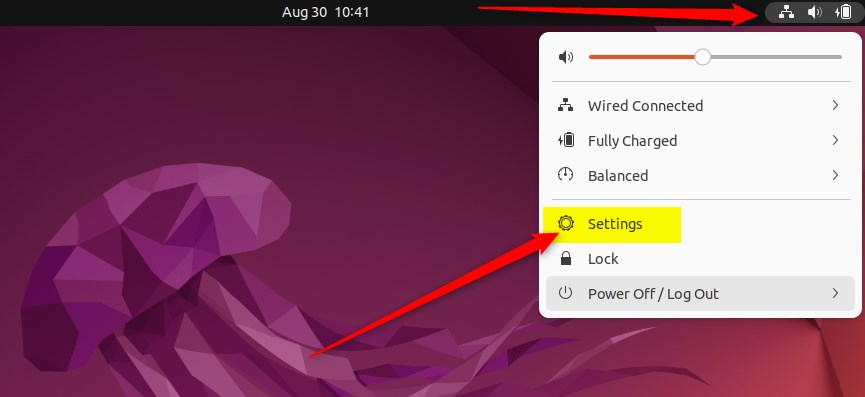
- Click the System menu at the top-right corner of the top bar. It holds the network, sound, and power icons.
- Look at the small panel that opens. It holds the quick settings.
The second way is to press the Super (Windows) key, type “Settings”, and open the app from the Activities search results. Use whichever is faster for you.
- On the System menu, select Settings, as highlighted below.
- Check that the Settings window opens, with a list of categories down the left side.
- In the Settings window, click Displays in the left sidebar. On some Ubuntu releases it is shown as a tile instead.
- Check that the Displays panel opens. It shows your connected screens along with their resolution, refresh rate, and scale options.
If you can’t see Displays, scroll the sidebar down. The list is longer than the window on small screens.
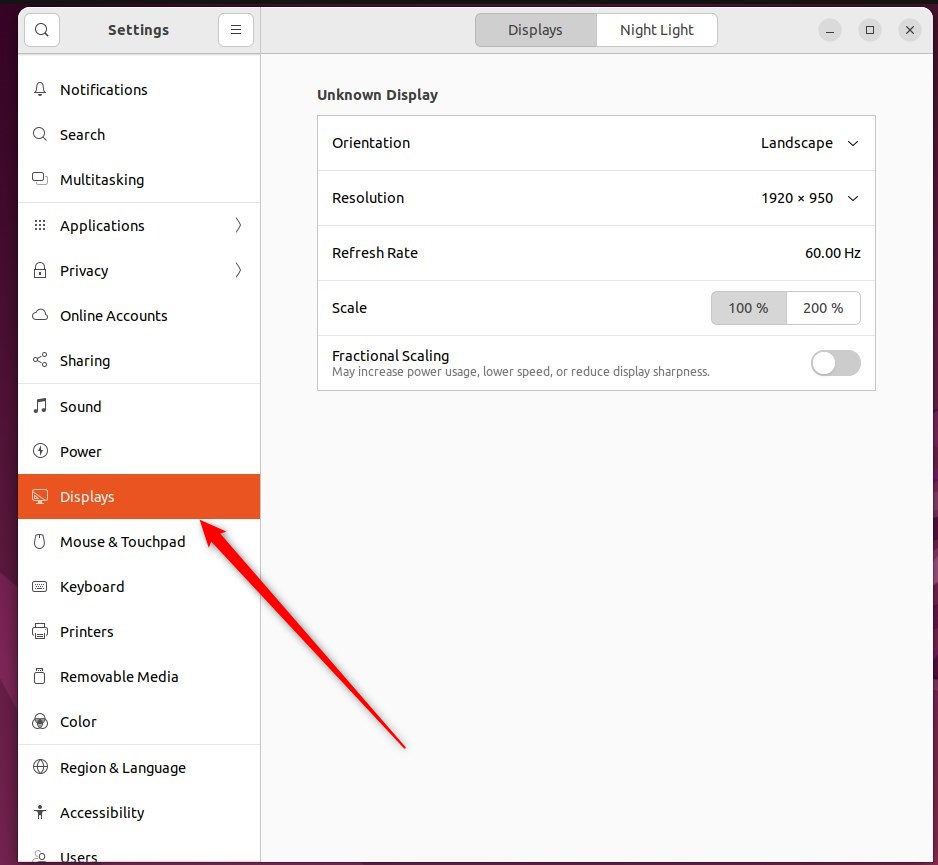
- In the Displays panel, find the section for your screen, which is listed under its display name.
- If you have more than one monitor, select the one you want to rotate first. On a multi-monitor setup the Orientation setting belongs to the selected display, so choosing the wrong one rotates the wrong screen.
- Open the Orientation drop-down menu.
Only the selected display is rotated, so your other screens stay as they are.
On some single built-in laptop screens and in some virtual machines, Ubuntu hides the Orientation drop-down because the display or driver doesn’t report rotation support. If that is your case, see the terminal method at the end of this tutorial. On tablets and 2-in-1 laptops with a built-in sensor, rotation is usually automatic. Look for an automatic rotation toggle in Settings Displays, or a rotation lock in the System menu. If the screen won’t stay put, turn the lock on or off there before you set an orientation by hand.
Choose an orientation for your device from the list. Here is what each option does:
- Landscape (default). This is the normal wide layout that most monitors and laptops use. Pick it to go back to the standard view.
- Portrait Right. The screen turns a quarter turn to the right, so it is tall instead of wide. Use it when you physically turn your monitor clockwise.
- Portrait Left. The screen turns a quarter turn to the left. Use it when you physically turn your monitor counter-clockwise.
- Landscape (flipped). The image is turned upside down, a half turn from normal. It is useful for a monitor mounted upside down, or to correct a screen that has flipped by accident.
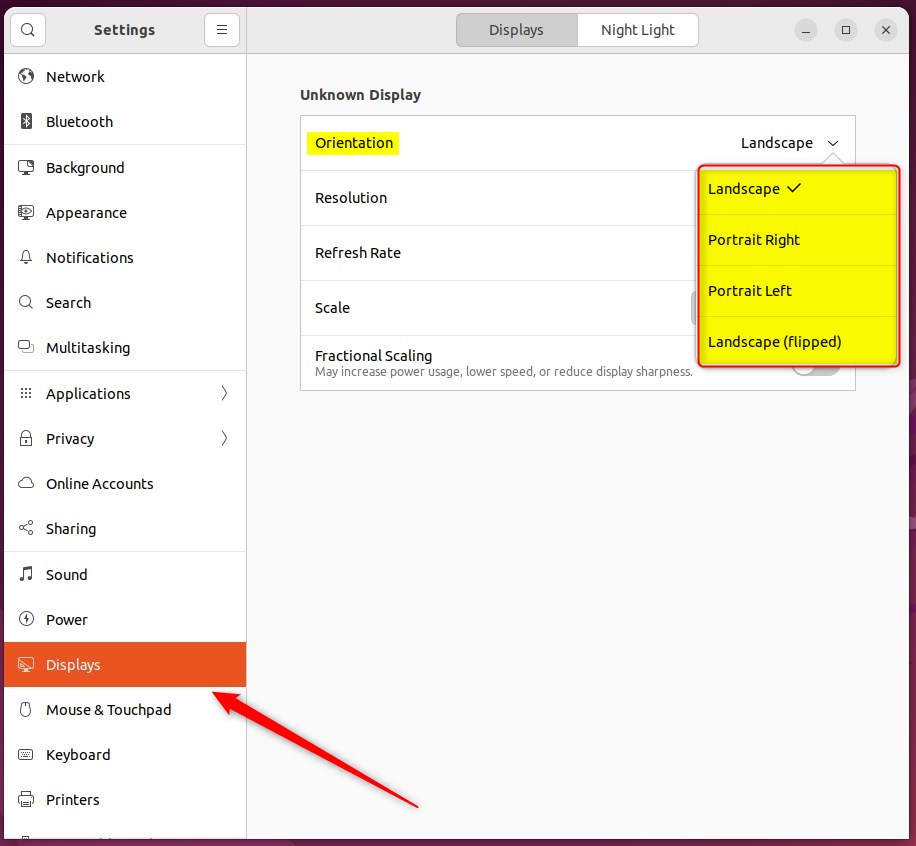
- After you pick the orientation, click Apply to test it.
- Watch the screen. It changes right away, and Ubuntu shows a confirmation prompt.
- If the new orientation looks right, click Keep Changes before the timer runs out.
- If it looks wrong, click the revert button or do nothing. Ubuntu goes back to the previous setting.
If you are using a physically rotated monitor, note that the mouse and touch movement follow the new layout, so give it a moment to get used to it.
That completes the process, and you can close the Settings app. No restart is needed, and the setting is kept for your account the next time you sign in. To undo it later, return to Settings Displays, set Orientation back to Landscape, then click Apply and Keep Changes.
If the Orientation option is missing or does nothing: you can rotate from a terminal instead. What works depends on your session type. You can check it in Settings About, where the Windowing System entry reads either X11 or Wayland.
- X11 session. The xrandr tool is the usual choice. Run it with no options to list your outputs and their names, then use its rotate option on the output you want. It accepts the values normal, left, right, and inverted, which match Landscape, Portrait Left, Portrait Right, and Landscape (flipped). The change lasts for the current session only, so a reboot or new sign-in brings back the old orientation. That also makes it a safe way to test.
- Wayland session. xrandr can’t rotate native Wayland displays. A small third-party tool called gnome-randr can do the same job in GNOME on Wayland, but it is not part of a default Ubuntu install, so check its documentation before you install it. GNOME also stores the saved display layout, including rotation, in a monitors.xml file in your user configuration. Edit it only as a last resort, and make a backup copy first, because a bad entry can leave you with a broken screen layout at sign-in.
- Still no luck. Check that your graphics driver is up to date and that you’re not inside a virtual machine whose display driver doesn’t support rotation. In a VM, rotate the screen from the guest tools or hypervisor settings if they offer it. Otherwise, rotate the host display.
Conclusion:
- Changing the display orientation in Ubuntu Linux is a straightforward process that you can do from the Settings app, under Displays.
- Ubuntu Linux supports several screen orientations, including Landscape, Portrait Right, Portrait Left, and Landscape (flipped). On a multi-monitor setup, each display has its own setting, so select the right one first.
- After selecting the orientation you want, click Apply to test it, and then confirm it so the change is saved.
- Once the change is applied, you can keep the new settings with Keep Changes, or let the 20-second timer run out to return to the previous configuration.
Frequently asked questions
What are the option for the Linux nvidia screen display orientation down arrow?
The Orientation drop-down menu in Settings Displays offers four choices: Landscape, Portrait Right, Portrait Left, and Landscape (flipped). Landscape is the standard view. Portrait Right and Portrait Left turn the screen a quarter turn in either direction. Landscape (flipped) turns it upside down. The menu works with NVIDIA graphics when the driver supports rotation.
How to change screen orientation in Ubuntu?
Open Settings, click Displays, and choose a new option from the Orientation drop-down menu. Pick Landscape for the normal view, Portrait Right or Portrait Left for a tall screen, or Landscape (flipped) for an upside-down display. Confirm the change if Ubuntu asks, and the screen rotates.
What are the option for the Linux screen display orientation down arrow?
The Orientation drop-down menu in Settings Displays lists four options: Landscape, Portrait Right, Portrait Left, and Landscape (flipped). Landscape is the default. The two Portrait options rotate the screen a quarter turn, and Landscape (flipped) turns it upside down. You don't need extra software to use any of them.
How to rotate display in Ubuntu?
Open Settings, click Displays, and open the Orientation drop-down menu. Select the rotation you want. Use Landscape for the normal view, a Portrait option for a tall screen, or Landscape (flipped) to fix an upside-down display. The change applies right away, and you need no terminal or admin rights.
Still have a question?
Answered by AI from this guide. Good questions may be added to this page — please don't include personal details.
Did this guide fix your problem?

About the Author
Richard
Tech Writer, IT Professional
Richard is a writer at Geek Rewind who turns complex IT tasks into clear, step-by-step guides. He draws on years of hands-on experience in system administration and enterprise IT operations, focusing on Windows, Linux and WordPress: the problems people actually run into, and the fixes that work. His server and WordPress guides come from systems he runs himself. Richard builds and maintains the platform behind Geek Rewind, from its Ubuntu servers and Nginx configuration to its custom WordPress plugins. Many new tutorials start with readers' questions, and he's always glad to answer them in the comments.
No comments yet — be the first to share your thoughts!