How to Change Purchase Sign-in Settings in Microsoft Store

Purchase sign-in settings in the Microsoft Store control when Windows asks for your account password before you buy apps and games. By default, the Microsoft Store on Windows 11 and Windows 10 asks for a password on every paid download. This stops accidental charges, for example when someone else uses your PC or you click Buy by mistake.
Turning off the password check makes checkout faster. The change takes a few clicks, but it only affects the computer you are using right now. Your other devices keep their own setting, and your Microsoft account password stays the same.
You change Microsoft Store purchase sign-in settings by opening the Microsoft Store app, clicking your Profile icon, selecting Settings, and then toggling “Purchase without passcode.” This allows you to require or skip password prompts for purchases on that device.
How to Turn On or Off Purchase Sign-in on Microsoft Store
Microsoft Store purchase sign-in settings let you choose whether your computer asks for a password every time you buy something or lets you check out without typing it. You make the change inside the Microsoft Store app. Open your account settings and change the checkout preference for your current Windows device.
You decide whether entering your password stays mandatory for every purchase. If other people use your PC, or you share it with children, leave the password prompt on. If you are the only user and you protect your PC with a strong sign-in, turning it off is a reasonable trade for speed.
- Open Microsoft Store on your Windows 11 PC. Type
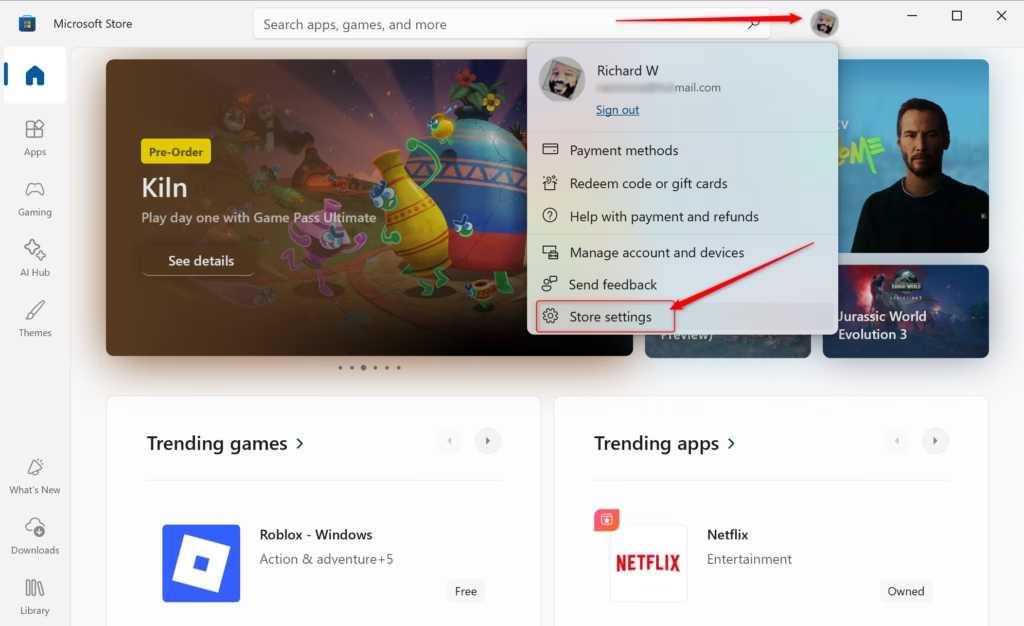
Microsoft Storein the Start menu search to find it, then select it from the results. The Microsoft Store window should open on its home page. These steps are written for Windows 11, so on Windows 10 the menu names may differ slightly. - Click your Profile icon at the top right, next to the search box. A menu should drop down. If you see a generic person icon instead of your picture, you are not signed in yet, so sign in with your Microsoft account first.
- From the menu, select
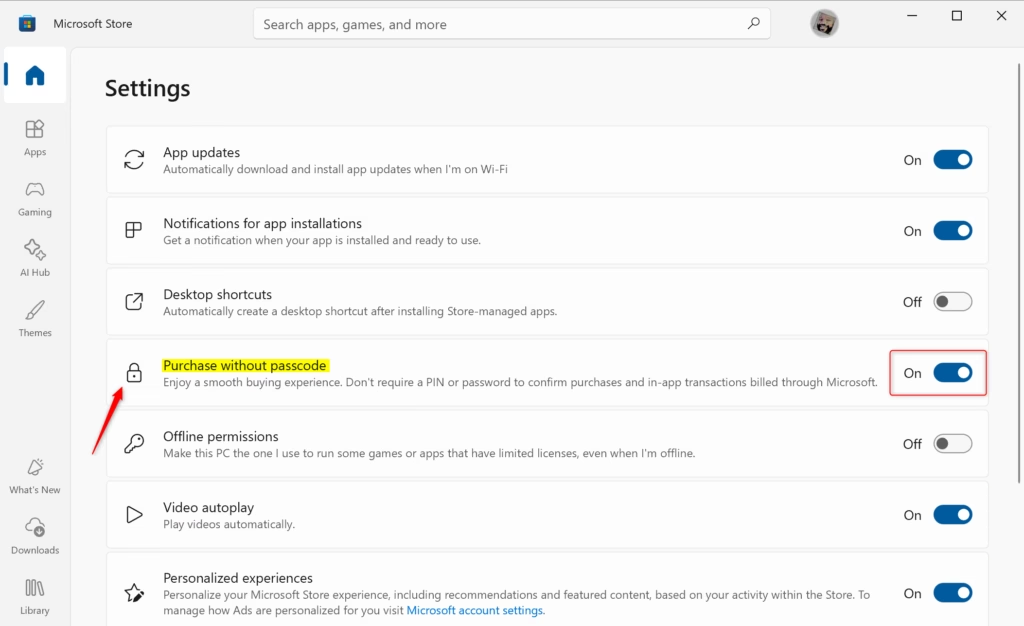
Settings. The Store settings page should open. - In the Settings panel, find and click
Purchase without passcode. If you can’t find this option, make sure you are signed in to the Store with your account and that the Store app is up to date. - Use the switch to turn
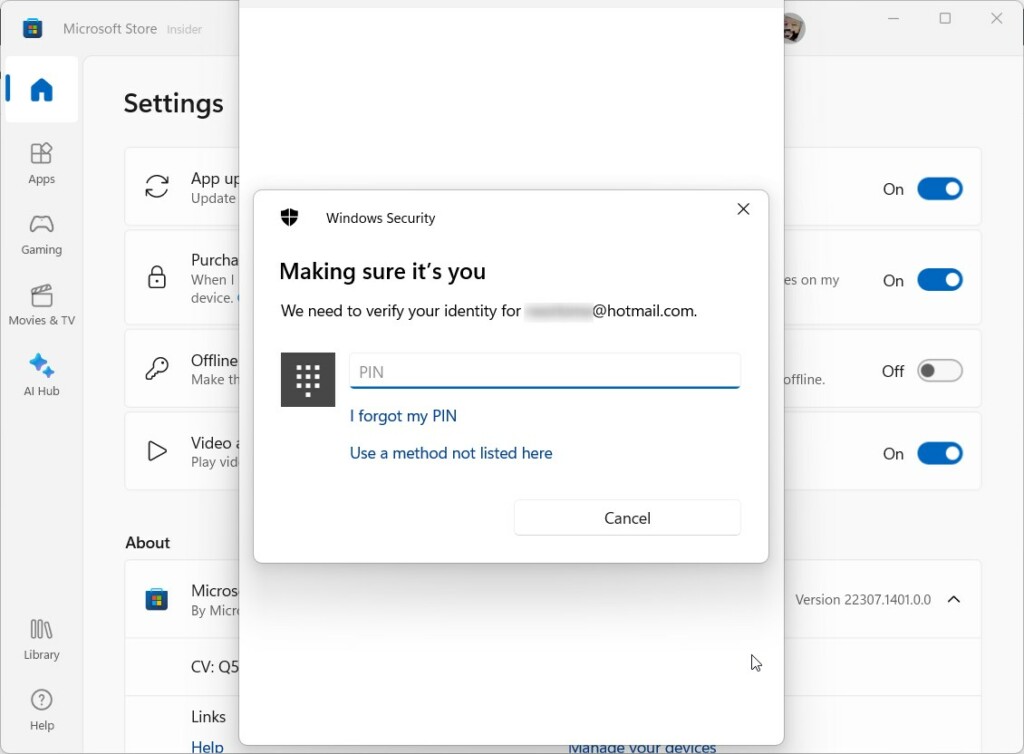
On (to skip password prompts)(to require a password for purchases) orOff (to require password for purchases)(to skip password prompts). The switch should change position right away. - ⚙️ Admin Privileges Required: Windows may ask you to enter your
PINor password to confirm this change. Enter it when prompted. If you are on a work or school PC and can’t complete this prompt, ask your administrator to make the change.
What Happens Next?
Disabling the Microsoft Store purchase sign-in requirement removes password prompts during checkout on that specific PC. To restore this security measure, go back to the same settings panel in the Microsoft Store and flip the toggle back. You don’t need to restart the PC or the app to undo it.
Re-enabling the prompt ensures that nobody can complete a purchase from your account on this PC without entering your credentials. This is the safer choice on shared computers, laptops you carry around, and any PC that other people can use while you are signed in.
The updated configuration takes effect immediately. You don't need to sign out or restart Windows. The next time you buy something in the Store, it will follow the new setting.
More Help and Information
For more information or official support, visit the Microsoft Support page regarding purchase sign-in settings. Check it if the options in your version of the Store look different from the steps above, since Microsoft updates the Store app regularly.
Summary
Microsoft Store purchase sign-in preferences only apply to the specific device you are currently using, so your laptop and desktop need to be set up separately. You can manage these checkout verification choices directly inside the app without changing your main Microsoft account password online.
- You can choose whether Microsoft Store asks for your password when buying items.
- Changing this setting only affects the device you're using, so repeat it on each PC you own.
- Follow the steps inside the Microsoft Store app to turn this feature on or off. Switch it back at any time, with no restart needed.
- Always keep your device secure, especially if you turn off the password prompt. Use a strong sign-in and lock your screen when you step away.
- If you found this useful, feel free to share your thoughts or questions below!
Was this guide helpful?

About the Author
Richard
Tech Writer, IT Professional
Richard is a writer at Geek Rewind who turns complex IT tasks into clear, step-by-step guides. He draws on years of hands-on experience in system administration and enterprise IT operations, focusing on Windows, Linux and WordPress: the problems people actually run into, and the fixes that work. His server and WordPress guides come from systems he runs himself. Richard builds and maintains the platform behind Geek Rewind, from its Ubuntu servers and Nginx configuration to its custom WordPress plugins. Many new tutorials start with readers' questions, and he's always glad to answer them in the comments.
I want to delete the last email address and sign in new address in Microsoft.