How Do You Adjust Pen Press and Hold Duration Windows 11?

Pen press and hold duration in Windows 11 sets how long you must keep the stylus tip on the screen to trigger a right-click. A shorter time opens context menus faster. A longer time stops accidental right-clicks while you write or draw.
You can change this in the Settings app, but the right-click feature has to be turned on first. Settings and Control Panel only show pen options on a device that has pen or touch hardware. If you don’t see them on a pen-capable device, check that the pen is paired or connected. The registry methods below work on any PC, but they only matter if you actually use a pen.
Open Settings with Win+I, then go to Bluetooth & devices Pen & Windows Ink Additional pen settings. Move the slider labelled “The amount of time you must press and hold to perform the gesture” left for a shorter wait or right for a longer one. The default is 1 second, and the change applies immediately with no restart.
Option One
Change Pen Press and Hold Speed and Duration in Settings
This is the easiest method and works the same on Windows 11 Home and Pro. Use the slider to set how long the pen must stay down before Windows treats it as a right-click.
- Open Settings by pressing
Win+I. The Settings window should open. - Click Bluetooth & devices on the left side.
- Click Pen & Windows Ink on the right side. You should now see the pen options for your device.
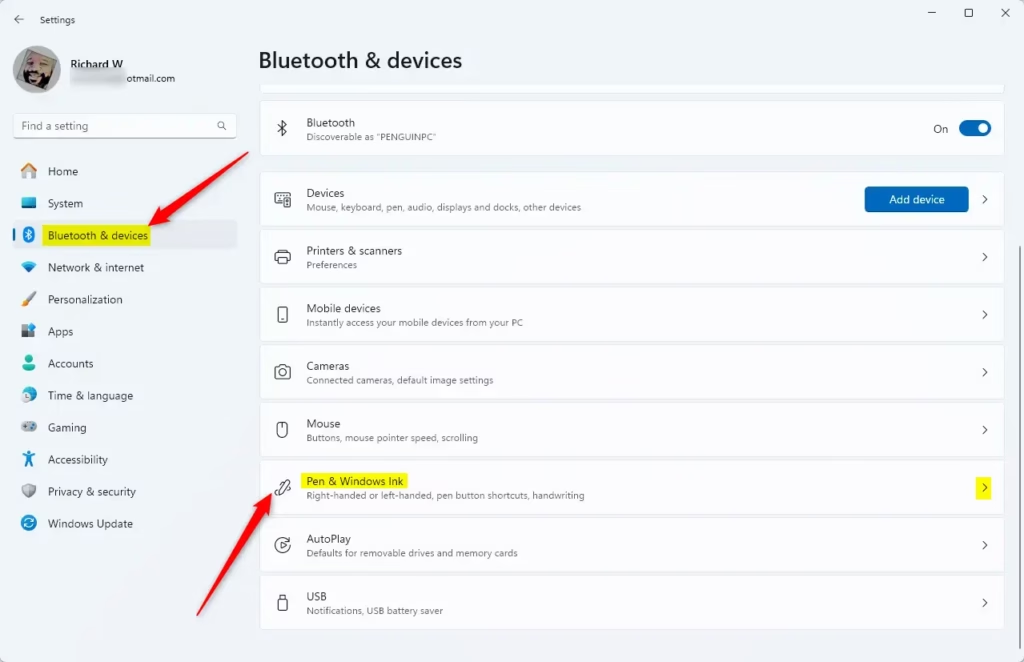
Windows 11 Pen & Windows Ink settings page - Click Additional pen settings to expand it. More options appear below it.
- Find the slider named The amount of time you must press and hold to perform the gesture.
- Move the slider left for less time or right for more time.
The default time is 1 second. Hover your mouse over the slider to see the current time.
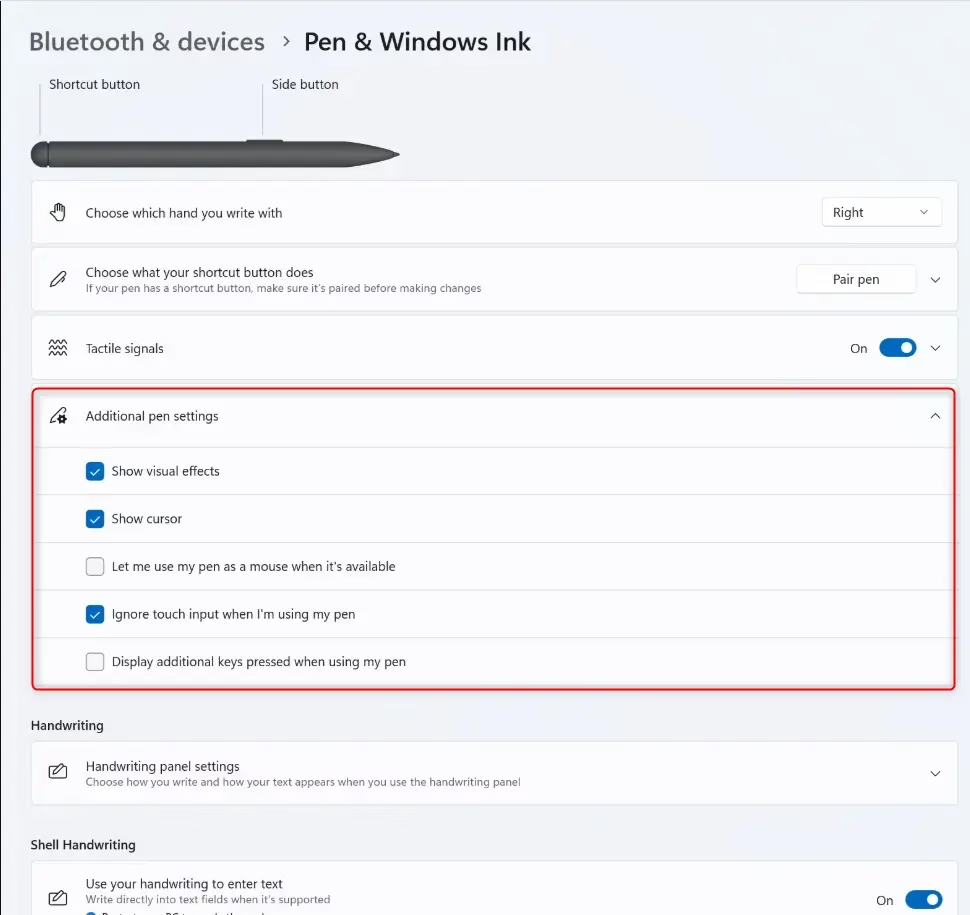
Additional pen settings in Windows 11 with double-tap speed slider. - Test the new timing by pressing and holding the pen tip on the desktop. If the right-click menu appears too soon or too late, adjust the slider again.
- Close Settings when you are done. The change applies right away, with no restart.
To undo the change, move the slider back to 1 second.
Option Two
Change Touch Press and Hold Speed and Duration in Control Panel
It also has a built-in test area, so you can try the values before you save them.
- Open Control Panel and switch the view to icons (Large icons or Small icons) if it is set to Category.
- Click the Pen and Touch icon. The Pen and Touch window should open. If the icon is missing, Windows has not detected pen or touch hardware.
- Click the Pen Options tab.
- Select Press and hold in the list.
- Click Settings. A dialog with two sliders opens.
- Adjust the Speed slider left (short) or right (long) to set how fast the right-click mode action happens.
- Adjust the Duration slider left (short) or right (long) to set how long the press and hold lasts.
- Use the test area in the dialog to try your new values with the pen before you accept them.
- Click OK.
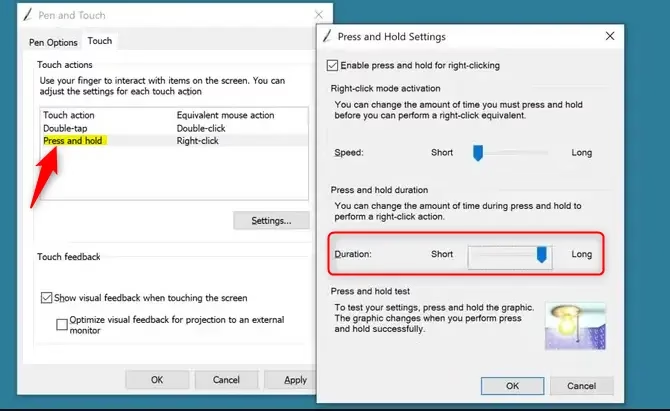
Pen and Touch press and hold settings sliders Windows 11 - Click OK again to close the Pen and Touch window.
- Close Control Panel when you are done.
To undo the change, open the same dialog and move both sliders back to where they were. You can also click Cancel before you press OK to discard it.
Option Three
Change Pen Press and Hold Speed in Registry Editor
Registry Editor is the riskiest method here, so export the key first (File Export) if you want an easy way back. It works on both Home and Pro.
- ⚠️ Requires admin privileges. Open Registry Editor by typing
regedit.exein the search box. Approve the User Account Control prompt if it appears. - In the left pane, navigate to this path:
HKEY_CURRENT_USER\Software\Microsoft\Wisp\Pen\SysEventParameters
- In the right pane, double-click the WaitTime DWORD value. The Edit DWORD (32-bit) Value box opens.
- Select Decimal as the base. Do this first, because the number you type is read differently in Hexadecimal.
- Type a number between 100 (short) and 5000 (long) for your press and hold speed.
The default speed is 300.
- Click OK.
- Close Registry Editor when finished. If the new value does not take effect, sign out and back in, or restart the PC.
To undo the change, set WaitTime back to 300.
Option Four
Change Pen Press and Hold Duration in Registry Editor
This method edits the HoldTime value, which controls how long the stylus must stay on the screen. It sits in the same registry key as WaitTime.
- ⚠️ Requires admin privileges. Open Registry Editor by typing
regedit.exein the search box. Approve the User Account Control prompt if it appears. - In the left pane, navigate to this path:
HKEY_CURRENT_USER\Software\Microsoft\Wisp\Pen\SysEventParameters
- In the right pane, double-click the HoldTime DWORD value. The Edit DWORD (32-bit) Value box opens.
- Select Decimal as the base.
- Type a number between 600 (short) and 4500 (long) for your press and hold duration.
The default duration is 2300.
- Click OK.
- Close Registry Editor when finished. If the new value does not take effect, sign out and back in, or restart the PC.
To undo the change, set HoldTime back to 2300.
Summary
You now have four ways to change pen press and hold settings in Windows 11. You can use the modern Settings app, the classic Control Panel, or edit the WaitTime and HoldTime values directly in Registry Editor.
- Settings: The easiest way, using the built-in Settings app.
- Control Panel: An older method that gives you a test area to try out your settings.
- Registry Editor (Speed): For advanced users who want to adjust the WaitTime value directly.
- Registry Editor (Duration): For advanced users who want to adjust the HoldTime value directly.
All methods work in Windows 10 and Windows 11. Pick whichever one feels easiest. If you are unsure, start with Settings.
What is app adjust net in?
App Adjust Net is not a standard Windows feature. You may be thinking of pen adjustment settings in Windows 11, which let you change how long you hold your stylus on screen to trigger a right-click. Find these in Settings Bluetooth & devices Pen & Windows Ink
What is adjust in marketing?
In marketing, adjust means to change prices, messaging, or campaign strategies based on performance data and market conditions. Businesses adjust their approach to reach customers more effectively and improve sales results.
What is adjust software?
Adjust Software is a mobile analytics and attribution platform that tracks app installations, user behavior, and marketing campaign performance. It helps companies measure which ads drive app downloads and understand user engagement patterns.
Have a question about this guide?
Answered by AI from this guide. Good questions may be added to this page — please don't include personal details.
Did this guide fix your problem?

About the Author
Richard
Tech Writer, IT Professional
Richard is a writer at Geek Rewind who turns complex IT tasks into clear, step-by-step guides. He draws on years of hands-on experience in system administration and enterprise IT operations, focusing on Windows, Linux and WordPress: the problems people actually run into, and the fixes that work. His server and WordPress guides come from systems he runs himself. Richard builds and maintains the platform behind Geek Rewind, from its Ubuntu servers and Nginx configuration to its custom WordPress plugins. Many new tutorials start with readers' questions, and he's always glad to answer them in the comments.
No comments yet — be the first to share your thoughts!